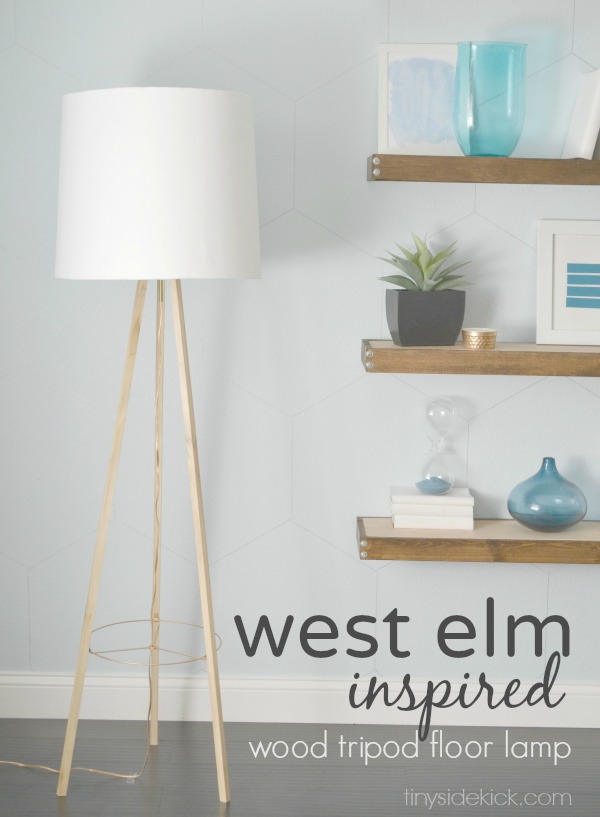
Wow, it has been an amazing week of Knock Off projects from Creating with the Stars (check out the top three here, here, and here), and now we have one more for you from the link up party! We’re so grateful for all of the entries, you guys rock. But as you know we could only pick one and we are in love with the simple process and price of Corey from Tiny Sidekick’s West Elm Tripod Lamp, plus it’s a dead ringer for the original. I mean, who doesn’t love West Elm, right?!
Don’t forget to come back tomorrow to vote for your favorites in round two of Creating with the Stars: Paint…we can’t wait to see what the top 9 have been up to this week for their projects!
———————————————————————————————————————————————————
Hi ECC readers! I’m Corey from TinySidekick and can I just take a minute to say how excited I was when Monica and Jess emailed me about sharing my West Elm Tripod Lamp knock off here? {squeeeel} I’m a big fan of their’s and am feeling all giddy inside! This knock off was the first project of my first series and it has been really fun to share with everyone.
I’m a huge fan of West Elm, but designing and decorating a home is all about balance right? Splurge a little, DIY a lot. Gotta keep the ol’ budget in mind. So when I was browsing around West Elm a few months ago I fell in love with their wood tripod floor lamp. Then I immediately fell out of love with it because it was $250 bucks. Then porbably in the middle of the night, the idea of recreating my own very similar one magically popped into my head! And so my DIY West Elm knockoff version was born and I’m going to show you how we made it for just under 40 bucks! Isn’t it pretty?
I think I came pretty close to the one that inspired it all don’t you? All the weird looks I get from people when I walk around a store taking pics has paid of here.
So are you ready to make your own? If you can make a few cuts with a saw and do a little bit of drilling, you can do this project. I’ll walk you through it and give you some little tips along the way so you can avoid some of my mistakes.
Supply list:
Three 3/4 inch square, 6 ft. long pieces of wood for the legs of the lamp. Get wood that looks nice and smooth especially if you are going to leave it natural like I did.
1/4 inch metal cable clips to attach the metal ring at the bottom. (I found these at the hardware store next to the cable wire.)
a lamp kit (Amazon affiliate link)
6 inch brass nipples (found right next to the lamp kit)
a pack of nuts and washers for lamp parts (also right next to the lamp kit)
a 4 inch piece of scrap wood that is about 1 1/2- 2 inches thick to hold the top of the legs together and to hold your light. I used MDF board from the trash can in the back of the home depot.)
a can of spray paint to paint your metal pieces and the cord. I used Krylon Gold Metallic spray paint (Amazon affiliate link)
3 screws to attach the legs
a lamp shade and bulb
the top metal ring of a 16ish inch lamp shade. It needs to be one with 3 prongs like the one in the photo above. (I found mine at the Salvation Army for 3 dollars and ripped out the top ring.)
Building a Wood Tripod Floor Lamp:
Step 1: Spray paint the top ring of the lamp shade that you ripped apart, 3 cable clips and screws that go with them, and your cord in the color of your choice.
Step 2: Cut each of your wood legs to 55 inches at a 5° angle at the top and bottom making sure that the surfaces of the ends are parallel.
Step 3: Decide the placement of your bottom ring and attach the cable clips.
Have a buddy, hold up your cut legs in the position that they will be on your finished lamp while you hold the ring in place toward the bottom and mark where the cable clips will go.
You want to make sure that your lamp will be steady so be sure that the legs are not too close together. My ring was 15 inches and the ring ended up being 15 inches from the bottom of the legs. If your ring is a little bit smaller, you will need to move it up to keep the tripod wide enough.
Once you have marked where your ring will go, attach the cable clips to the inside side of each leg.
This part gave us a bit of trouble but here is what finally worked.
Step 4: Create a triangle to hold everything together.
Cut a triangle out of your scrap piece of wood that is 3 1/2 inches on each side. Then, mark 3/4 of an inch in from each point on all sides and cut each point off at a 10 ° angle.
Pre drill a hole for the nipple of the light kit in the center of your triangle too. (We didn’t do this and realized that it would be easier to drill this hole before attaching the legs…whoops!)
Step 5: Attach the legs.
It is really important to pre drill your holes and go slow because you are working with small pieces of wood and you don’t want them to split.
So, pre drill holes (at a little bit of an angle) in each side of your cut triangle and each outside edge at the top end of your legs. Then, attach each leg with a screw, going slowly so you don’t split the wood.
Step 6: Attach your bottom ring.
Place your bottom ring into the cable clips and press the clips in with your finger to hold them in place.
Step 7: Assemble the light kit.
Follow the instructions on the package of the light kit to attach it to your tripod lamp. I had the bottom of the 6 inch nipple pretty far down to add detail in the finished product. It will depend on your lamp shade, but you want the lamp shade to just cover the wood triangle part at the top.
Step 8: (optional) Stain your legs.
I rubbed a coat of teak oil on my legs just to bring out the natural color of the wood a little bit. I really liked the natural color though so I didn’t stain them. Plus I like the contrast of the wood tones when it is next to the Rustic Floating Shelves that we built.
Step 9: Add a shade and you are done!
I recovered a large lamp shade that I found at a thrift store for $5. It had a textured fabric on it originally, but I was still able to make it work and I’ll be showing you how I did soon.
So here she is in all her beauty! I love the simple details that the metal brings and may I just say this tripod lamp looks perfect against the subtle pattern of the DIY Sharpie Wallpaper!
So what do you think? Did I get it pretty close to the inspiration?
This is just the first knock off of a six week series with 2 more weeks to go, so pop on over to TinySidekick and see what I’ve been up to!
Have a great rest of your Sunday!


The comments +