
![]()

Welcome back guys! Can you believe it’s already the third week of CWTS? We sure can’t! It’s flying by! Before we get to this week’s voting, we wanted to let you know about a special episode of “Knock It Off” that aired last night. So… my parents think they’re kinda funny and they’d been asking me for ages to help them out with a really big project at their house, finally they gave up harping on me and actually submitted an application to be on the show!! Yeah, like a legit application. Well you can only imagine what happened next.
Let’s just say our producers loved all the old pictures my parents dug up of me and Jess in high school and perhaps the world’s most embarrassing picture of me in a sports bra from 6th grade! All that aside, it was a really fun project to work on with them and the makeover turned out awesome! You can check out the full episode online.
Alrighty, now onto this week’s upcycle projects.
A FEW REMINDERS FOR ROUND TWO…
1- PROJECTS ARE ANONYMOUS:
Our bloggers have done their best to keep things legit and not reveal which project is theirs. This keeps the playing field level.
2- ONE VOTE PER ROUND:
You can only vote once, this isn’t a popularity thaang… we want to know which DIY project is the very best!
3- WINNER ANNOUNCED WEDNESDAY:
Wednesday we will announce the winner of Round 2 and also say goodbye to 3 talented bloggers. Last week was impossibly hard to say goodbye to three, and we know this week is going to be just as hard!
4- FULL TUTORIALS
We’re hooking you up with even more amazing DIY tutorials! Last week’s tutorials can be found HERE. Tomorrow, Sarah Dorsey (last year’s CWTS Champ) will be sharing her paint project, and then each day following the 1st, 2nd, and 3rd place winners will share their complete tutorials for their winning projects!
5- ROUND 2 PRIZES
Ryobi Ultimate Combo Tool Kit
(We LOVE Ryobi tools! You will too!)
$250 Lucent Lampworks Gift card
(Lucent is a local small business, but ships nationally. His lights were on Extreme Home Makeover- check out his site!!)
$150 Minted Gift card
(After making my Christmas cards with Minted, I’ve fallen in love with their products and their super creative blog!)
Creating with the Stars Round 3 Upcycles
1. Trash to Treasures Garden Space
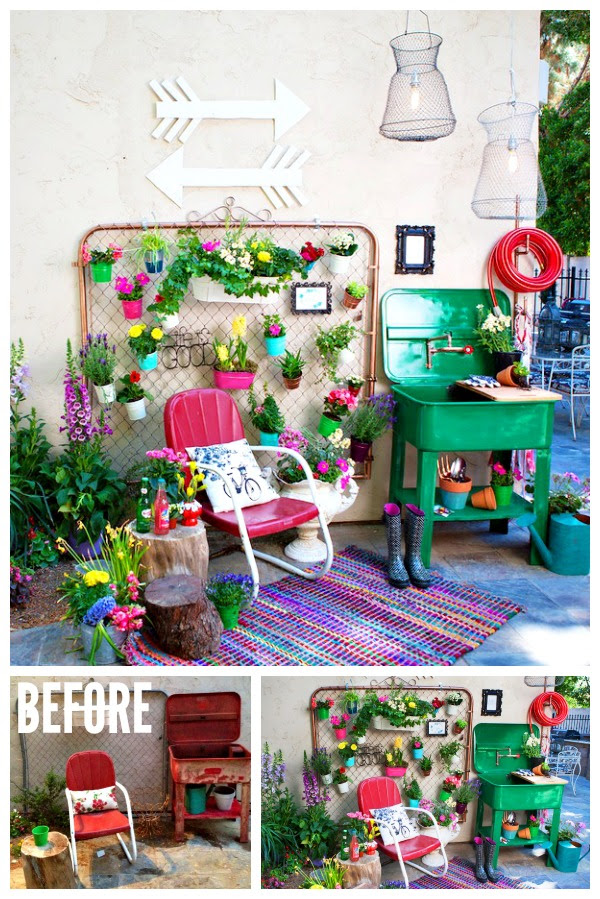
Spring is in the air and everyone I know is craving a gorgeous outdoor space. By upcycling a few items, you can create a stunning Springtime setup in your own yard! The great thing about upcycling is that you can totally change and transform items into something completely different or just tweak them a bit to use them for a different purpose. In this garden space, I did a little bit of both!
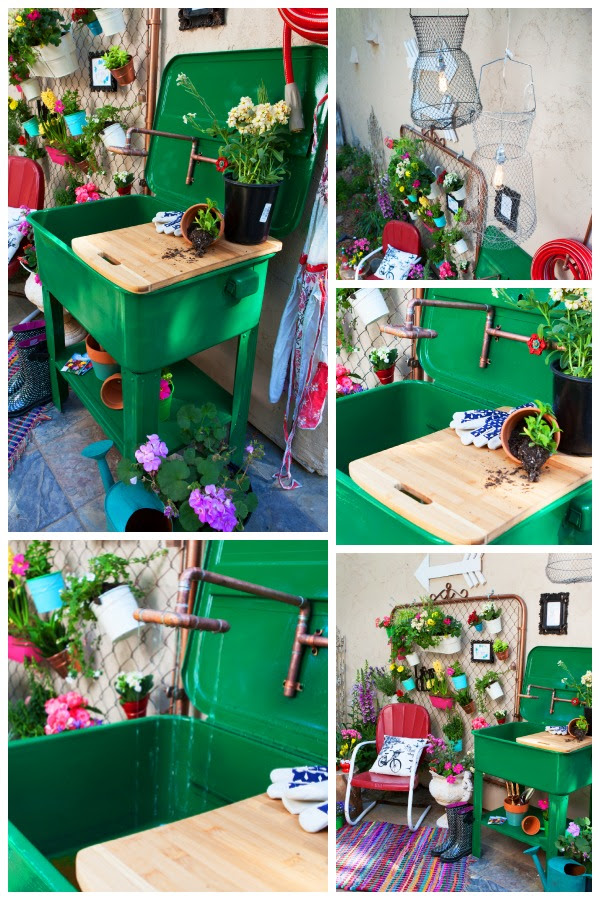
This car parts washer is usually used for degreasing grimy car parts but I transformed it into a gorgeous outdoor gardening sink. I made a custom copper pipe faucet and ran water to the sink using an existing hose bib. Then, I painted it one of my favorite colors, kelly green. I upcycled a wooden cutting board to make a table top to have an area to pot flowers for my vertical garden area. This garden sink also has a convenient little shelf underneath to hold my gardening tools. The adorable lights were upcycled from antique fishing nets I found at the Antique Mall in the fishing section. To the right of the sink, I used some of the extra copper left over from the faucet and made these convenient little hooks to hold my hose and gardening apron.
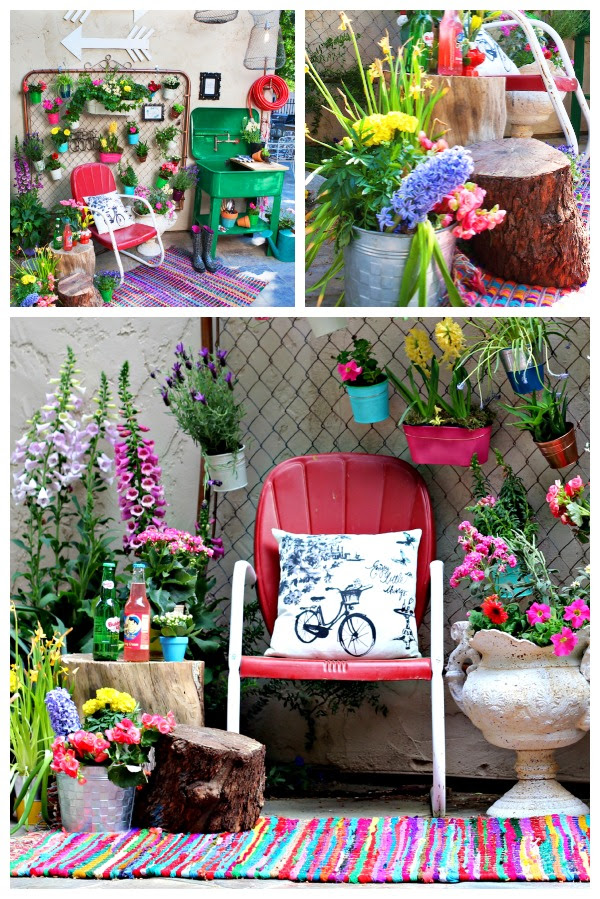
Finally, I used an old garden gate, spray painted it with cooper spray paint and mounted it on the side of the house. Then, I hung pots of my favorite flowers to create a vertical garden without taking up space on the patio! I also used couple of tree stumps to serve as an side table when I need a break! I used old plywood and cut out the arrows with my jigsaw. I can’t get enough of the flowers and sunshine this time of year!
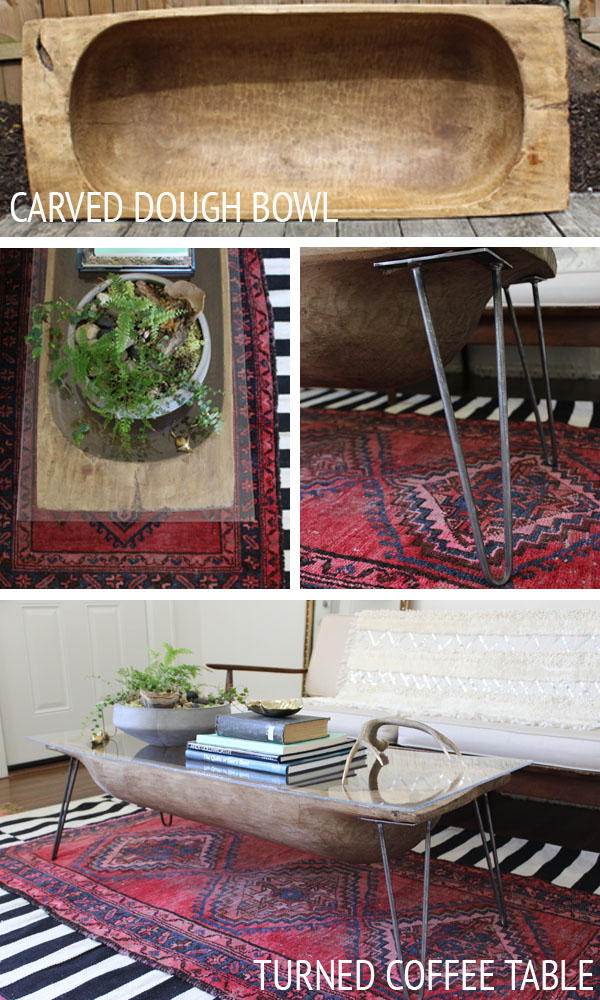
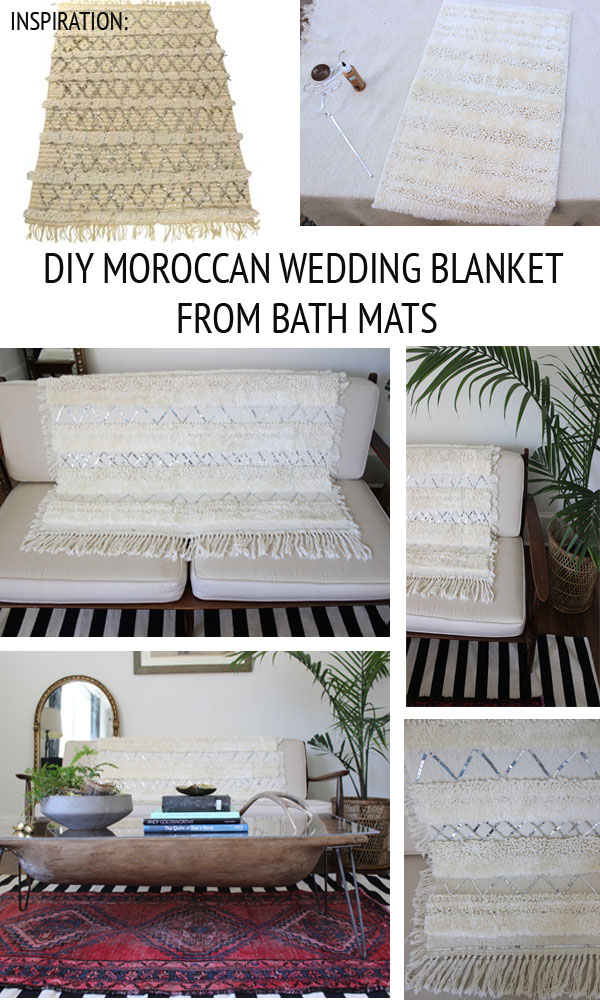
2. Dough Bowl Turned Coffee Table, Bath Mat Turned Moroccan Wedding Blanket
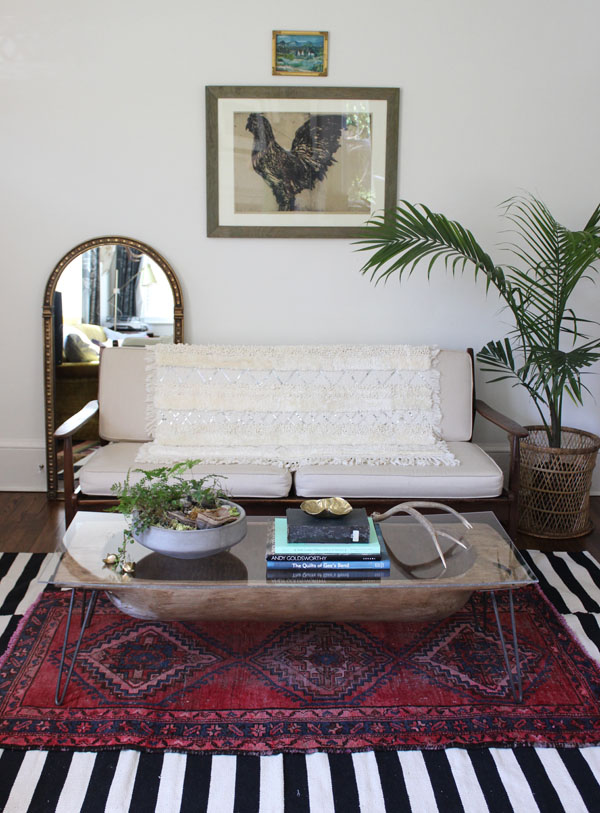
Growing up, my parents had one of these antique, carved dough bowls on our dining room table. It was my great-grandmothers and it was carved to knead her dough in. Ever since, I’ve had a fascination with these bowls. They’ve become really popular (a.k.a. expensive) in the last few years. I’ve seen them for sale for $300 or more, depending on the size. So, when I came across this 5 ft. long dough bowl at an antique store for $75, I jumped on it. I later realized that you’re pretty limited on what you can do with a wooden bowl this size. The answer was clear: upcycle it! I took some mid-century iron legs and secured them to the base. I really love this hairpin style and how the metal mixes with the carved wood. Then I cut some thick plexi-glass to fit the top. I chose plexi-glass for a less breakable and less dangerous top. That allows a surface to style, while not covering up that gorgeous wood underneath. The original beauty of my bowl is preserved, but in a very functional way.
3. Upcycled Barn Door
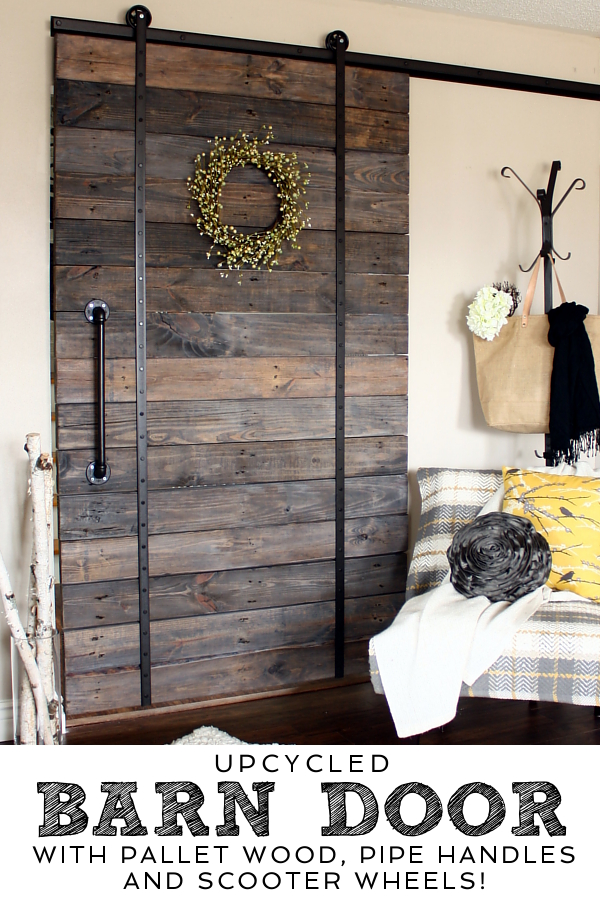
The week three Upcycle project was an easy choice for me – I’ve always wanted a rustic barn door somewhere in my house. There’s just something about reclaimed wood paired with heavy metal hardware that makes my creative heart go pitter-pat.
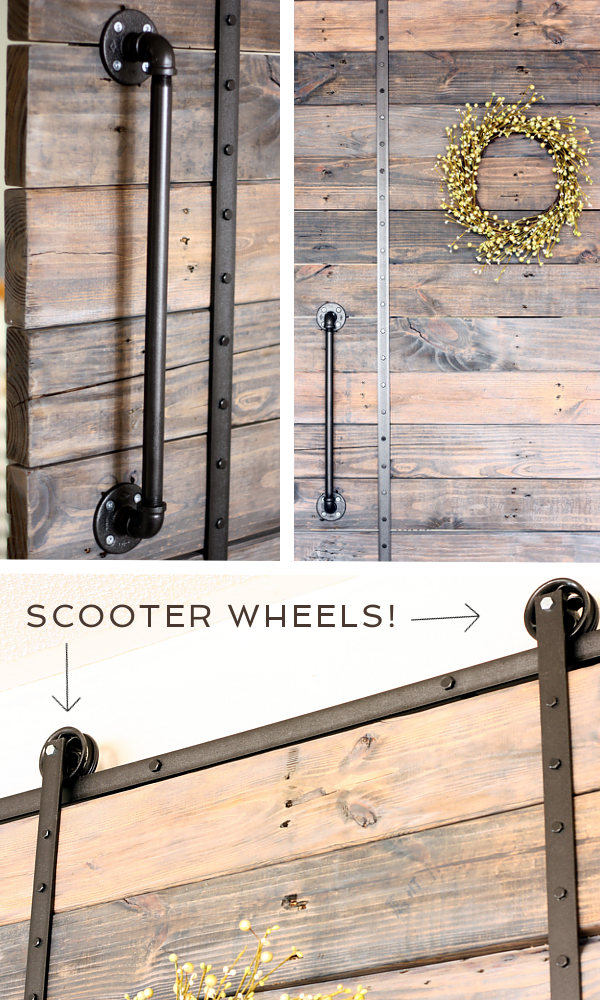
Initially I was going to use real barn boards – they always have a such a gorgeous naturally aged patina. But when I went to look at some in person there were two problems. The first was cost – just the wood for the door would come to over $200 no matter which way I designed it. The second issue was how rough it was to the touch. Since it would be in a doorway that gets a lot of traffic, I had visions of someone getting their shirt snagged or something. And sanding the roughness from it seemed to go against keeping it’s original character. So after some digging around, I found some perfectly aged chunky pallets that could be dismantled, cut to size and given an antiqued grey-wash finish.
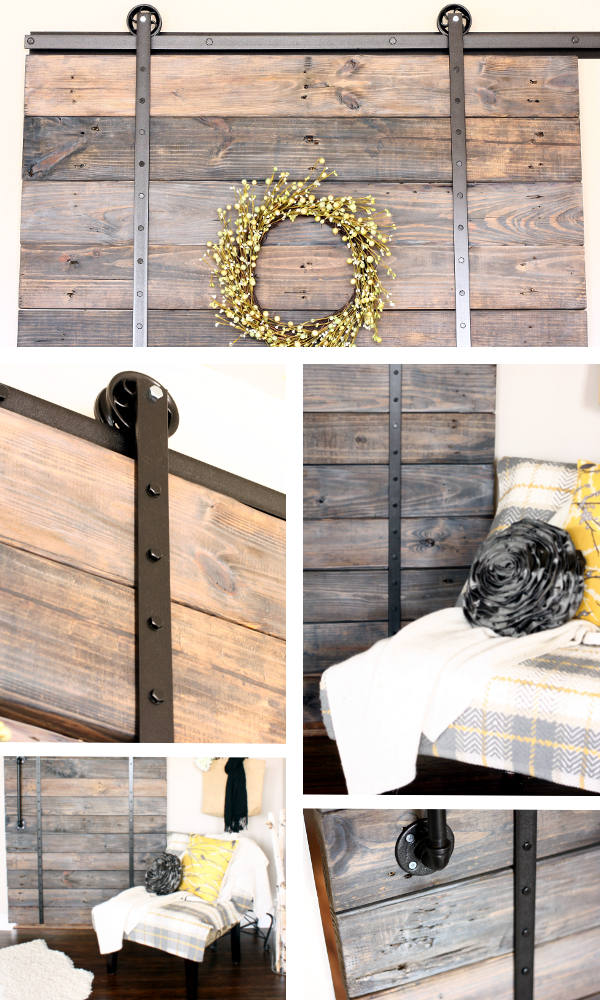
Aside from the beat up, chunky wood, two other favorite details are the huge cast pipe-fitting handles and the rollers that were made from the wheels of a child’s broken scooter (minus the rubber). This upcycled project is honestly one of my favorite projects to date!
4. Chain link chairs, elegant console and DIY art
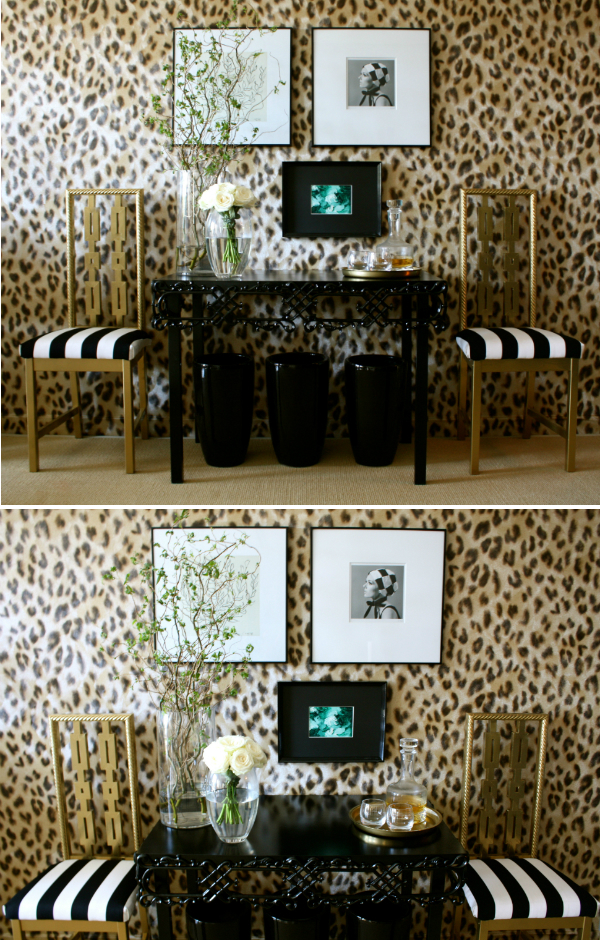
Week three calls the contestants to up-cycle so with something old transformed into something new, I recreated this area in my home into a modern space through re-use and repurposing. Reclaiming old pieces of furniture and putting a modern stamp on each was my starting point. My inspiration? Ralph Lauren’s 2013 home collection with a touch from Roberto Cavalli opulence and edge.
Let’s just say there is nothing minimalist in my vision for the project. The room’s piece de resistance is the Gold chain link chair. I settled on an Ikea Stefan chair and chopped the backrest section off. And set about assembled a chain link pattern out of inexpensive wood. Cutting each piece to size, using wood glue and nails I created the chain link pattern and the box frame that houses them. I then framed the edge with picture framing to add texture. The bare wood got a solid sanding and filing and then the completing touch with gold paint. To add to it’s sophistication I cut foam and upholstered the bare wood seat in a striped black and white fabric which I had cast off as scraps of material I’d never use. Very Ralph Lauren, no? The once simple and uninspiring chairs become a feature in the room. There is nothing more satisfying than taking a inexpensive and totally uninspiring chair and making it the star of the show.
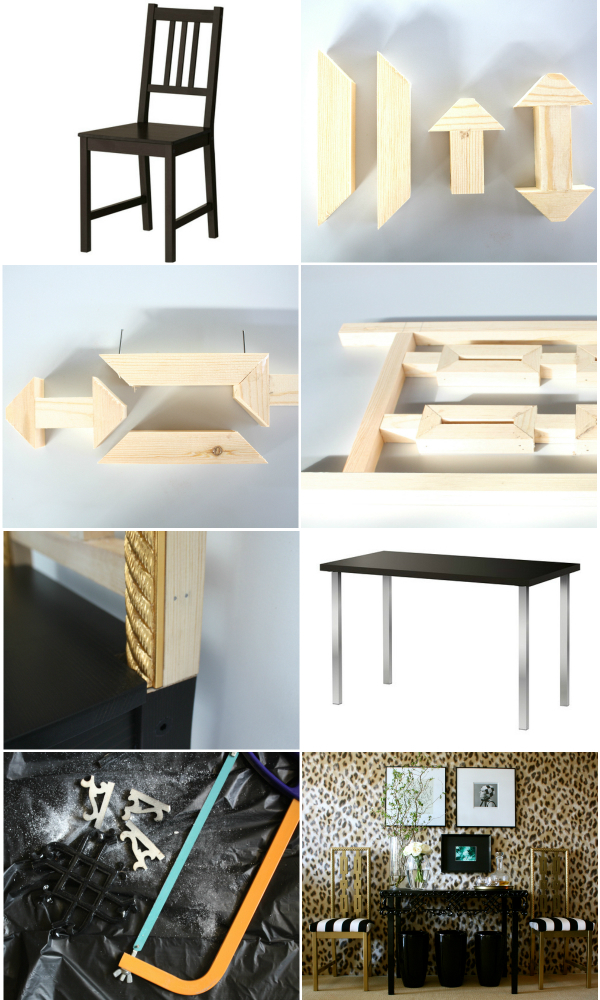
The chairs needed a console to sit between them and I decided that a gloss black table would anchor the scene. Queue the second piece of uninspiring Ikea furniture, the Linnmon desk which I had stored in my garage. Stock standard and totally bland against the opulent chairs I knew the desk needed to be modernized. I found wall cornices, sprayed them black from a rather intense gold and cut them to size, attaching them to the desk. Black enamel paint sealed the deal with this desk and the outcome is serious, sophisticated and chic.
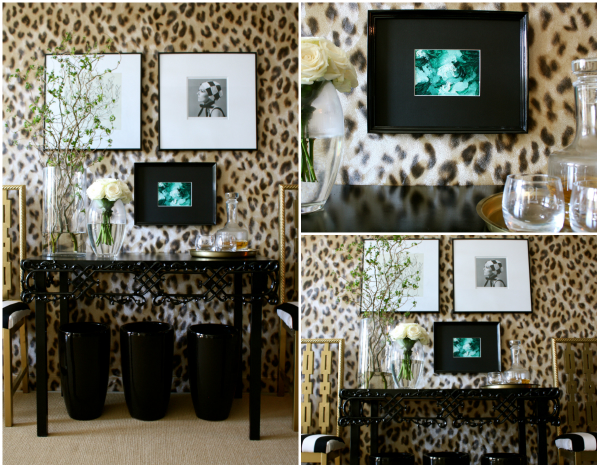
Channeling Cavalli, I used left over wallpaper which I had from another project and used it to cover the feature wall to show off the chairs and table. Black and white art were used for a modern twist and a pop of green goes perfectly with animal print so I set upon my third up cycle and painted my own piece of art to give the space some colour. A plain piece of white paper upcycled into an interesting piece of art with a repurposed frame completing my challenge.
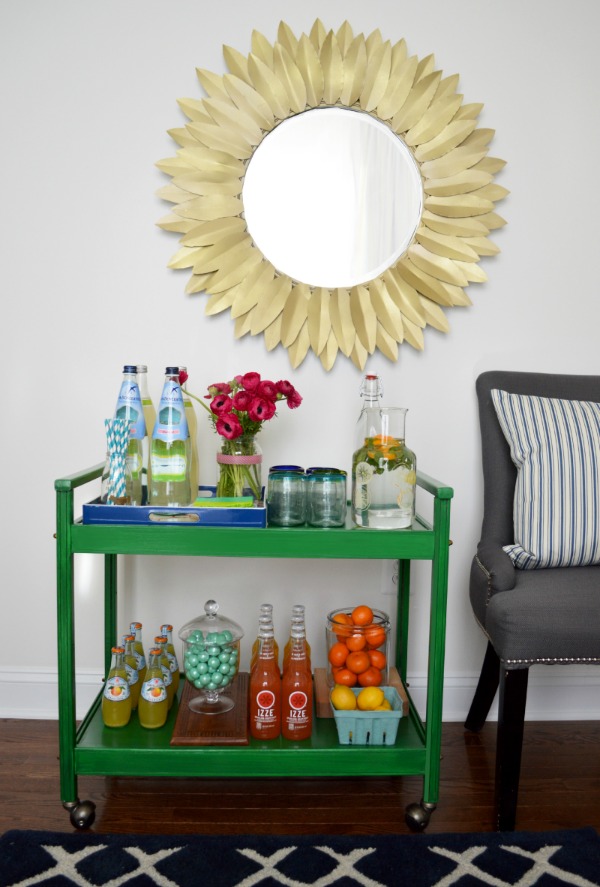
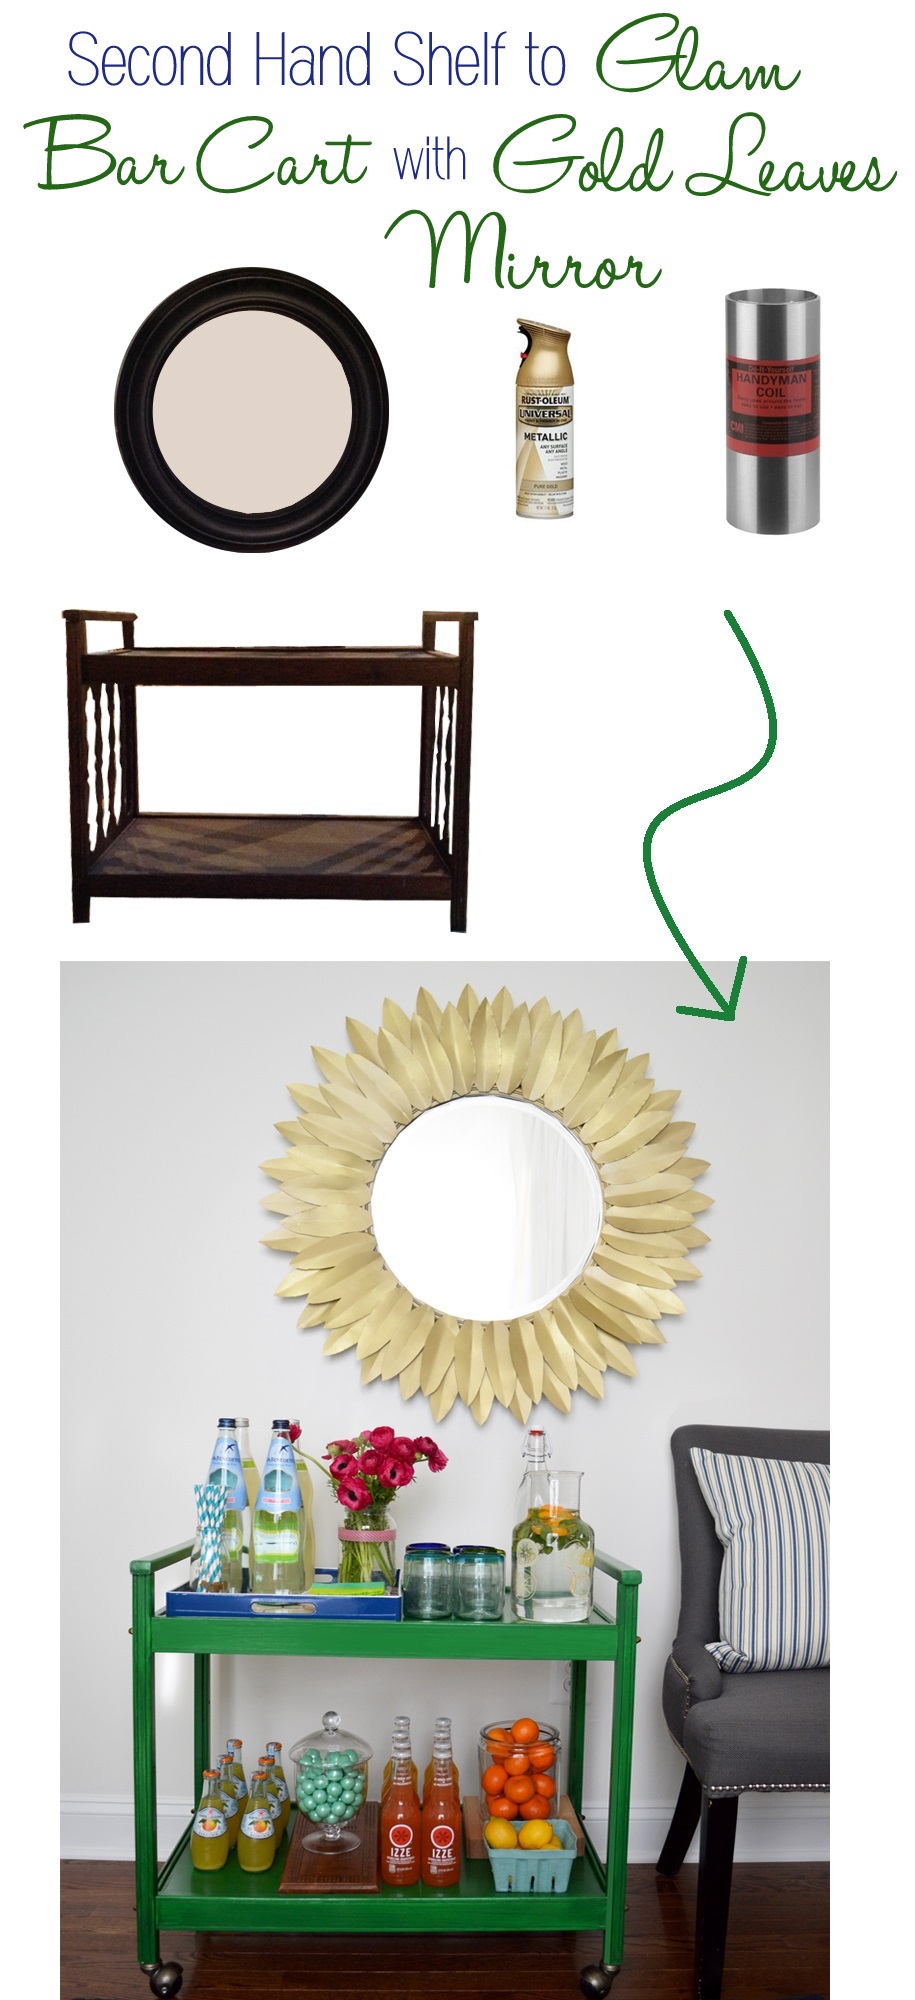
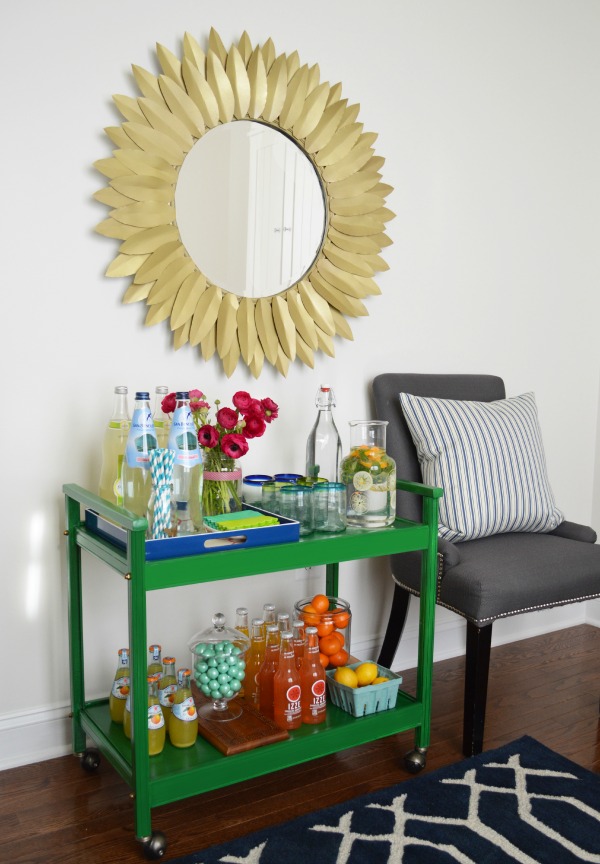
5. Second Hand Side Table to Glam Bar Cart with Gold Leaves Mirror
6. Scrap Metal Sculpture
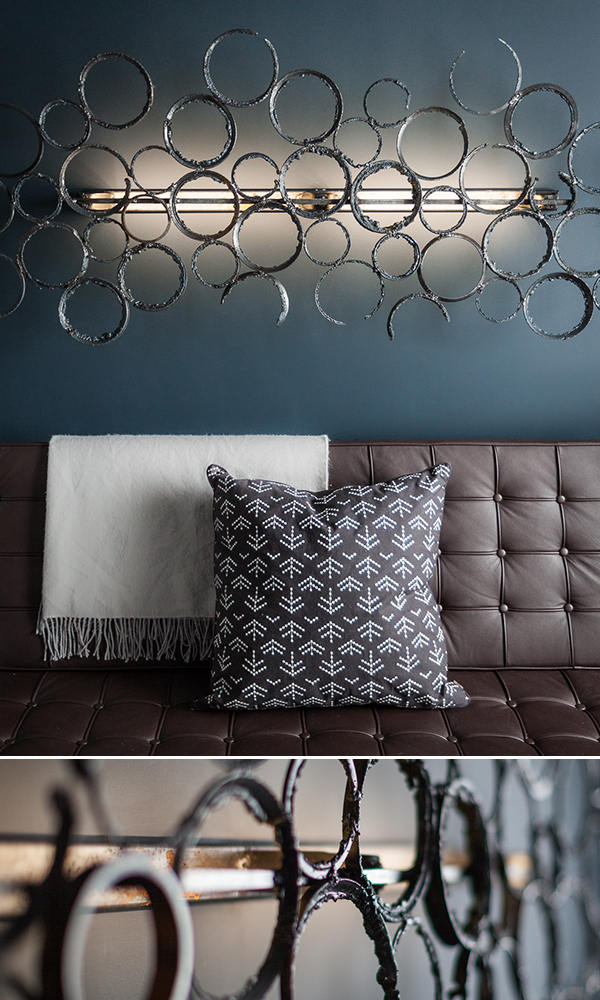
I will preface this by saying that as of two days ago, I did not know how to weld nor had I ever touched a welder. I’ve been searching for a piece of art for my office for a while now and have always thought a sculpture made of scrap metal would be cool. But when I saw wire feed arc welder kits were on sale for $119 (I know, insane price!) at Princess Auto , I said screw it and bought one. What better time to learn a new skill than two days before the project’s due!

Not 100% sure the definition of “upcycle”, Wikipedia said that I should be “converting waste materials or useless products into new materials or products of better quality”. Fair enough, time to go dumpster diving! I hit the jackpot when I found a whole dumpster full of scrap metal at the local trades college. The circular pieces used are apparently scraps produced from bevel cutting the ends of pipes; the cutting torch used gives them that very rough and industrial look. The circles are welded to a frame constructed from rectangular tubing. One tube acts as a wall mount, which I attached three supports to that suspend a second piece of tubing off the wall. This floating piece of tubing is what the circles are joined to and it also hides some LED strips that splash a nice glow on the wall and backlight the sculpture. To power the LEDs, low voltage wiring was fished through the wall so no cables are hanging down to ruin the look. Dirt, rust and imperfections in the materials were left as-is to accentuate the scrap metal look, but the whole project was sprayed with a clear satin finish to keep the mess sealed in. Otherwise just rubbing up against it would stain your clothes. The sculpture was screwed directly to the studs, which is an absolute must since this thing is HEAVY.
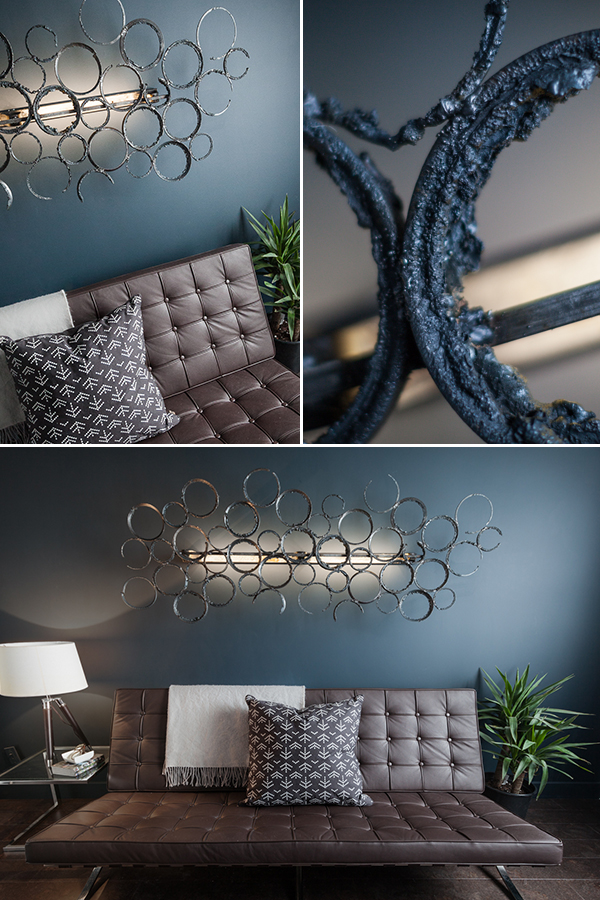
Overall I’m super happy with the results and think it fits the room perfectly!
—————————————————————————————————————————

Create your free online surveys with SurveyMonkey , the world’s leading questionnaire tool.
While you’re at it, make sure you’ve entered our Apple Vacations® Dream Vacation Giveaway! Trust, me it’s amazing!
![]()


[…] project is ours but hopefully you’ll be able to guess based on our style! Head on over to East Coast Creative Blog and […]
Amazing projects again! So excited to see who they belong to!
So exciting! I think I’m getting to know everyone’s style and could probably guess which projects belong to the other talented bloggers! Good luck everyone! xo, Shannon
[…] We asked for upcycle and that’s what our incredible top 6 contestants gave us! We’re so proud of this group and everything they have produced thus far. From 299 entries down to the top 12, top 6, and after tomorrow’s results, we’ll know who our final 3 are, that’s just crazy! If you haven’t yet chosen a favorite from yesterday’s upcycle round, stop what you are doing and GO VOTE NOW! […]
I love each and every one! We are so thrilled to be among such talent and it really is anyone’s game at this point! Awesome job everyone!
xoxo, M & S
[…] this gorgeous? This pretty thing was in the East Coast Creative Blog’s link party for Crafting With The Stars (have you been following that? I’m really good at picking the winning project this time […]