
![]()

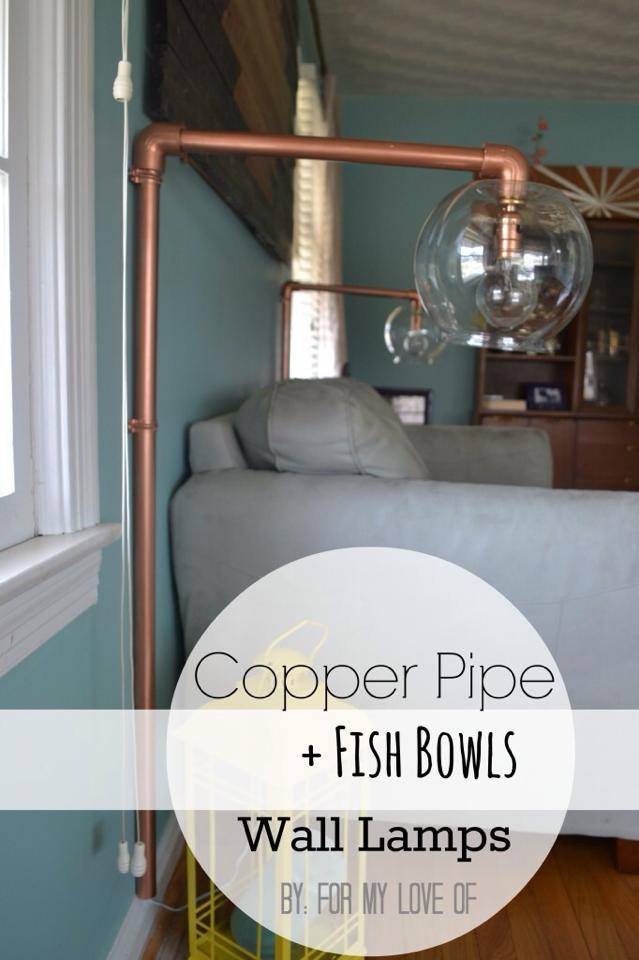
We’re so excited to introduce you to Corinna from For My Love Of blog, she has been following Creating with the Stars since week one and even entered the contest with her stenciled hexagon wall. Each round she has been linking up with us and this week we fell in love with her Upcycled Fish Bowl Copper Wall Lights. You can’t get more creative than using a fishbowl as a light cover, can you?!
Wow, is the Grand Prize Round of Creating with the Stars already upon us?! We’re so grateful for the amazing support and the amazing work everyone has put into this incredible competition. Thank you for making it another great year, we can’t wait to see what 2015 brings for CWTS.
OK enough from us, take it away Corinna…
——————————————————————————————————————————————————
Howdy Friends of East Coast Creative!
Thank You Jess and Monica for enjoying my project enough to invite me over to share the tutorial with you all. This project is all about copper, a little industrial design, and modern influences. If you’re thinking, “Fish Bowl? I don’t have a fish bowl!” I assure you, continue reading and you’ll see it can be adapted. But you may just want to go buy yourself some fish bowls and make a pair just so you can tell your friends what your lamps are made of. Jus’ Sayin’ 😉
My idea for the Upcycle week’s project were wall light fixtures made out of copper (“copper”) piping and fish bowls. Say what?! Let me explain- Bubby got a betta fish for his 1st birthday. “Fishy friend” has moved into new homes a few different times which has left us with several empty fish bowls. It could have been copious amounts of caffeine mixed with several nights lacking in sleep, but the idea struck and I just did it!

How Long Did It Take?
I ran into so many speed bumps during the process that I don’t have an accurate time frame. Minus spray paint dry time, I imagine it wouldn’t take longer than 1 hour!
What Did I Use?
1 inch Electrical Conduit pipe (1 10 inch long pole), PVC Elbow joints (4), Copper Spray Paint (1) , 2 Hole Pipe Straps (4), Make A Lamp Kit/Necessary Lamp Making pieces (2 kits), Plastic Fish Bowls (2), E-6000 (Although I recommend either using PVC pipe with the PVC elbows or Copper pipe with Copper elbows)
The Process >>>
Of course I first had to gather my supplies. After supplies were purchased, I cut the electrical conduit with a pipe cutter. 2 pieces were cut to be 42 inches long, the other 2 pieces were cut to be 18 inches long. This used up the entire 10 feet of pipe perfectly. I then hung the pipes and laid out the visible lamp pieces, PVC elbow joints, and 2 hole straps and spray painted everything generously.

While that dried I had hubby drill holes into the bottoms of the fish bowls.
Everything had to be assembled at once. At least that’s the best way I figured to do this. I applied E-6000 as I connected the pieces to ensure any knocking around bubby did wouldn’t cause it to completely collapse. This became an issue for me when I realized that the 1 inch Electrical Conduit pipe did not fit into the 1 inch PVC elbow joint pieces.


To remedy the problem, I wrapped macrame cord leftover from my DIY Macrame Wall Hanging around the ends of the pipes to make them fit snug into the PVC pipe. If I had more time to complete the project, I would have just gone back and picked up PVC pipe. I TOTALLY recommend using PVC pipe with PVC elbows or Copper pipes with Copper elbow fittings. Not mixing materials.

Another hiccup I ran into, and I ran into it too with my DIY Vase Lamp (Although I thought I followed the directions correctly for the Make A Lamp kit) My lamps did not turn on. Turns out I had my wires backwards (Yes, on both these and my vase lamp wtf).

Hubby them helped drill the straps in place while I held the lamp in place and BAM- totally cool wall lamps.


I really like them. Bubby went on a pretty epic lamp breaking spree when he was first learning to walk. 18 months later and we now have a wonderful 22 month old is more interested in feeding his fish and drowning my plants. So this pair of lamps should be safe. Loads more DIY light fixtures are coming up soon so make sure you’re following for all the epicness coming soon!
Oh, and you know one of your Pinterest friends is going to love this project, don’t forget to pin it for their sake!


—————————————————————————————————————————————————————
Pretty cool, right? Thanks for hanging out with us today Corinna and showing everyone your Upcycled Fish Bowl Copper Wall Lights. OK, everyone don’t forget to come back tomorrow for the final round of Creating with the Stars, our contestants have been hard at work on their home decor projects!
Only 2 more days to enter for a chance to win a beach vacation to Punta Cana from Apple Vacations…
![]()


Copper is the It Girl this year! Beautiful!
With the tubing and the clear bulbs, these do remind me of my Christmas present lights. Which I still love.
But we still haven’t put the verdigris finish on the big chandelier yet….
Anyhoo, thanks for the nice tutorial.
[…] Accent Wall, Week 3- Copper Pipe and Fish Bowl Wall Lamps (this one was chosen as the week’s Link Up winner, […]