

It’s time for Round 2 of CWTS, and let me just be honest with you for a second… Round 1 literally blew my mind, like it’s gone, friends. Maybe that’s why I posted ridiculously handsome pictures of Theo James from Divergent on Instagram and professed my love for him publicly. Yeah, that was a smooth move for this 30-something-mom-of-four… let’s just say I dropped a few notches on my daughter’s cool scale. So anyhow, I blame it on the amazing knock off projects.

If you missed Round 1, you’ll want to check it out. I mean who doesn’t want to embarrass themselves on Instagram right?
Click on the image below for The Round 1 Recap!

A FEW REMINDERS FOR ROUND TWO…
1- PROJECTS ARE ANONYMOUS:
Our bloggers have done their best to keep things legit and not reveal which project is theirs. This keeps the playing field level.
2- ONE VOTE PER ROUND:
You can only vote once, this isn’t a popularity thaang… we want to know which DIY project is the very best!
3- WINNER ANNOUNCED WEDNESDAY:
Wednesday we will announce the winner of Round 2 and also say goodbye to 3 talented bloggers. Last week was impossibly hard to say goodbye to three, and we know this week is going to be just as hard!
4- FULL TUTORIALS
We’re hooking you up with even more amazing DIY tutorials! Last week’s tutorials can be found HERE. Tomorrow, Sarah Dorsey (last year’s CWTS Champ) will be sharing her paint project, and then each day following the 1st, 2nd, and 3rd place winners will share their complete tutorials for their winning projects!
5- Round 2 Prizes
We’ve rounded up a prize package for all their painting needs…and maybe some wants, too!
$150 of Annie Sloan Chalk Paint Decorative Paint Products
$150 Modern Masters Paint Gift Card
$150 of Rust-Oleum Paint Products

Enough talk- let’s get to it! CREATING WITH THE STARS ROUND 2: Paint
1 final important thing you should know about this round. The only requirement was to use paint. It could be on a wall, furniture, fabric, lampshades, couches, small woodland creatures, etc… So as you’re picking your fav, keep an open mind that there were no requirements other than paint! Happy Voting!
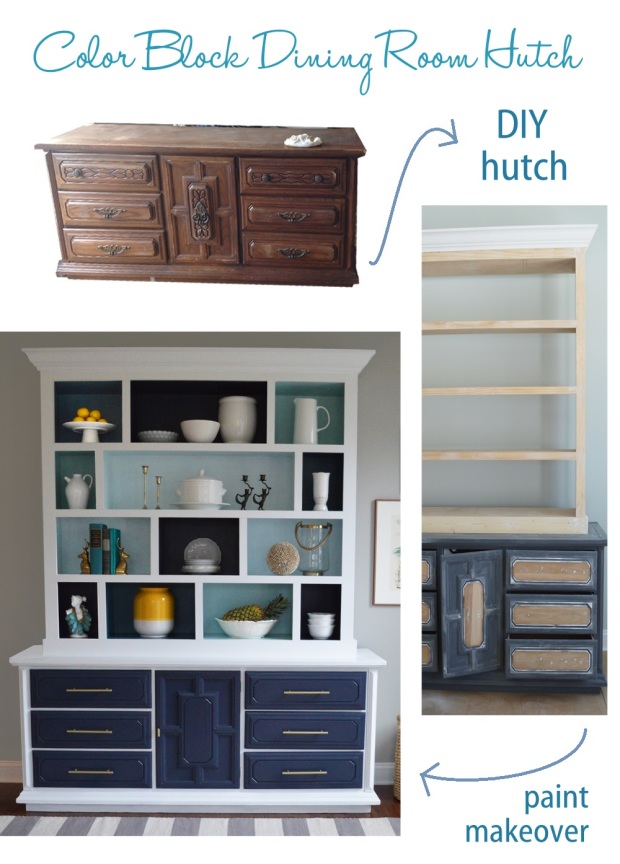
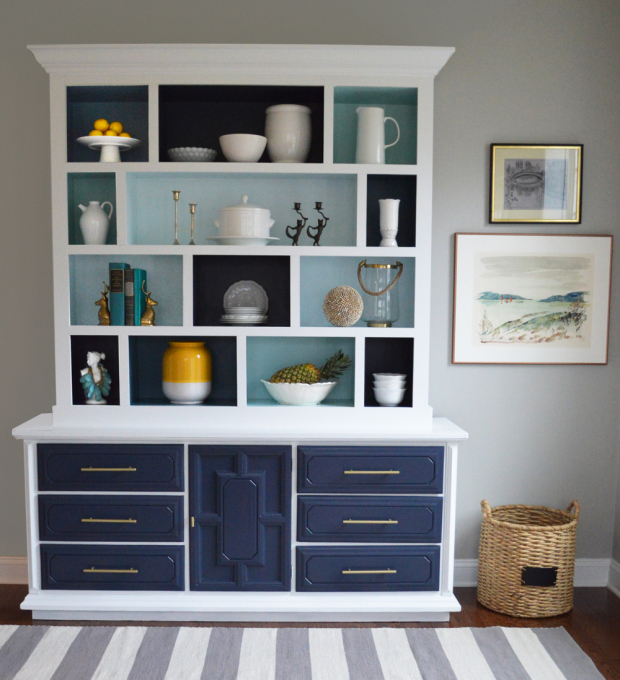
1. Baby Blues Hutch
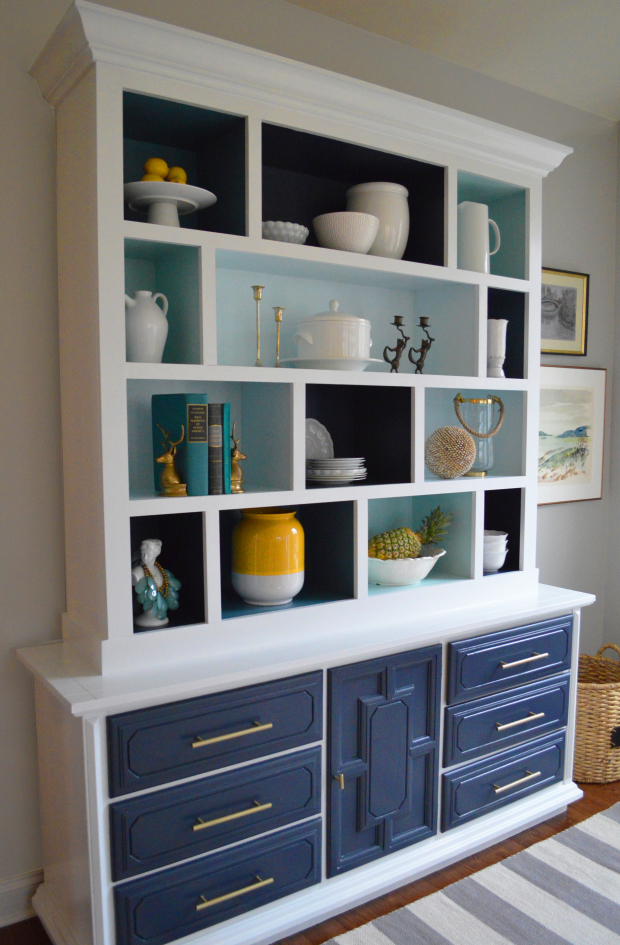
I came across an inexpensive 1970’s style buffet table at a local thrift store. It was made out of solid oak and had potential to be something more than firewood. I’ve wanted a tall hutch for our home and decided this old buffet table would be a great starting point.
The first thing to go was the old hardware and the raised panels on the drawer fronts. I built shelving out of veneered plywood and attached it to the top of the buffet table. I wanted a staggered look so I built dividers to break up each shelf. I added pine trim and topped it off with some crown molding to give it a bit of flare. I painted each cubby with different shades of blue to give it a unique color-blocked look.
I’m thrilled with the way the hutch turned out! It’s amazing that some creativity and hard work can transform something blah into something beautiful.
2. Hand-painted Watercolor Kilim Wall, Ombre Table & Paint Dipped Chair

I love graphic kilim patterns. When I was asked to create something using paint, I immediately wanted to do a kilim design on a wall. I didn’t want the outcome to have a small, repeated pattern like it was stenciled. So, I sketched my own with a goal of an end result of a more artsy, hand-painted look. To achieve this, I taped off very little, so that there would be some slight imperfections from doing it by hand. I also really wanted more of a watercolor, see-through look versus a harsh paint color. I added some water to my paint and it gave me that dimension I was looking for.

While I love how my hand-painted wall turned out, every painted wall needs some great accessories and styling! I pictured this nook being a little sitting area, so I scoured my local thrift stores for some goodies. I found a great rattan chair and simulated an asymmetrical paint-dipped look with my favorite color of the moment: coral. I wanted an end table, but just wasn’t finding exactly what I wanted. So, I picked up a stool and a gold-framed tray. The stool got a blue/green ombre effect and I painted the center of the tray white, leaving that bright, gold frame. I attached the tray to the top of the stool for a unique end table. Even the little wooden candlesticks got a paint upgrade!
I love how my graphic kilim wall and sitting nook turned out! It’s amazing how far a little paint can go.
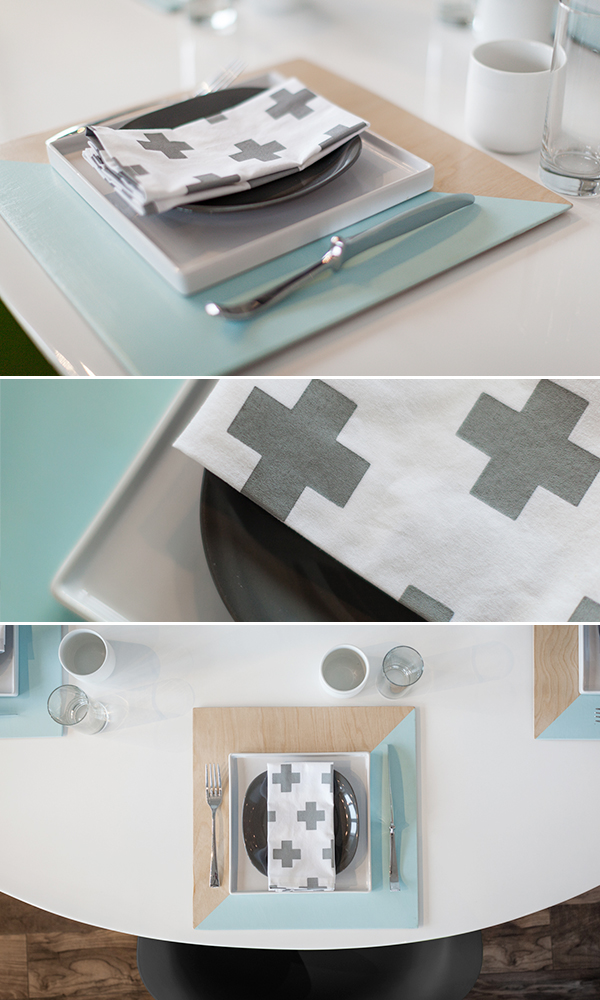
3. Painted Place Setting
I definitely found this week’s challenge difficult since busy patterns and lots of color (things that come to mind with a painting theme) aren’t exactly my style. Nonetheless, a custom table setting provided a perfect way to bring together multiple painted elements while staying true to a more minimalist design.
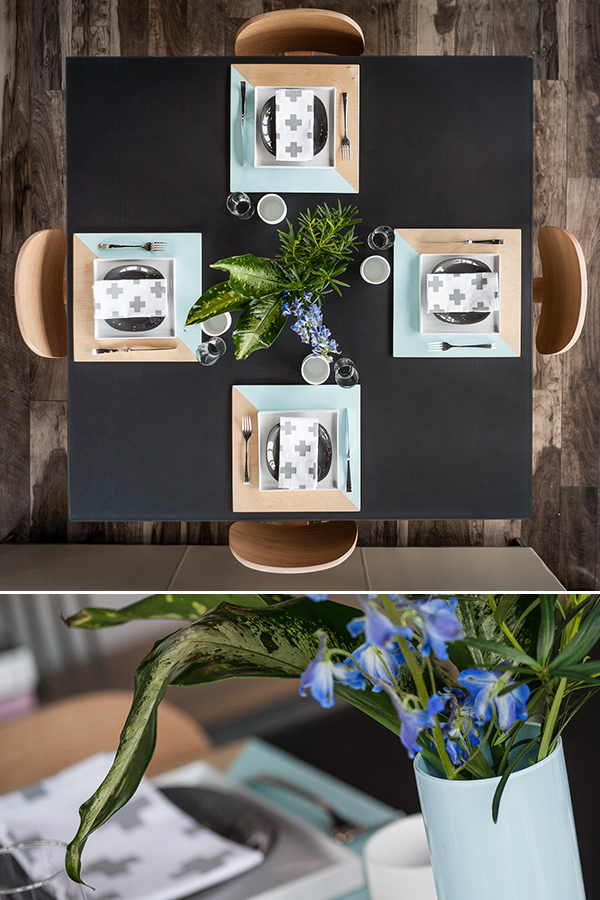
Using common supplies and craft paint (with fabric base added), a tight mesh screen was constructed and the cotton napkins were screen printed. Don’t have a proper a screen printing squeegee? Me neither! I used a plain old stick of 1×2 lumber. Don’t have special photosensitive emulsion and dark room to transfer your design? Me neither! I used adhesive vinyl to create a stencil (painter’s tape also works). The process resulted in a perfectly uniform, crisp print that a paintbrush or stamp just can’t rival. Believe me, I tried both! The design was printed past the fabric’s edges, which were then folded and sewn, for an “all-over print” effect.
The placemats were constructed from 1/4″ birch plywood and the edges were finished with matching birch veneer. The painted geometric triangle design allows a variety of patterns to be created just by changing the orientation of the placemats; I like the design shown in the first picture as it creates a faux diagonal table runner! You can even line them up in the centre of the table and use them as an actual table runner!
The high gloss vase at the center of the table was painted the same minty blue used on the placemats to tie the whole theme together.
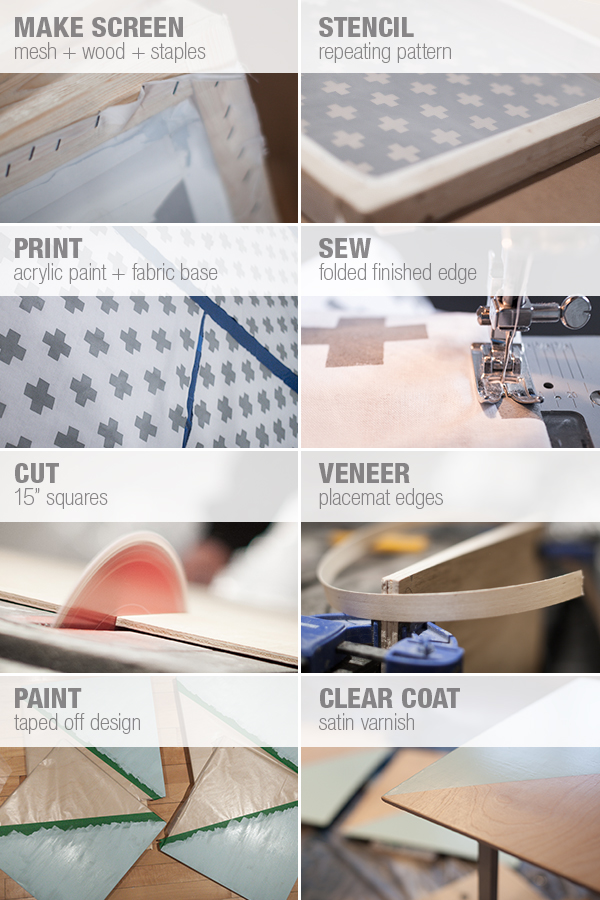
As you can see, the pieces are quite versatile, working on both dark or light tables! Six place settings were made, although only four are shown.
4. Painterly Pixelated Wall Treatment
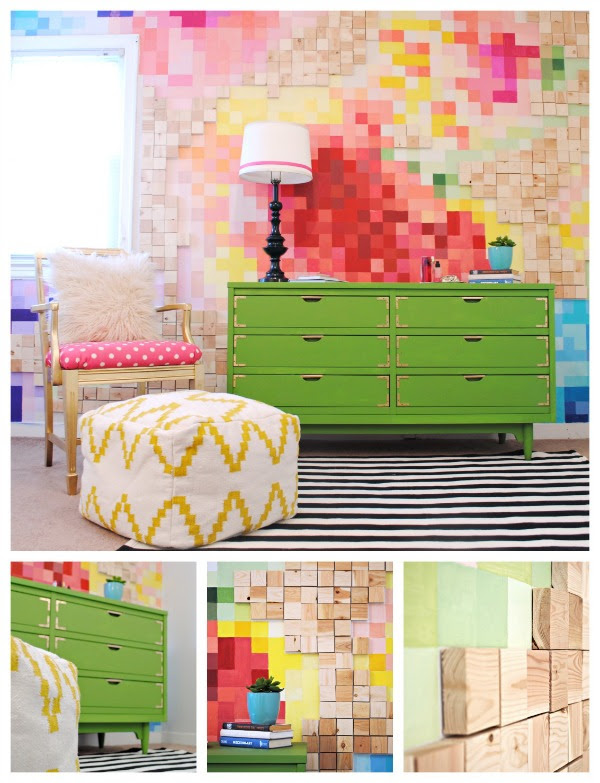
This Painterly Pixelated Wall Treatment is made up of over 1800 hand painted squares and over 450 individually cut wooden squares. I found a floral image online and created the mosaic look in Photoshop. This painterly pattern has hundreds of different shades of nearly every color imaginable! This bold wall treatment is bright, colorful and perfect for teens and pre-teens!
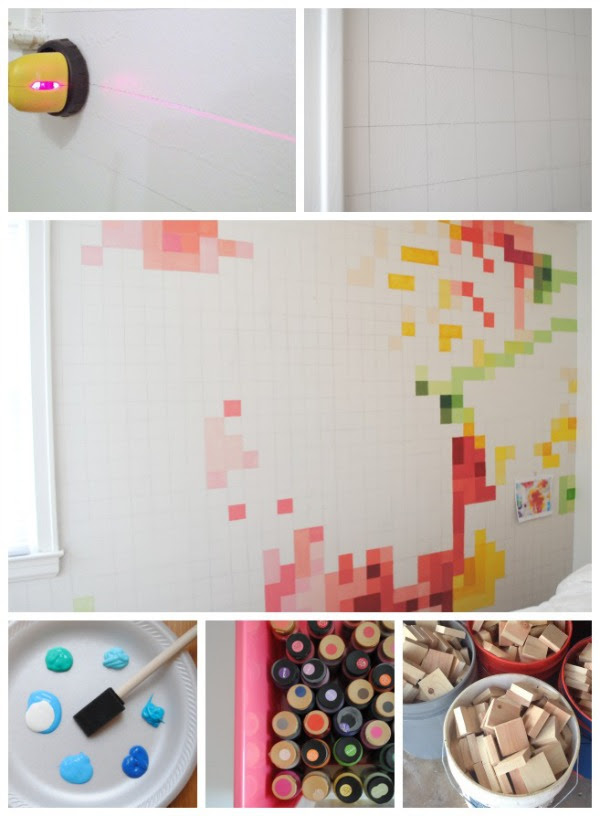
After hand drawing each square and mixing my own colors, I painted each individual square one at a time to create the floral painterly look. When the painting was done, I applied each wooden square block to the white space on the wall.
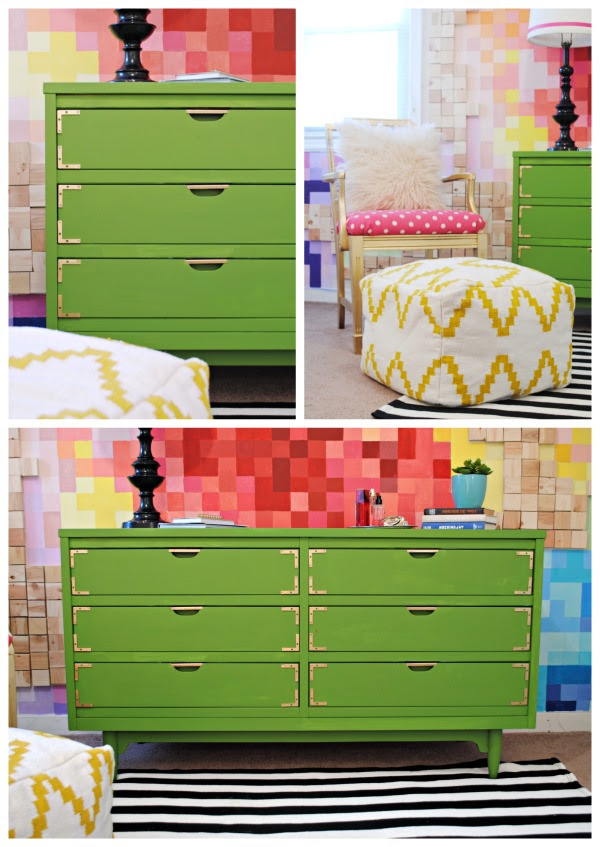
I used my own chalk paint recipe to paint the kelly green dresser. I added the brass corners to match the drawer pulls to give it that super cute and trendy campaign dresser look. I also painted the pink and gold chair and the black lamp. The patterns and mix of colors is the perfect combination for a playful and exciting space!
5. Painted Popsicle stick Wall Tiles & Eames Chair
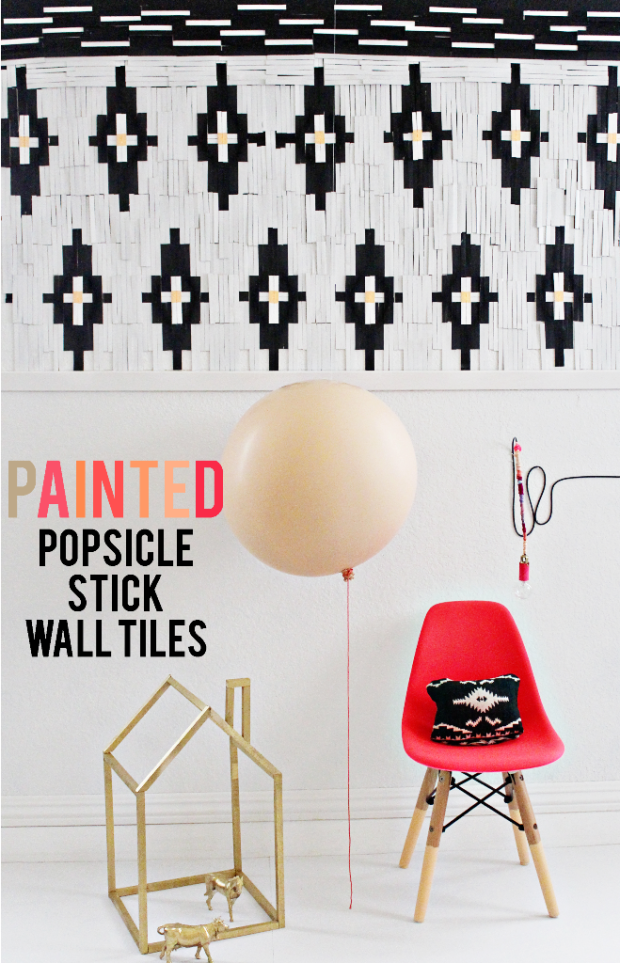
I adore paint! I find that it’s the most inexpensive way to change the entire look of any room, wall, or piece of furniture. This week I thought it would be fun to go bold and try something new for a kids space.
Many cans of Rustoleum spray paint & 2000 Popsicle sticks later, and I was able to create a pattern that mimicked wall tiles on the wall. It not only made my wallet happy, but it is renter friendly. I am in love with the bold black and white design and the punch of neon on the Eames chair brings the space to an exciting and energetic level.
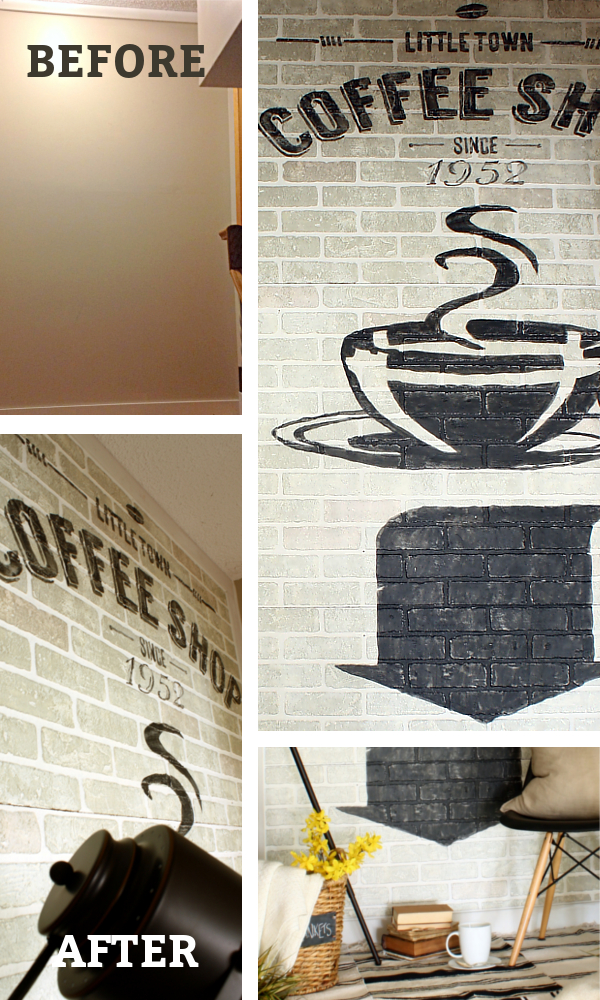
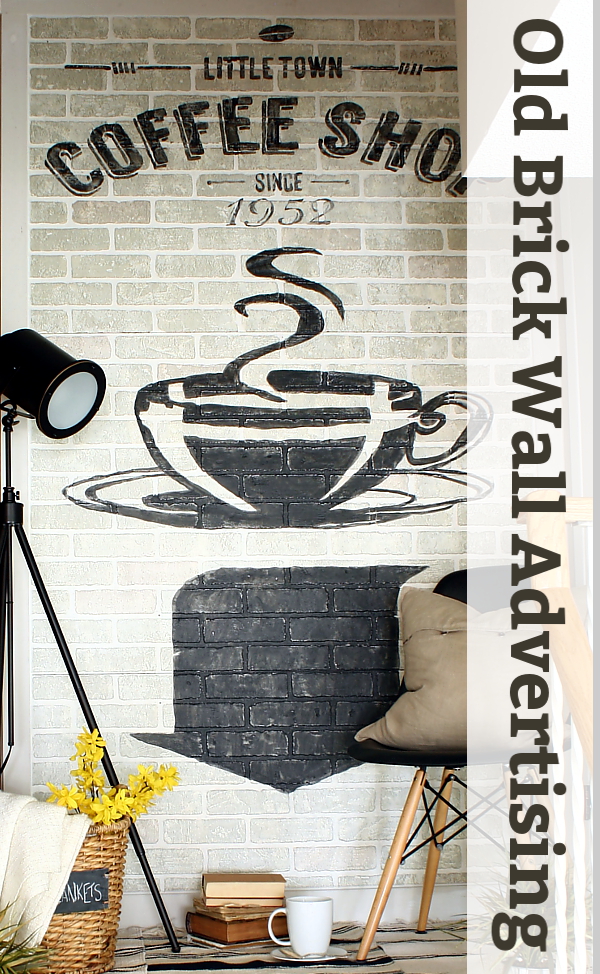
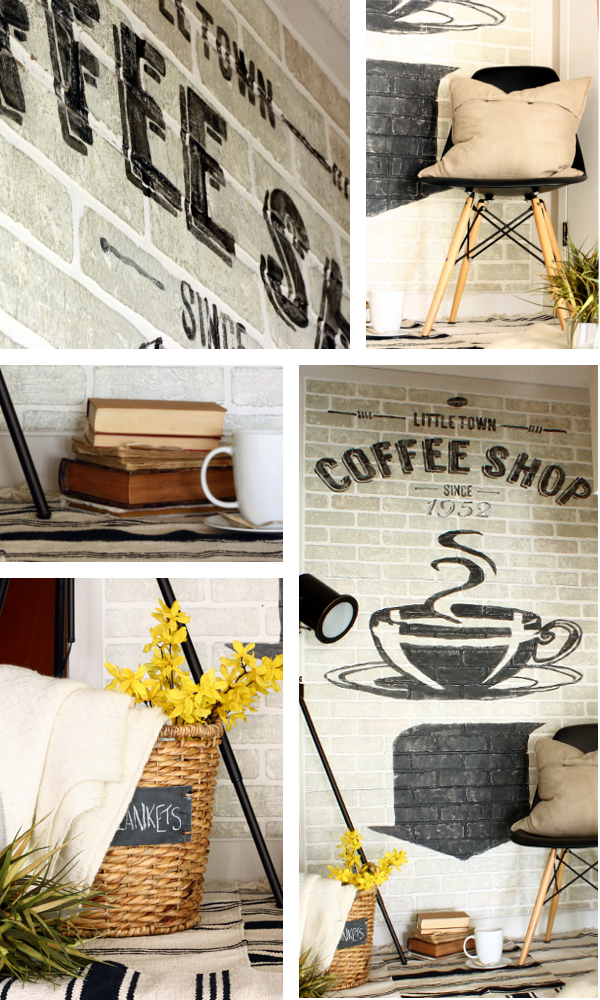
6. “Old” Brick Wall Advertising
When I think of paint projects, I typically think of furniture makeovers or really cool stenciled walls. For Round Two | Paint, I initially thought I’d paint an advertisement or typographic mural directly onto the wall. But for #CWTS2014 I wanted to do something a little out of the ordinary.
As I was browsing Google and Pinterest for inspiration, I fell hard for the look of old brick wall advertisements. I kept searching and loving the look both indoors and out – in cafes and restaurants and on the side of old main street buildings. And then it hit me – why not install faux brick inside and paint onto that?
My “old” brick wall advertisement for a small town coffee shop isn’t colorful or super complicated – as in anyone could do it (just wait till you see how!). But it will certainly make for interesting conversation when people come to visit!
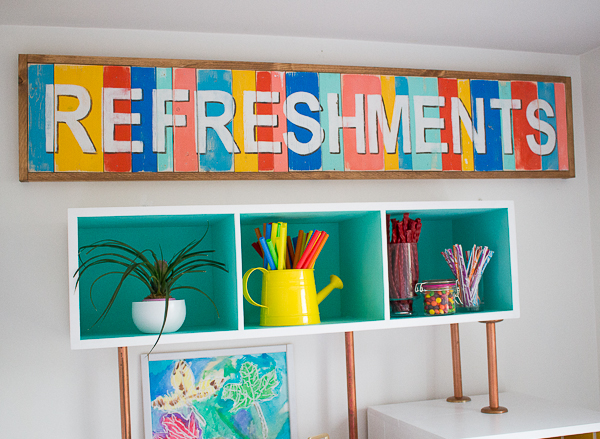
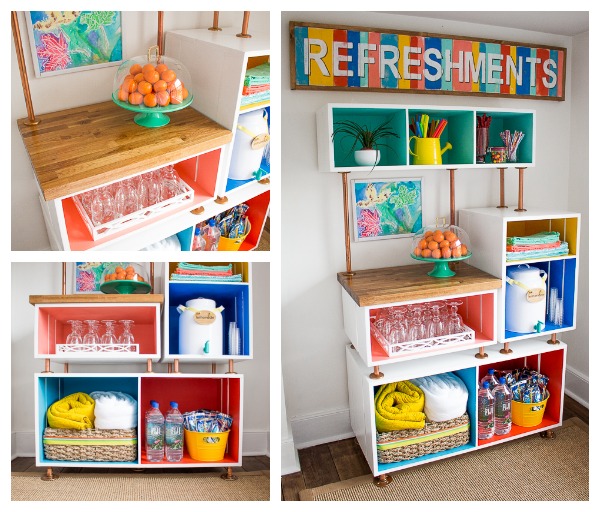
7. Family Refreshments Station
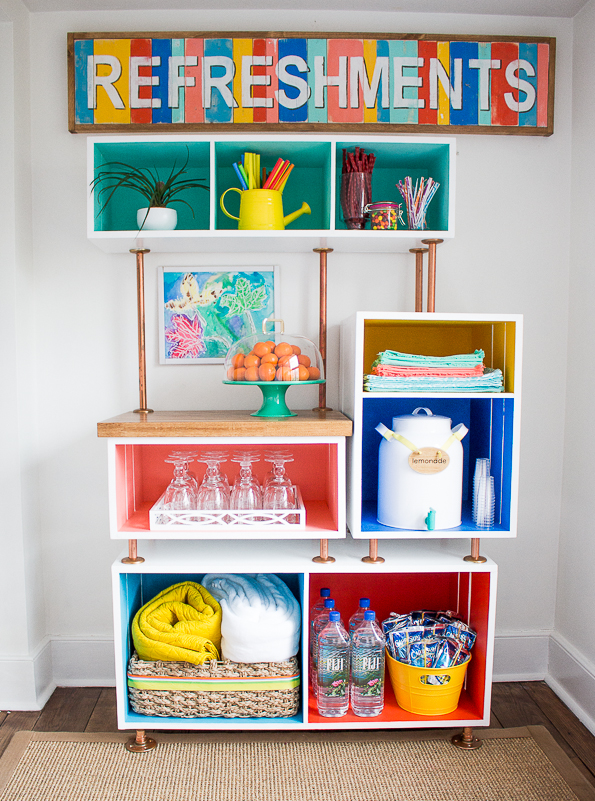
Two scrap busting projects make up this family refreshments station. First the shelving composed of wood boxes was built using scrap lumber and painted high gloss white enamel on the exterior with bright colors on the interior.
And for the second, I used more scraps and the same paint colors to make the ‘refreshments’ sign above the boxes for a finishing touch. The boxes are connected using copper pipes and flanges and a scrap slab of butcher block serves as counter prep space.
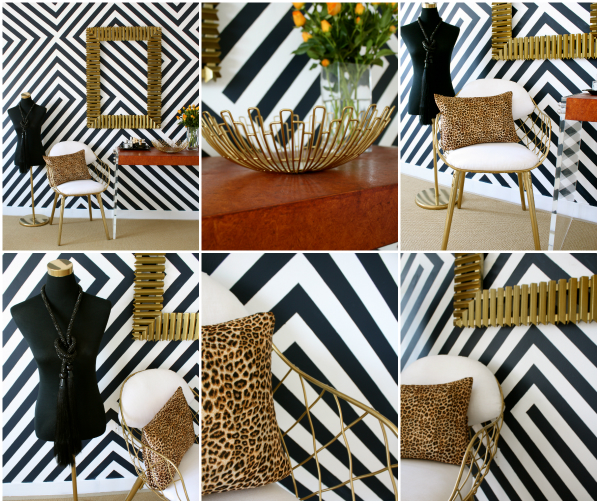
8. Modern Art Deco Statement Wall
Let’s be honest, everything looks better with a fresh coat of paint. Even so, paint is underrated. It transforms an otherwise ordinary white wall into a statement wall. With the use of varnish, acrylic artist paint and latex glaze I took this chip board and gave a totally inexpensive and unattractive product a high end finish, which is now a unique feature in my spare room.
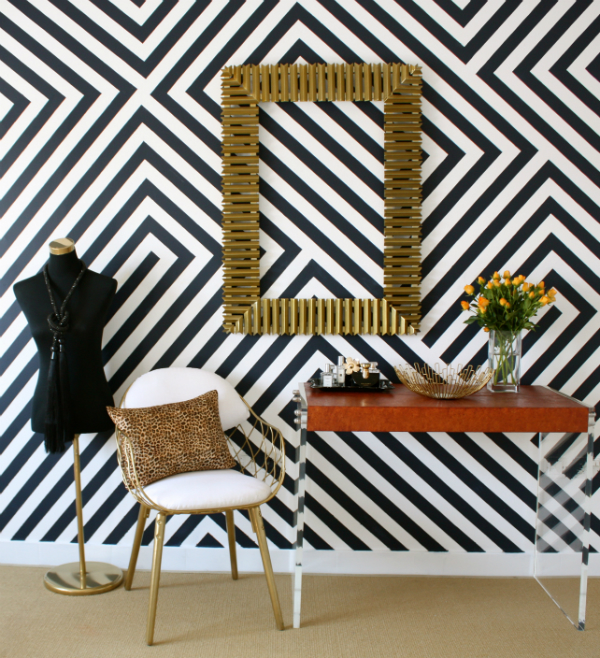
This week I decided I was going to do something different. I pondered my plan for some time and eventually decided on a statement wall, the paint world is your oyster here. While I love herringbone, it’s been done. I decided I would get unique with it and make my own pattern, all you need to create this statement wall is a pattern in mind, painters tape and paint! Oh, and did I mention, patience and time. Better stock up on that. Bucket loads are needed.
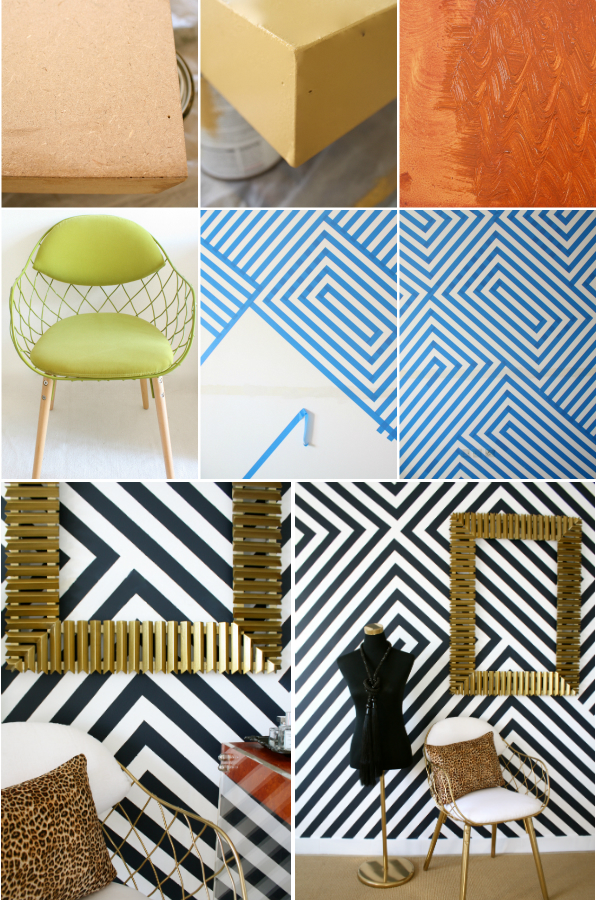
It most definitely wasn’t the easiest job preparing the wall with the pattern, but I am so totally in love with the end product, it was well worth it. For the dresser, I fell in love with it when I saw it online, so I decided I would make it for myself. The only splash out in this whole project was the acrylic legs, which are just amazing against this wall. I love how you can see the pattern through them! The chair screamed my name when I came across it, it has such a unique shape and I just knew it could look even better, I took a simple green chair from paired down to luxe by painting it gold and reupholstering the cushions in a fresh white.
This section of my spare room is now most definitely one of my favorite places in my home. By using paint with a fresh take I have created a bold and modern look inspired by the art deco era.
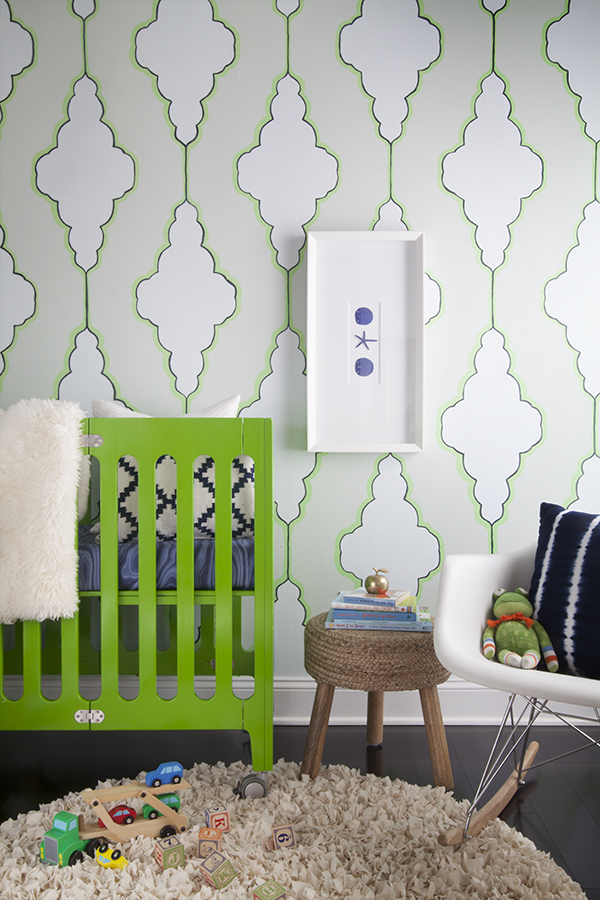
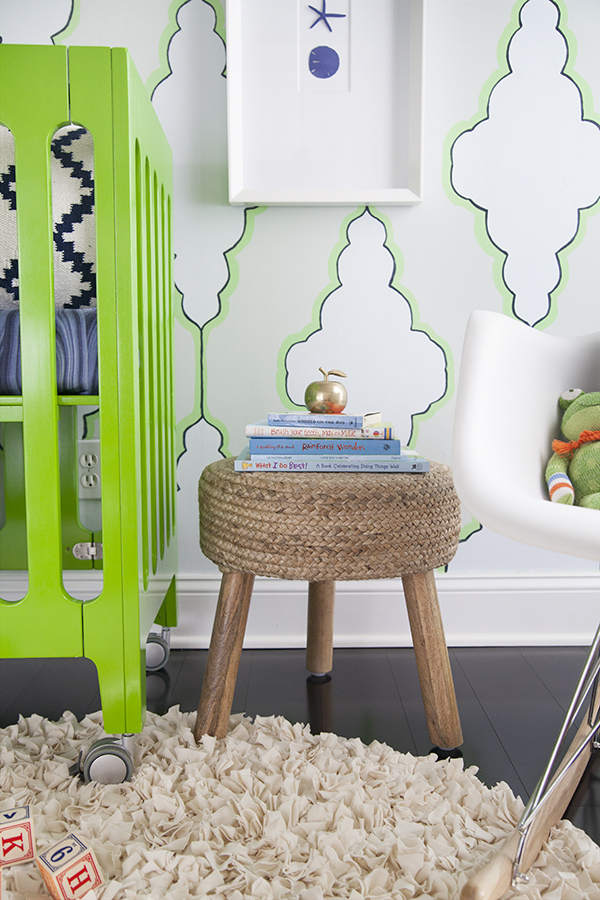
9. Hand Stenciled Nursery Wall
When we were assigned the task of painting, I turned to my arsenal of inspiration – my cellphone photos. I love how that little device enables me to capture everyday musings so easily. Many of them are screenshots from my favorite form of social media: Instagram. When I saw this rug several months ago, I knew it could make an amazing paint treatment.
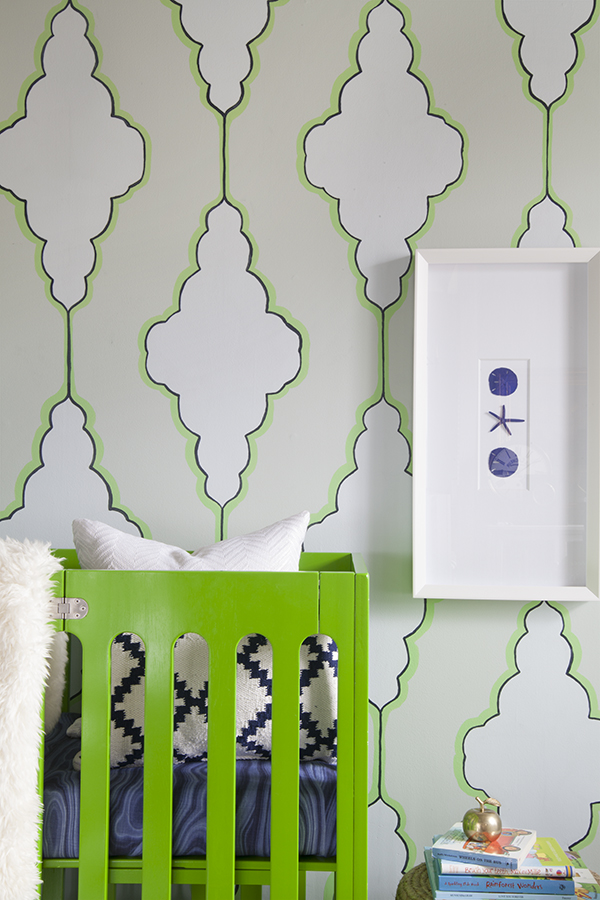
I began by drawing a stencil and making marks every 12″ up the wall. After spacing the stencil out on the lines, I hand-painted the light blue, then the green, followed by the navy.
I think it’s a fun and fresh take on the stencil treatments we’ve been seeing a lot of, and embracing the hand-drawn look made it a less stressful task (no need for perfection). The playful result is perfect for any kid’s space.
Not bad, eh? How will you ever choose a favorite?! We’ve gotta say- these are some insanely unique, one-of-a-kind paint projects!
A big thanks to
Survey Monkey for sponsoring the voting for CWTS! We had smooth sailing for Round 1 Voting and that’s thanks to their awesome customer service & super-simple platform! We highly recommend them to all our blogger pals!













Amazing entries! Wow i’m totally blown away! Just a detail, the pics for the “Old” Brick Wall Advertising entry are not working! I’m really curious about it i’ll wait to see it to vote 🙂
Holy cow, I was TOTALLY going to do that exact deco pattern on my office wall! I even bought special painter’s tape and everything, but the thought of all that tedious work has me putting it off. I’m totally inspired now though. Amazing.
As usual, they are all fantastic. It was a close call for me between the pixelated wall and the black/white pattern on the wall, because they both were so work intensive, but the pixelated wall won out because it is so creative. But they are all beautiful!
AGAIN ALL OF A HIGH STANDARD AND VERY DIFFERENT.LOTS OF CREATIVE WORK.I AM SO IMPRESSED WITH THE MODERN ART DECO STATEMENT WALL.LOTS OF HARD WORK TO GET ALL THE LINES EXACT.MAKES AM AMAZING IMPACT.MODERN AND ULTRA CHIC AT THE SAME TIME.WELL DONE TO THIS LADY.KEEP IT COMING.
I’m totally appreciating the ridiculous amount of work that went into these projects. Wow!
Love them ALL!
All of these are serious, no joke, balls to the walls amazing. 2 & 4 took my breathaway….not quite like Theo James without a shirt but super close!
wow these are all off the charts amazing!!! I can’t pick just one! Agh!
Wow, such amazing projects! Really love #3 though. The place settings are just so clean, and would be very versatile!
[…] We had a busy weekend painting for our Creating With The Stars Round 2 project. Voting is open today and tomorrow (until Midnight). Of course we can’t tell you which is ours, but go vote for your favorite. […]
[…] goodness was it a crazy week! I’m talking Cra-ZY! We would love if you’d head over to East Coast Creative and vote for your favorite project! Of course we hope it’s ours but seriously, they are all […]
Those are all unbelievable! Just like last week I kept saying “Oh my God” out loud with each one I saw!! I will be pinning each and every one of these! So inspiring…. I don’t think it’s right that a single one of them has to be eliminated 😉
These project just blow my mind. They are incredible.
[…] along with Creating With the Stars over at East Coast Creative?? Right now they’re on Round 2 & this week’s theme is – you guessed it – PAINT! If you haven’t had a […]
[…] stolen the show away from them! If you haven’t voted yet, well what are you waiting for?! GO VOTE NOW! Plus, if you need a little recap to refresh your memory or missed out on what happened in round […]
[…] East Coast Creative – Crafting with the Stars Link Up! […]
My first thought in clicking over to see the paint projects was, “oh no! CWTS is half way over!!”
WELL DONE TO ALL THE CONTESTANTS.THE HEAT MUST BE SOARING AND THE NERVES RISING.IT IS SO EXCITING TO SEE WHAT THEY WILL COME UP WITH..GOOD LUCK TO ALL.YEEE MY PICK OF THE WEEK – ART DECO WALL MADE IT.
[…] Round 2 Projects: Round 2 Results […]