I’ve had this project in my mind for a few months now. It was inspired by a printed pattern I had seen in the window of a shop. I couldn’t remember exactly where I saw it, but I was pretty sure it was a cool shop we had passed when we were in London in November. Great story right? Crafty DIY project inspired by a European city… Then, two weeks ago it hit me… It was JCrew at our local mall! I just about died laughing when I put it all together!
Well, JCrew or London, I sure am glad it inspired me…
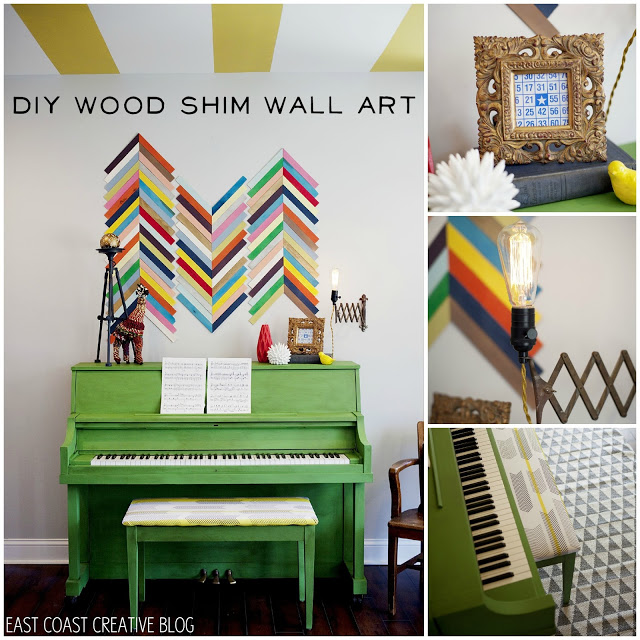
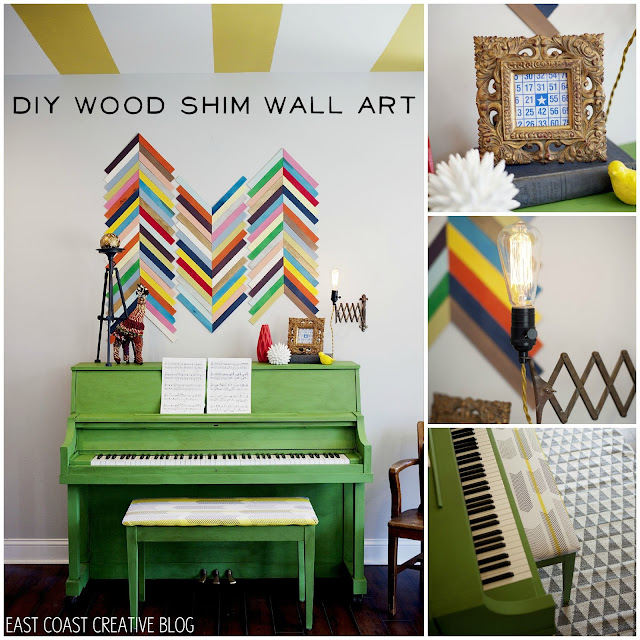
For under $20 we created DIY Wood Shim Wall Art

I wanted something with BOLD color, and a modern feel, that married well with a bit of industrial flare!
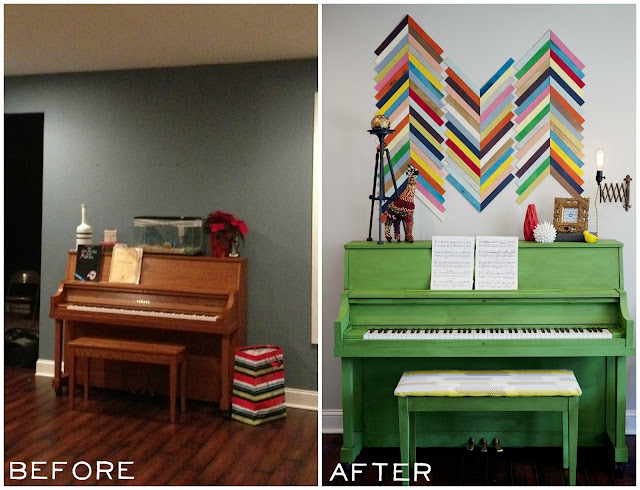
How’s that for a Before and After?
Who knew our dumpy oak piano could be such a show stopper? (You can read all about that little makeover right here. )
Who knew our dumpy oak piano could be such a show stopper? (You can read all about that little makeover right here. )
Here’s a peek at the details- I love how my DIY light works with the Wood Shim Art!
Even though it looks pretty complex, the process was super simple and the longest part of the process was waiting for the paint to dry.
Here’s how we did it:
#1- Purchase Long Wood Shims
We bought 5 packs of these from Lowes for $3.84 each. They sell two sizes, so make sure you go with the longer of the two 11 7/8″ (yellow package).
#2- Cut the ends at a 45 degree angle. I used my miter saw and cut each piece- I started with one at a time, then did a little math in my head, noticed it would take me… 2.7 years, and then started cutting five at a time. Worked like a charm!
#3- Paint Your Shims I created a little spray paint zone in my basement and used all my leftover spray paint colors. When you’re painting, just make sure that you put half with the angle to the left and half with the angle to the right or you’ll be stuck with one sided arrows!
After they had dried I was left with this awesome assortment of color!! I used about 13 different colors, but I also think doing the whole project in various shades of one color could look pretty epic too!
#4- Make (or use) a Plumb Line Once we decided where we wanted our center point, we needed to get a straight vertical line to follow.
We took a nail, some bakers twine, and a socket to DIY a little old plumbline. Nail it in and voila!
#5- String Line your Vertical I love my string line… seriously, I use it all the time! We put it at our top and bottom marks (created using our plumb line) and then snapped that baby to give us a guide line.
#6 Determine your Pattern This step saved us major time. Use the floor to get your layout right and then installing it on the wall is a breeze. We wanted our pattern random and we wanted varying lengths and heights.
#7- Glue it on the Wall Rather than using 300 tiny nails (that could very easily splinter the shims) we opted for Gorilla Wood Glue. It was simple to use, will hold securely, and won’t damage my walls completely (the way liquid nails would).
Following our pattern, Jess glued and I placed the arrows. Shims are very imperfect, so I had to be okay with tiny gaps and just kept using the center line to keep things straight.
Even before it was finished, we knew we were obsessed with it!
We finished it off with some fun accessories and the coolest light fixture ever, and called it a day.

There were a lot of DIY elements around this project, so to find out details about other projects, you can check ’em out below., We’ll be posting more about them in the next few weeks, so just hold tight. 🙂
What do you think? Could you paint a piano green? Or glue shims to your wall?


Looks awesome – I love the bold colors and the fun details in this. Probably would never dare to do this in my home because I am such a chicken when it comes to my own house, ha ha!
Congrats on the TV show, this is great news. Too bad I can’t watch it here in Europe, so please don’t leave your blog alone too much =)
They have full episodes online. Well you probably know that by now LOL.
I love it! I may need to plan a knock off of your knock off now that it’s spray painting weather…
I absolutely ♥ ♥ ♥ this!!! Thanks for the tutorial! 🙂
This is amazing! I know the wall decoration was the point of the post and its beautiful but what really caught my eye was the fabric on your piano bench. Would you be able to tell me where I can buy it? I’m trying to figure out what color to paint my upcycle dresser project – your piano convinced me to go with the green chalkboard paint, and maybe putting the pattern from the bench onto the drawer fronts…
[…] about these babies! Check out the full post about them here. I also added a custom light to my living room/piano room and I think it’s what gives the room a high end feel. I think with just a generic side lamp, […]
[…] away!! If you missed all the fun details of my piano makeover and DIY Wood Shim Wall Art, click HERE for the full post with all the […]
I love the Wood Shim Art may just have to add it to my apartment wall. Since I’m short on a saw Ill just angle them so they lye on each other at 90 degrees at a chevron angle! Love it!!
Thanks Kellie!
I’m so glad you like it! Thanks for reading our blog! 🙂
[…] green piano and wood shim wall already has a lot of color, so I just added a simple garland and some primary balls. I love the […]
[…] Wood Shim Wall Art […]
I would love to know what’s the wall color on the after pictures. I’ve been looking for a light grey color just like that one!
[…] source […]
[…] Monica / eastcoastcreativeblog.com […]
[…] Monica / eastcoastcreativeblog.com […]
[…] Monica / eastcoastcreativeblog.com […]
[…] Monica / eastcoastcreativeblog.com […]
[…] Monica / eastcoastcreativeblog.com […]
[…] Retro diamond style here and wood shim style here. […]
[…] Monica / eastcoastcreativeblog.com […]
[…] Monica / eastcoastcreativeblog.com […]
[…] Monica / eastcoastcreativeblog.com […]
[…] Monica / eastcoastcreativeblog.com […]
[…] Monica / eastcoastcreativeblog.com […]
[…] Monica / eastcoastcreativeblog.com […]
[…] Monica / eastcoastcreativeblog.com […]
[…] Monica / eastcoastcreativeblog.com […]
[…] Monica / eastcoastcreativeblog.com […]
[…] Monica / eastcoastcreativeblog.com […]
[…] Monica / eastcoastcreativeblog.com […]
[…] Monica / eastcoastcreativeblog.com […]
[…] Monica / eastcoastcreativeblog.com […]
[…] Monica / eastcoastcreativeblog.com […]
[…] Monica / eastcoastcreativeblog.com […]
[…] Monica / eastcoastcreativeblog.com […]
[…] eastcoastcreativeblog.com […]
[…] You’ll love how wood shims can turn an empty wall into a modern work of art. Monica of East Coast Creative used 13 different colors for this project but believes using different shades of one color would also be amazing. The best part about this project: she used Gorilla Wood Glue, so no walls were hurt in the making of this project. Learn more about this no-nail wall decorating idea by visiting East Coast Creative, The Blog here. […]
[…] Monica / eastcoastcreativeblog.com […]
[…] Monica / eastcoastcreativeblog.com […]
[…] Monica / eastcoastcreativeblog.com […]
[…] Monica / eastcoastcreativeblog.com […]
[…] Monica / eastcoastcreativeblog.com […]
[…] Monica / eastcoastcreativeblog.com […]
[…] Monica / eastcoastcreativeblog.com […]
[…] Monica / eastcoastcreativeblog.com […]
[…] Monica / eastcoastcreativeblog.com […]
[…] Monica / eastcoastcreativeblog.com […]
[…] Monica / eastcoastcreativeblog.com […]
[…] Monica / eastcoastcreativeblog.com […]
[…] Monica / eastcoastcreativeblog.com […]
[…] Monica / eastcoastcreativeblog.com […]
[…] Monica / eastcoastcreativeblog.com […]
[…] Monica / eastcoastcreativeblog.com […]
[…] Monica / eastcoastcreativeblog.com […]
[…] Monica / eastcoastcreativeblog.com […]
[…] Monica / eastcoastcreativeblog.com […]
[…] Monica / eastcoastcreativeblog.com […]
[…] Monica / eastcoastcreativeblog.com […]
[…] Monica / eastcoastcreativeblog.com […]
[…] Monica / eastcoastcreativeblog.com […]
[…] Monica / eastcoastcreativeblog.com […]