
If you missed all the amazing projects of our first annual Creating with the Stars, be sure to check them out below!
————————————————————————————————————————–
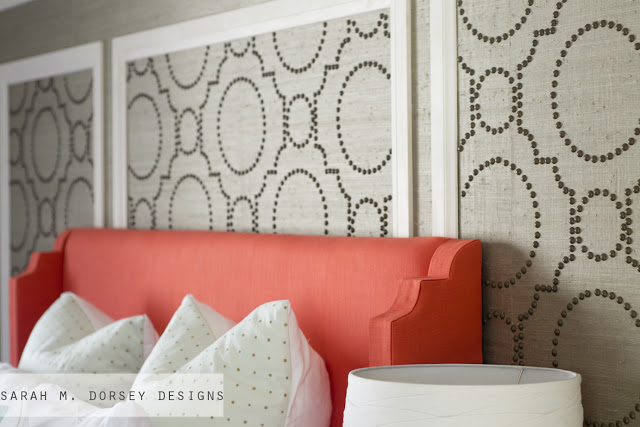
Sarah’s unbelieveable bedroom transformation blew us away. The color combinations, details and style of the room were simply perfect and we fell in love immediately. She had a few awesome tutorials for her projects, so we decided to break them into two posts. Today, you’ll see how she made that temporary accent wall that is a great solution for you renters out there, or those of you who have Design ADD like us! 🙂
When I heard that this week’s theme was home decor I instantly knew that I wanted to do a bedroom feature wall and a dramatic headboard! With my amazing diy partner and husband, David, we got straight to work!

Living in a rental makes it nearly impossible to install classic wallpaper and nailhead, so we decided to build a separate feature wall! We wanted to incorporate two of my favorite materials, nailhead and grasscloth wallpaper. I love the texture of the wallpaper and the dimension of the nailhead!
Want to know how we built the wall? Here we go!

We purchased three sheets of plywood from Home Depot and had them cut to 7′ high. Since the feature wall is 12′ long, it would need to be built inside of the room. We designed it so that it could easily be dismantled into three pieces to be removed. We tied the seams together with 1x3s and built a frame on the back with 1x3s so it was extra sturdy and straight. We then flipped it over and primed it so that they wall paper adhesive wouldn’t soak in.

Once dry, we cut the wallpaper to the correct height, placed it to the side and rolled wallpaper adhesive over the primer. We then used a wallpaper smoothing tool to remove any bubbles. The steps were repeated with 4 rows across, lining up the seams. It was helpful to have two people so that it could be adjusted as needed!

For the design, I was inspired by this fantastic headboard by Annie Selke. We created the design in Illustrator, and calculated the distance between the nailhead and printed it on two sheets of 11×17 which were taped together. We then punched little holes through the dots and used a felt tip pen to lay it out on the wallpaper.
Nailhead isn’t the most fun thing to apply, but once you hit a rhythm you move pretty fast! Here are a few tips that I found helpful as I went.
1. To help protect my fingers from the hammer and to grab the nailhead more easily, I used rubber finger tips on my thumb and index finger (you know the ones that they sell in the office supply stores for sorting paper and such?) When I did hit my fingers, it hurt a lot less, and they weren’t even sore when I was done!
2. If your wood is soft enough, push a few in with your finger first and then hammer. This saves time since you are putting the hammer up and down less frequently. Since our plywood was soft and hard in different spots, this wasn’t always possible, but it helped when we could!
3. Lastly, this feature wall took about 2,250 nails. Wow, that’s a lot of nails! So it was helpful to have two people or if you have the time, break it up over a few days. Total install time for the nailhead with two people was about 8 hrs.

It was helpful to install the trim (we painted first) before the nailhead reached the edge, so we knew exactly where to stop it. We used finish nails to secure the trim and then filled the holes with wood filler, sanded and painted once dry.
Next, we decided that we wanted the wall to sit just above the trim, so we cut legs to height out of a 1×12 and secured it to the back frame. We then installed a few cabinet anchors through the trim into the wall to make sure that it was firmly attached.
This wall was pretty massive! Almost the length of the room, but I LOVE the impact that it has on the space! Just because we are renting doesn’t mean that without a little creative thinking we can’t have a statement wall!


I mean, c’mon. That is genius, and we don’t mind saying we wish we had done it first! Ha! Check out Sarah’s fabulous blog, and then come back tomorrow to learn how to make that coral headboard!
Oh yeah! One more thing! Have you linked up your favorite home decor project yet? You can do that here for a chance to be featured on EC2 and win some great prizes. Fun for everyone! 🙂


I just love that accent wall – and since I saw it on her blog yesterday, I have been wanting to have one too… now, reading about the 2000+ nails scared me a bit 😉 I might need the help of the duracell bunny for it.
Still, so much dedication to a room is marvellous!
When I started, I wasn’t exactly sure how much nailhead it would take and was surprised! While definitely not the fastest project, it was surprisingly manageable, I would recommend enlisting a little help or breaking it up over a few day though!:)
that is gorgeous. I almost want to do it. but those 2000 nails ugh.
Thanks so much Erin! Looking back, I may of opted for the nailhead strips and a straight design. That would be a good time saver with a similar look!
WOW! I did not realize during voting how muhc went into that project. Seeing more photos and reading about the process I am sooooo impressed! I loved the headboard but I didn’t pay much attention to the accent wall. I love it!
LOVE it all, Sarah! the contest was super fun to see such great designs. i have been stuck with great furniture and no decor beyond that for six years since moving into our home… thanks to your blog and the girls at east coast creative – i feel like i am finally inspired (and by that i mean copying your great style!) =) thanks.
Hate to use an overused word…but AWESOME is the best word to describe it! Beautiful idea and beautiful job!
Absolutely amazing! Freakin’ fanatastic! Sarah, you ROCK!!
Wow. I seriously love this!! As a fellow renter, I now feel like I have no excuses for lame, boring rooms! 😉 Thank you for such great ideas. I LOVED this space and voted for you. I’m thrilled to read more on your blog, Sarah! Congratulations!
P.S. Hey EC2 girls! 😉 Hope y’all are having a great week!
That is so impressive! Just curious, any idea what this project cost? I love it!
[…] you look closely at the temporary accent wall she designed, you will notice the nails that Sarah used to create her pattern with… about […]
[…] 2. Create an Interesting Accent Wall Project via Hometalker Monica @East Coast Creative Blog […]
[…] Project via Hometalker Monica @East Coast Creative Blog […]