

We loved Amanda’s project this round because they did some things we’re totally into… Everyone knows I have a thing for yellow (check out my yellow dining room buffet here). We also use our projector any chance we get (check out Jess’ gigantic shaped frame), and we just love that they were willing to stage their garage to get the PERFECT look! Well, it paid off, Amanda! Now, tell us how you made this awesome painted wall mural and dresser happen…
—————————————————————————————————————-
I have to admit, I was pretty stumped with the paint round at first. I’m not super creative when it comes to thinking up wall art or paintings, and I didn’t have a lot of ideas in mind for what I could do. But then, I remembered this little guy sitting out in my garage: 
Corey and I have had this Bjursta sideboard from Ikea in our garage for a few weeks now – my sister was getting rid of it and asked if I wanted it, and I rarely turn down free furniture, so I said yes even though I didn’t really have a plan for it. Corey and I figured it could live in our garage when we convert it into a family room (which we fully plan to do ASAP!), but that was the end of the plans we had for it. So, after a brainstorming session one night, Corey and I landed on a plan – we’d give this guy a makeover and set it up in a high-contrast room. The goal was punchy, modern, and fun. After some debate, we landed on this color palette, with paint from Home Depot.

(The colors are Sunny Side Up by Behr, Cordite by Home Decorators Collection and Totally Black by Home Decorators Collection)
We started off with a black wall… 
We just painted one of the walls in our garage for this particular project – down the road once we convert it, we’ll probably do the rest of the walls black as well (or 1-2 black and the rest white), but I didn’t want to go there yet. So, if you back up from our shot a little bit, you’d see…  Just Keeping it real, y’all. For contrast, we picked out a super rich, mustard yellow for the sideboard.

Just Keeping it real, y’all. For contrast, we picked out a super rich, mustard yellow for the sideboard. (Obviously this is not the finished sideboard – just with one coat on it! Just a reminder that things look crazy before they start to look good!)
On the walls, we originally planned on just hanging a gallery wall, but when I got the idea to paint a world map on it, we knew it was the way to go. We pulled up a good map online and used our projector to get it up on the wall.

I was surprised by how quick it was to get the map painted – we just used some small paintbrushes and I outlined while Corey filled in. It took about an hour and a half from start to finish, which is way better than I expected. 
(Yes, we do DIY projects in our pajamas. Don’t you?)

Once everything was all finished and dry, we decided the sideboard needed a little something extra. So we grabbed some paint in the same color but a different finish (the main part is high gloss, the details are flat), and used the projector again to add some numbers. It’s a super subtle detail, but we love that about it – when you’re looking from straight on, the map is totally the star. But if you shift yourself a little to either side, the numbers suddenly jump out at you. 

 After the numbers were finished, it was just time to style! We added an Ikea rug to hide the concrete floor (and to add some pattern)…
After the numbers were finished, it was just time to style! We added an Ikea rug to hide the concrete floor (and to add some pattern)…
..added a lamp for some height…
.  ..
..
..…and then we finished it off with a few accessories and books. And it looks a little something like this:


I’m pretty head over heels with this little set-up, and I’ll admit – I’m sad it’s in our garage because I can’t gaze at it every day! But, hopefully we’ll be able to tackle the rest of this room pretty soon and I can go stare at it anytime I want to!
———————————————————————————————————————
Talk about dramatic! Amanda’s garage is now the prettiest one we’ve ever seen! It has been so much fun to browse Amanda’s blog. One thing that caught our eye is this China Cabinet makeover. The chalkboard paint is such a fun surprise at the back and we loooooove that hardware.

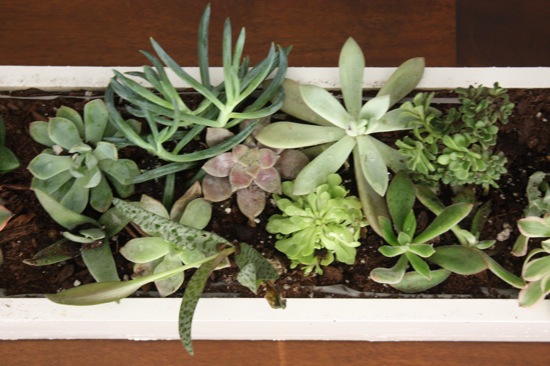
Plus, this little table-length succulent trough is too cute!
We have two more awesome tutorials from Melissa and Sarah tomorrow and Saturday, so be sure to come on back. Also, if you haven’t linked up your favorite paint project, you can do that until tomorrow at 10 PM EST. We LOVE seeing all the incredible things you guys do in your homes! We’ll pick our favorite and feature it here on EC2 on Sunday!


wow, that turned out fabulously, love that yellow!
Follow Coffee Beans and Bobby Pins on Bloglovin’
L.Mae Boutique Giveaway!
That was an excellent before & after. You went bold with that yellow & it turned out to be the perfect choice. Great job!!!
That was an excellent before & after. You went bold with that yellow & it turned out to be the perfect choice. Great job!!!