
One of the most fun parts of the Creating with the Stars contest is getting to see the fun projects linked up in our weekly link party! The girls in this contest are seriously talented, but guess what?! So are YOU! If you want to get a burst of inspiration, check out the fab upcycle projects that were linked up right here.

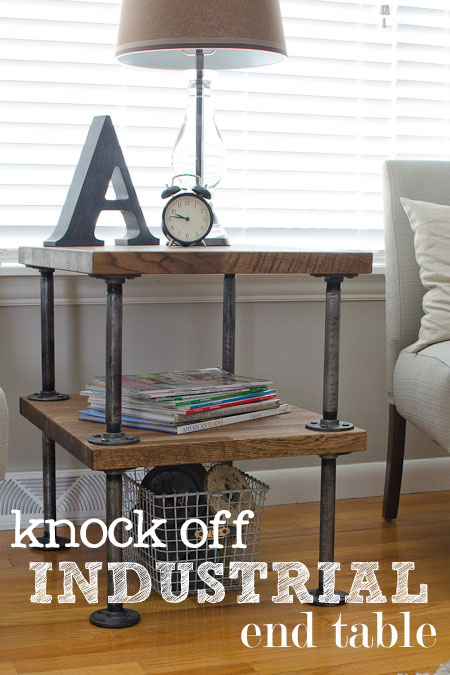
We were immediately drawn to this end table when we saw it in the party since we’re both HUGE fans of rustic industrial style furniture. Allison from The Golden Sycamore put some serious effort and time into this piece and it tells! It’s absolutely gorgeous! Well done, girl. 😉


As I mentioned a few weeks ago on my blog, I’m really into the industrial look right now. I seriously can’t get enough of it! While I was playing around online one day, showing my husband all these cool industrial tables, he got an idea in his head : Why not build one ourselves? One thing led to another and now we have our own custom industrial end table for our living room! (You can see the reveal post {here}). This was our inspiration for the table …
My husband and I are really happy with how our table turned out and I’m excited to share this project with you, but I want to warn you, this particular DIY project is not for the faint of heart. This project is a bit of a process and can be dangerous if you don’t know what you’re doing and aren’t careful. PLEASE do not attempt this unless you feel very confident in your abilities. Please be sure you take all safety precautions when using a power tool or dangerous chemicals or objects and read the instruction manuals before using them. I am not a trained professional. If you are uncertain, please consult an expert before attempting this or any projects on this blog. I will not be responsible for any injuries or damages caused by any attempts to recreate this or any projects posted on this blog.

Alright, now that that’s out of the way, onto the tutorial. Aging Galvanized Metal

SUPPLIES:
8 – 3/4″ x 10″ galvanized pipe ($29.60)
16 – galvanized floor flanges ($116.16)
48 – 1/4″ x 1″ galvanized lag screws ($22.08)
HCl / toilet bowl cleaner
Plastic container
Small map gas torch ($41.97)
Heat safe gloves ($4.46)
Vegetable oil Beeswax Metal pan
Metal pliers
PROCEDURE : Start by putting your galvanized metal plumbing supplies in a plastic container. Add enough HCl / toilet bowl cleaner to cover all the metal and let sit for 2-3 hours. This process will remove the zinc coating off the galvanized metal. **DO THIS PART OUTSIDE OR IN A VERY WELL VENTILATED AREA – YOU DON’T WANT TO BE BREATHING THESE CHEMICALS IN!! (This is a picture of the screws in toilet bowl cleaner. We did them separately, but you can just put everything together.)

After a few hours, rinse all your metal pieces off. Pour some vegetable oil in a metal container. Wearing heat safe gloves and holding your piece of metal with a pliers, heat metal with torch until it is hot enough that it turns orange. Once it is thoroughly heated, dip in vegetable oil. Then reheat the piece of metal to orange hot. Once it is hot enough, set in oil to cool for about 30 seconds. **AGAIN – USE CAUTION. DO THIS PART IN A SAFE AREA AND HAVE A FIRE EXTINGUISHER NEAR BY IN CASE OF FIRE!!


The metal will still be very hot, so take the piece of metal out of the oil with a pliers.

Cool the metal with water.

Once it’s cool to the touch, scrub off burned oil residue with water and a wire brush.

Lightly heat metal again with torch (about 30 seconds) and coat with beeswax. Once coated, rub with cotton rag while still warm.

Let cool before handling. Metal will still be hot for a while.

And that’s it! Haha! I know the process is intense, but if you really want the aged look, it’s worth it! Here is what your finished product should look like. Repeat process for all your pieces of metal.

Now onto the wood shelves.

SUPPLIES:
1 – IKEA Numerar oak butcher block countertop ($129.00) – we used a little over half the length, so the cost of what was used was roughly $70
Tape measure and pencil
Circular saw
Straight edge
clamp
Router
Orbital sander and sand paper
Stain
Silhouette Cameo and stencil
Paint and paint brush
Mineral oil
PROCEDURE: Start by measuring your Numerar butcher block to the size you want your shelves and mark where to cut. Our shelves measure 19.5″ wide x 24″ deep.

Set up your straight edge clamp so that your saw will cut on your measured line. You’ll probably have to set it to about a half inch over to allow for the width of the saw.

Cut butcher block with circular saw. Repeat this process for second shelf.

Run orbital sander along the edges to ensure a smooth finish. Then router the edges of each shelf – remember to do the top and bottom sides to keep the look cohesive.

With your orbital sander, sand the finish off the top and bottom of both shelves.

Using Minwax Dark Walnut stain, wipe on stain and immediately wipe off to get a slightly darker color, but not too much penetration. If you desire a darker stain color, either leave the stain on longer before wiping off or apply more layers of stain to darken it.


I don’t have pictures of this part, but if you wish to add numbers to your top shelf, here’s how to do it. Choose the style and size of numbers you want and cut them out using your Silhouette Cameo. If you don’t have a Cameo, you can always print numbers out on your printer and then cut them out by hand. Once you have your numbers, arrange them on the shelf the way you want them and then trace around them using a white or black colored pencil. Once your numbers are traced, use craft paint and a small paint brush to paint inside the lines. Let paint dry and sand lightly with sand paper to desired distressed look.

Once you are done with your numbers (or if you skipped that step) wipe both shelves with mineral oil (or some other sealant like wax or polyurethane) to seal the shelves.

Now to put it all together. SUPPLIES: Drill Wrench or impact driver All your metal pieces Both shelves Level PROCEDURE: Drill pilot holes in each shelf. You’ll drill four holes per flange. Drill holes in the bottom of the top shelf. The bottom shelf will get holes drilled in both sides – top and bottom. Make sure to stagger your holes on the bottom shelf so that they don’t meet up with each other through the wood. Using your wrench or impact driver, on the bottom shelf, attach 4 flanges with your lag screws on the top side of the shelf. Screw pipe into the four flanges. Attach flanges to the bottom of the top shelf with lag screws. Screw those flanges to the pipe that is already attached to the bottom shelf. Attach flanges to the bottom side of the bottom shelf. Screw pipe into flanges and screw final flanges to the bottom of the pipe – these are the table’s “feet”. Check to make sure the table is level. If it isn’t, screw or unscrew pipes until the table is level. 
Alright, if you’ve made it to the end of this post, I applaud you! I told you it was intense! I definitely can see why our inspiration piece was almost $700! Not only are the materials relatively expensive, but it is also quite labor intensive! In the reveal post, I said that the table cost us about $300 to make. We had a lot of the tools on hand, but we had to purchase most of the supplies. In this post I’ve added up the supplies we bought and calculated our total cost (using about half the countertop cost since we can use the remainder of the countertop for another project). The total came to $284.27. If you add MI tax, it comes to $301 and some change. That’s a pretty good estimate on our part, if you ask me! 🙂 If I didn’t explain something well enough or you have any questions, PLEASE feel free to ask! I’ll do my best to help you out! Thanks so much for reading my loooong tutorial! 🙂
————————————————————————————————————————–
Isn’t that incredible?! Seriously, so good. Thanks for linking up, Allison! Don’t forget to check back at midnight tonight to see the Contestants Round 3 projects!


That looks incredible! What an effort–well done!
yay! Congrats Allison!