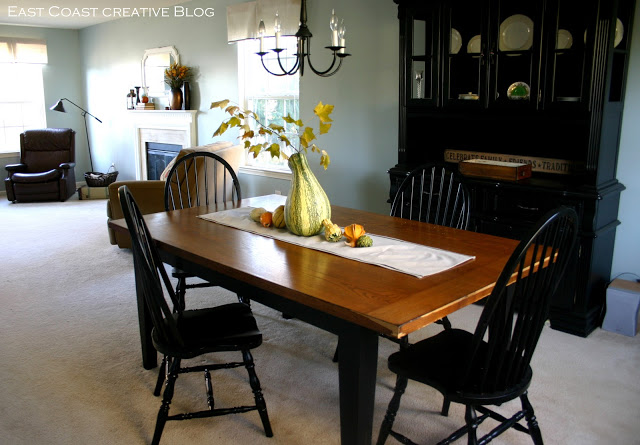
Oh goodness, this dining room is taking forever to finish! I’ve been working on it for the past several months as money and time have allowed, and we’re definitely in the home stretch, but it’s the little things that are making me crazy! I’ve already showed you the side table I made over, and the planked wall with exposed studs accent wall we created, which really helped change the feel of the whole space. But let’s be honest, one of the most obvious things that had to change to fit the whole “coastal/cottage” vibe I’m going for was the dining table.
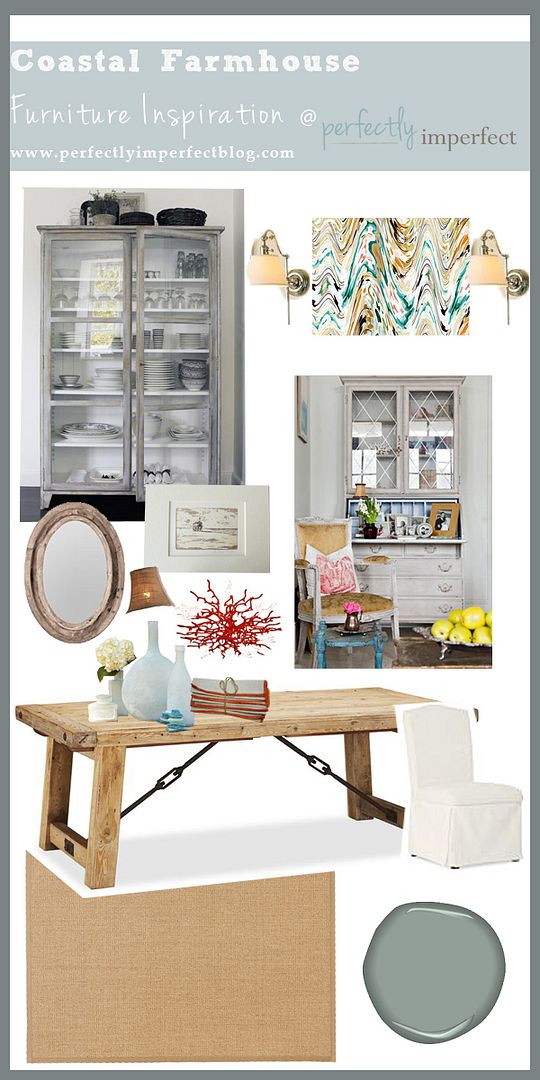
It’s a nice, solid wood table that my hubs and I bought for only $60 (yes, you read that correctly!) when we first moved into this house. I was so over the black hutch and the finish on this table, but it’s functional piece so I didn’t want to buy a new one. I haven’t done too much furniture refinishing, so I asked my bloggy pal and furniture expert, Shaunna, if she could make some recommendations as to what I should do to change them up to fit my style. Not only did she come up with some incredible furniture ideas, but she dreamt up an entire inspiration board for my room!

Isn’t that amazing? I love so many of her ideas, and hope my room turns out half as nice as her dream room! 🙂 So with her help, I started out refinishing the table. The first step was to remove the legs of the table and give them a good painting with Annie Sloan Chalk paint, aka my new love.. I decided to paint the legs in French linen, and then once that dried, did a wash of Pure White over top. That was the easy part.
The table top….not so easy. I started off by sanding the top with 60 grit sandpaper and my palm sander. It was so difficult getting through all the layers of whatever they sealed it with that it probably took me a good hour and half to sand it all down.
I almost didn’t mind, though, because what I saw as I was sanding made me super excited! I loved the look of the unfinished wood and the wood grain that began to show.
Even with all the sanding, I still didn’t feel like I had removed all of the old finish, so I brushed on a layer of CitriStrip. Basically, you brush it on and leave it for the recommended time. Then, you wipe it off with a lint-free cloth and with it, off comes the finish! This sanding/stripping method really worked to get my table back to it’s gorgeous, unfinished state.
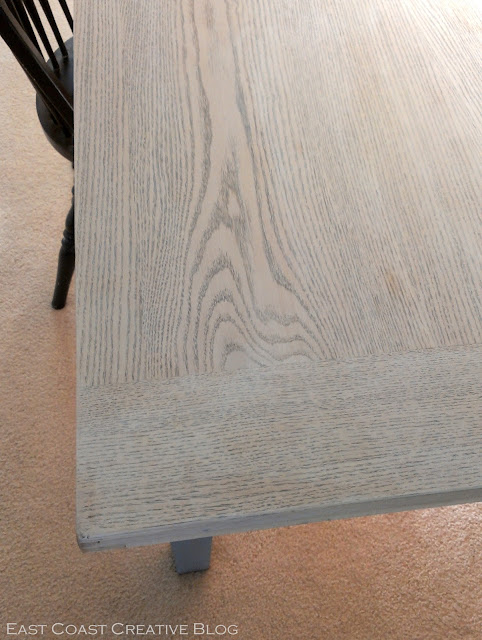
Shaunna recommended that I try white-washing the table with Pure White chalk paint, so that’s what I did. If you’re unfamiliar with white-washing, it is an awesome way to keep the character of a piece, while subtly adding a touch of color to it. Basically, you add water to paint until it’s the intensity you want. More water = less concentrated color.
I really wanted the grain of the wood to show, but I didn’t care for the peachy color of the wood, so I went with a very watered down white wash.
I brushed it on, and then wiped it back with a paper towel. Because my wash was mostly water, I had to wipe it immediately after I brushed it on because it was drying very quickly. Wiping the wash back helps brings the color of the grain out, which gives it a very reclaimed wood finish.
After I washed the whole table, I was over the top giddy mildly pleased with the results.
I can’t get over how well the table now fits in my dining room! It’s like it was meant to live in a coastal cottage all along.
The final step is sealing it with Annie Sloan Clear Soft Wax. Because this is a surface that will get lots of wear, since people will eat and drink there, it will need three coats of wax. I’m planning on doing that this week, but that’s the kind of little detail (that makes a big difference!) that I don’t want to do. Any one out there want to come finish my table? Please!?!?
Not bad for a $60 table, huh? 😉


nice work, Jess!! We stripped & sanded our big kitchen table a few years ago – it’s such a long process! But it totally transforms the space 🙂 I’m loving how bright & airy your dining room is becoming!
Thanks, Christina! Yes, it’s an unbelievably long process, but thankfully I’m nearing the end. Fingers crossed that I actually EVER seal the table. 😉
Have a great day!
Jess
Beautiful! give the room a whole new look!!
Thanks, Rebecca! Thank goodness it’s a drastic difference considering all the hard work that went into it. 😉
Thanks for reading-
Jess
It looks amazing!!!! I’m LOVING the whole room!
🙂
xoxo,
shaunna
All thanks to you, Shaunna! I SO appreciate all your help. 🙂
Jess
The table looks amazing!! Actually, the whole room is awesome … I wish my DH would be more open to me refinishing some of our furniture in a white wash/cottage look. I think I am going to start in the kids playroom … it might not be such a drastic, in your face kind of change for him and maybe he will like it? 🙂
Beautiful work!!
I say go for it! My hubs is always so skeptical about my projects, but once they’re done, he usually loves it! But don’t tell him I told you to do it. 😉
Jess
I’m loving your wall in your dining room!!!! Waaahooo! I have never white washed anything but it looks doable 🙂 Oh the sanding would have killed me but it looks so good now that you have the white paint on it. The room is coming together nicely 🙂
Thanks, Jessica! It’s finally resembling the room I had been seeing in my head!
Thanks for stopping by. Hope you’re well!
Jess
I could give you another dining room to re-do on a budget! I l.o.v.e. the way that came out! beeeeutiful. Seeing the after pictures make it hard to believe the befores, not to say I’m doubting at all, it’s just that stunning a transformation. And all that hard, physical work. I haven’t done stuff like that for ohhh, 30 yrs.? I commend you, Jess.
Janet
Thanks so much, Janet! So glad that it’s behind me now and I can concentrate on decorating the space!
Have a great night!
Jess
Amazing transformation, it looks right at home now. As for the waxing, that is nothing after what you have already done, it is simple, you can’t mess it up, and it makes a big difference, just go for it!!!
Very ambitious!! I’d love to know how the wax turns out…i have to strip and sand my kitchen table top and am anxious about a top finish that is able to withstand the wear and tear of kids. Question: is there a reason why you didn’t use the stripping gel first? Just curious so I know how to go about my project:) Thanks!
What a great transformation! It’s good that you also have a wide imagination on what you want to do with your furnitures. I am thinking now of refinshing my old furnitures! Good job! – colonialrestorationstudio.com
Wow! Very nice table. It was indeed a very good job. I wish i can have time to refinish my old furnitures too. 🙂 – http://www.colonialrestorationstudio.com
I Am loving the all pitcher and walls everything is perfect.That is great Post and nice pitchers you products.
All disgn are very beautiful and very clear.
Regards:
johncuttsrta
This dining table looks absolutely gorgeous, simple but gorgeous.
[…] Source: East Coast Creative Blog […]