
We were really lucky to have had two major statement art pieces in our most recent Nate Show thrift store room makeover. Monica posted yesterday about the roofing material art using our Royal Design Studio stencil that I was absolutely 100% sure would be a fail confident would turn out amazing. Really, they were just so cool. But our other major piece of art was super easy and looked amazing above our dresser turned buffet.

If you see a big frame, BUY IT! There are so many things you can do with them, and large frames are hard to come by, for sure. We couldn’t believe our good luck when we came across this huge frame at Liberty Thrift Store. At 25 bucks, it was definitely a splurge, but a frame this size would cost you 3 times that much (or more) at Michael’s, and we knew it would help fill the empty wall space in our on-set white room. This is what it looked like at the store:

Eeeek!That thing was begging us to take it home and cover it up with fabric. I honestly can not EVER imagine hanging this scene up in my home (no offense to any of you who have something similar hanging on your walls!).

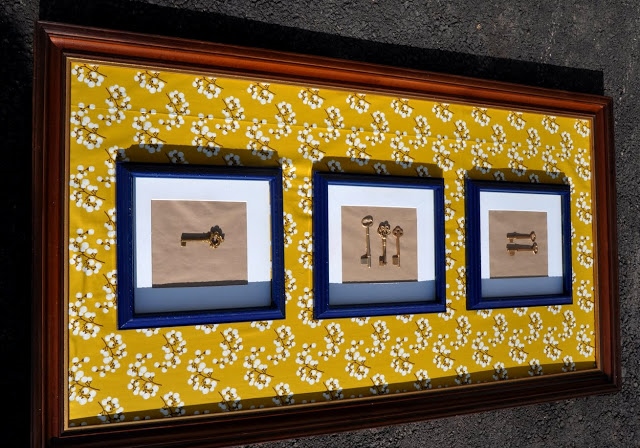
We purchased the fabric at Joann’s because, well, we loved it, but also because it played nicely off of that mustard yellow couch (which, quite honestly, we hated! But you work with what you have and it was the best option at the thrift store that day.) This project took a little more than a yard of fabric, spray adhesive, spray paint, stain, hot glue and craft paper. We also came across three of the same kind of frame, which we immediately snatched up so no one else could get their hands on them. I mean that literally. Another tip: if you find three frames that are exactly the same, BUY THEM! You won’t be sorry. And make sure you look past their color, and the picture in the frame- that can all be easily changed!

We started out by removing the picture and staining the frame a dark walnut. While that dried, we cut the fabric so there was about an inch or a little more extra all the way around. Then we sprayed the entire front of the existing picture with spray adhesive and gently laid the fabric down, making sure to smooth out the bubbles/wrinkles. If you’re trying this with a frame, be sure to have an extra set of hands- it makes it so much easier! The extra fabric was stapled on the back side of the picture. In the meantime, we spraypainted the small frames in the same high gloss navy that we used on the dresser.

We were able to salvage the mats from the old pictures in the small frames, which saved us loads of time. Woohoo for the small things! We then lined the back of the mats with craft paper so that we’d have a nice solid background to highlight our antique skeleton keys.

I messed around with the layout of the keys for a loooooong time a few minutes before I settled on the perfect layout. Speaking of the keys…

……aren’t they awesome? We actually had these keys from a previous shopping excursion at Architectural Antiques and were thrilled to use them in this project. They added so much character to this somewhat modern piece of art! Architectural Antiques is just one of the best places to find cool, old stuff in Bucks County. (If you’re local, you HAVE to go there.)


From salvaged windows and doors, to old hardware and keys, to antique mantels and loads more, they have some incredible stuff! Anyway, we mounted the keys using our trusty hot glue done and voila! She was finished.

Pretty sweet, right? We sure think so! (And so did Nate! 😉


LOVE it! This is a great piece of art and I love the fabric you picked; looks great with the navy frames.
That was my favorite part of the room!
love it! That fabric is so pretty.
LOVE the skeleton keys! I will definitely have to check out Architectural Antiques, that picture of all the corbels on their website has be brain going crazy with ideas. 🙂
Painting is one of my hobby. You share such nice and beautiful art with us. Its best part on room. As well as Its look very rich and great. Keep it up.