We’ve been making some slow and steady progress on our hallway bathroom redesign (see my game plan
here), but it feels like the eternal job. This is because of two things: we’re making sure all the funds are in place (even though this is a small job, we still want to be smart with our money), and I’ve been searching for all the right pieces. Here’s what we started with:
Not the worst bathroom you’ve ever seen, but it definitely had lots of room to improve. I’m so excited about this bathroom because it will be the very first room in our house that will be completed in the coastal/cottagey (neutral colors, weathered materials and warm wood tones) direction I’m heading in. I finally feel like I know what my style is, and now am taking baby steps to get my house in line. We started by breaking down the process into steps:
Step One: Prep the Area
First off, we had to take down that plain jane mirror and remove the builder grade vanity.
My he-man hubs cut through the caulk around the countertop with a razor and after that, just lifted it right off.
Removing the behomoth vanity came next. This was a bit tricky because we didn’t have a clue how to didn’t want to turn the water off completely to the entire house (he turned the water off locally, of course, though). After a bit of debating, Kevin decided to cut a small hole around the pipes with a jigsaw so that we could lift the vanity up and over the pipes.
Can you even believe the color of the walls behind the mirror? When we moved into this house 4 years ago, this was one of the first rooms we painted. The color was just unsettling. Still is, as a matter of fact.
Uh-oh. This was so not a happy moment. Actually, as we were pulling the vanity out, I said to the hubs, “I really hope the wood floor continues to the wall under the vanity.” Ugh. It did not, and so, this project just got a little trickier.
Thankfully, the previous homeowners kept a few extra planks of wood flooring, but no matter what we do, there’s going to be a difference in the staggered pattern of the floor where the vanity used to be. It’s a good thing I don’t care about everything being perfect. Why sweat the small stuff, you know? The final part of the prep stage was spackling and sanding the walls, and applying the base coat of paint to the walls (Olympic Quill color-matched in Valspar Premium from Lowes- A warm neutral gray.)
Step Two: Beef up the Moulding
This is a very simple and inexpensive designers trick that makes a world of difference. Some homeowners (ahem! Monica) are fortunate enough to have chunky baseboard trim, which just has a high-end, finished look, but we are not so fortunate. So, why not fake it? We bought 32 feet of half-round trim- enough to go around the entire bathroom, plus a little in case we made any mistakes. Then we took a piece of wood we had laying around to use as a guide (this is a must! It makes the whole job sooooo much easier).
Our piece of wood was roughly 3.5 inches tall. Cut the half-round so that it has nice corners that will match up using a mitre saw.(You can find loads of tutorials online that will teach you how to use a mitre saw and make the right cuts.) Place the wood on the top of the existing baseboard trim, lay the new cut half-round trim on top of that, level and then shoot in a few nails using a nail gun.
Next, use paintable caulk to fill in any gaps, and wood filler to fill in the nail holes. Finish with primer (ok, we did not do this because we NEVER prime, but you should do as I say, not as I do. We are such rebels. :), and a fresh coat of white trim paint.
Voila! Chunky and fabulous.
Step 3: Paint Stripes
I’m not going to go into detail about this step, because we followed the exact instructions for
painting the perfect stripe. I decided that we would paint a total of 3 stripes, and the middle stripe would be the darker color (Olympic Stormy Weather, color-matched in Valspar Premium)
The perfect stripe method worked perfectly! No bleeding at all. This picture does not do either color justice. They both lean towards gray, but are still warm like a neutral tan. I’m seriously in love with both of them, and am now contemplating painting the hallway/foyer one of these colors as well.
Step 4: Make a Huge Mess (Optional)
This is what our hallway currently looks like. How long can one live like this and not go crazy? We are are trying to figure out the answer and will fill you in. You’re welcome.
Step 5: Install New Lighting
It’s awesome and huge, but there’s just one problem: Because it’s an outdoor light, the recommended max wattage is 60W. That makes for a very dim bathroom. I’m not giving up on this light, though, because I’m basically already married to it. I’m toying around with adding additional lighting somewhere else, and switching out the bulb to a 75W bulb (I’m a rebel, remember?)
See how there’s almost no light shining above the fixture? Any suggestions?
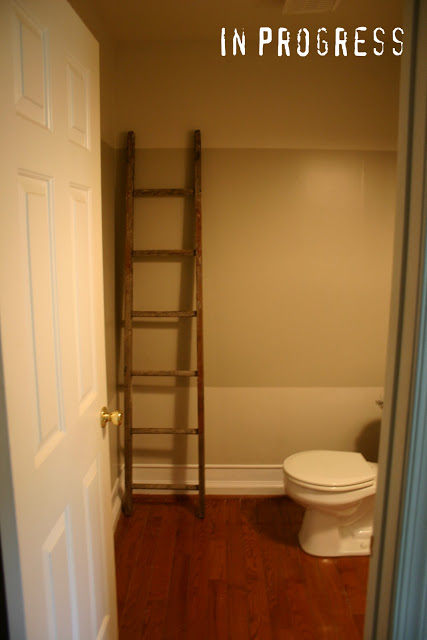
Here it is, as it stands today:
Lovely beefed-up trim.
Gorgeous stripes in neutral colors. I just had to throw my
old ladder in there because I’m so impatient. And guess what? It’s a keeper.
Wheeee! I’m totally loving it so far.
To Do List:
1. Add crown moulding. We’re holding off on this until we can get a friend to help since we’ve never done it before and we’ve heard it’s pretty scary.
2. Fix the flooring under the vanity and install baseboard in that area.
3. Paint and apply an antique glaze to the mirror.
4. Figure out the vanity situation.
5. Accessorize! (My favorite part!)
So, it’s slow and steady progress, but it’s progress nonetheless!
Happy Thursday,
————————————————————————————————————-
A big welcome to our newest sponsor, Dream Dinners in Colmar! If you don’t know about Dream Dinners, your life is about to get a whole lot better. Save 10% on your first order, when you use the code DDNC201110. Head on over and check it out!
————————————————————————————————————-


I am loving the beefed up trim! What a great idea!!! Can’t wait to see the end results.
Looks great so far!
Lookin’ good so far! Can’t wait to see the final reveal.
Love the paint color and the baseboard trick. I would paint the quarter round white too. It would make the great baseboards look amazing:)