

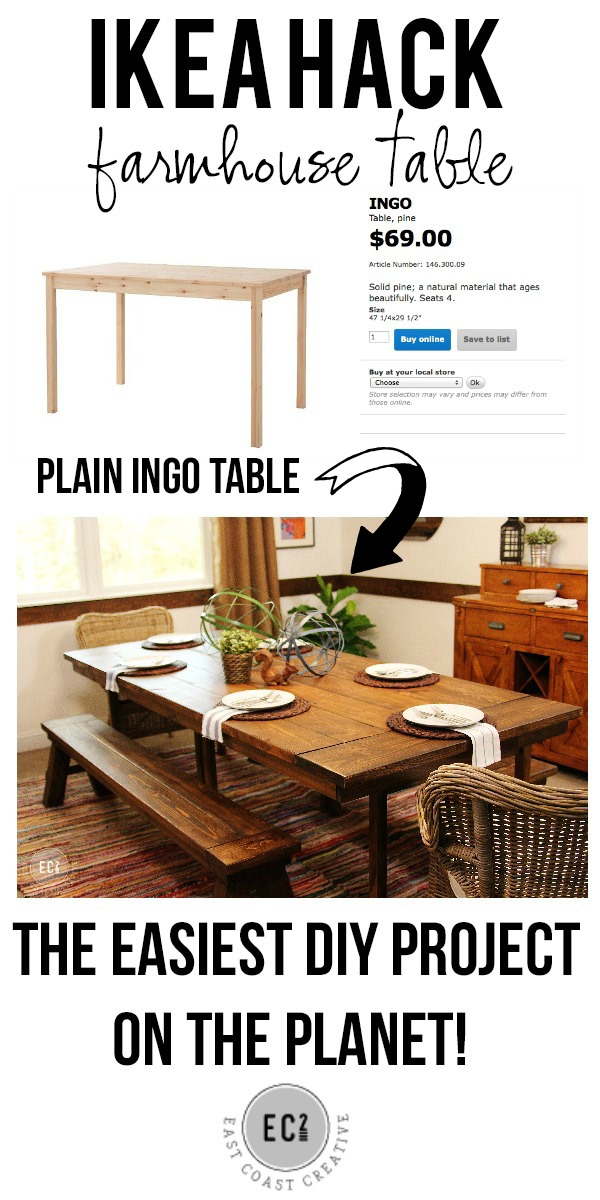

Ikea Hack: Build a Farmhouse Table (the easy way!) This project is not new to East Coast Creative Blog, actually it is one of our most popular posts of all time and it came way back when we first started the blog. Since now we have much prettier pictures, I’m going to give you all the steps and details here, but if you want to see the original Farmhouse Table that resides in my dining room, well check out the post here. It has a bit more of a modern flair than the traditional, rustic farmhouse style we did for this episode of “Knock It Off”. 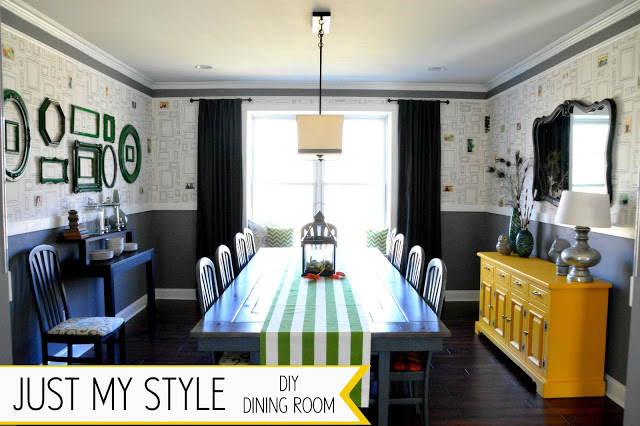 I’ll walk you through each step of the project, but since this is our most popular DIY project-I’ve created a printable materials checklist. It has all the wood measurements, tools, my stain recommendations etc, so you can print it out and take it to the hardware store. I like things Easy Peasy! Use the button below to download your checklist.
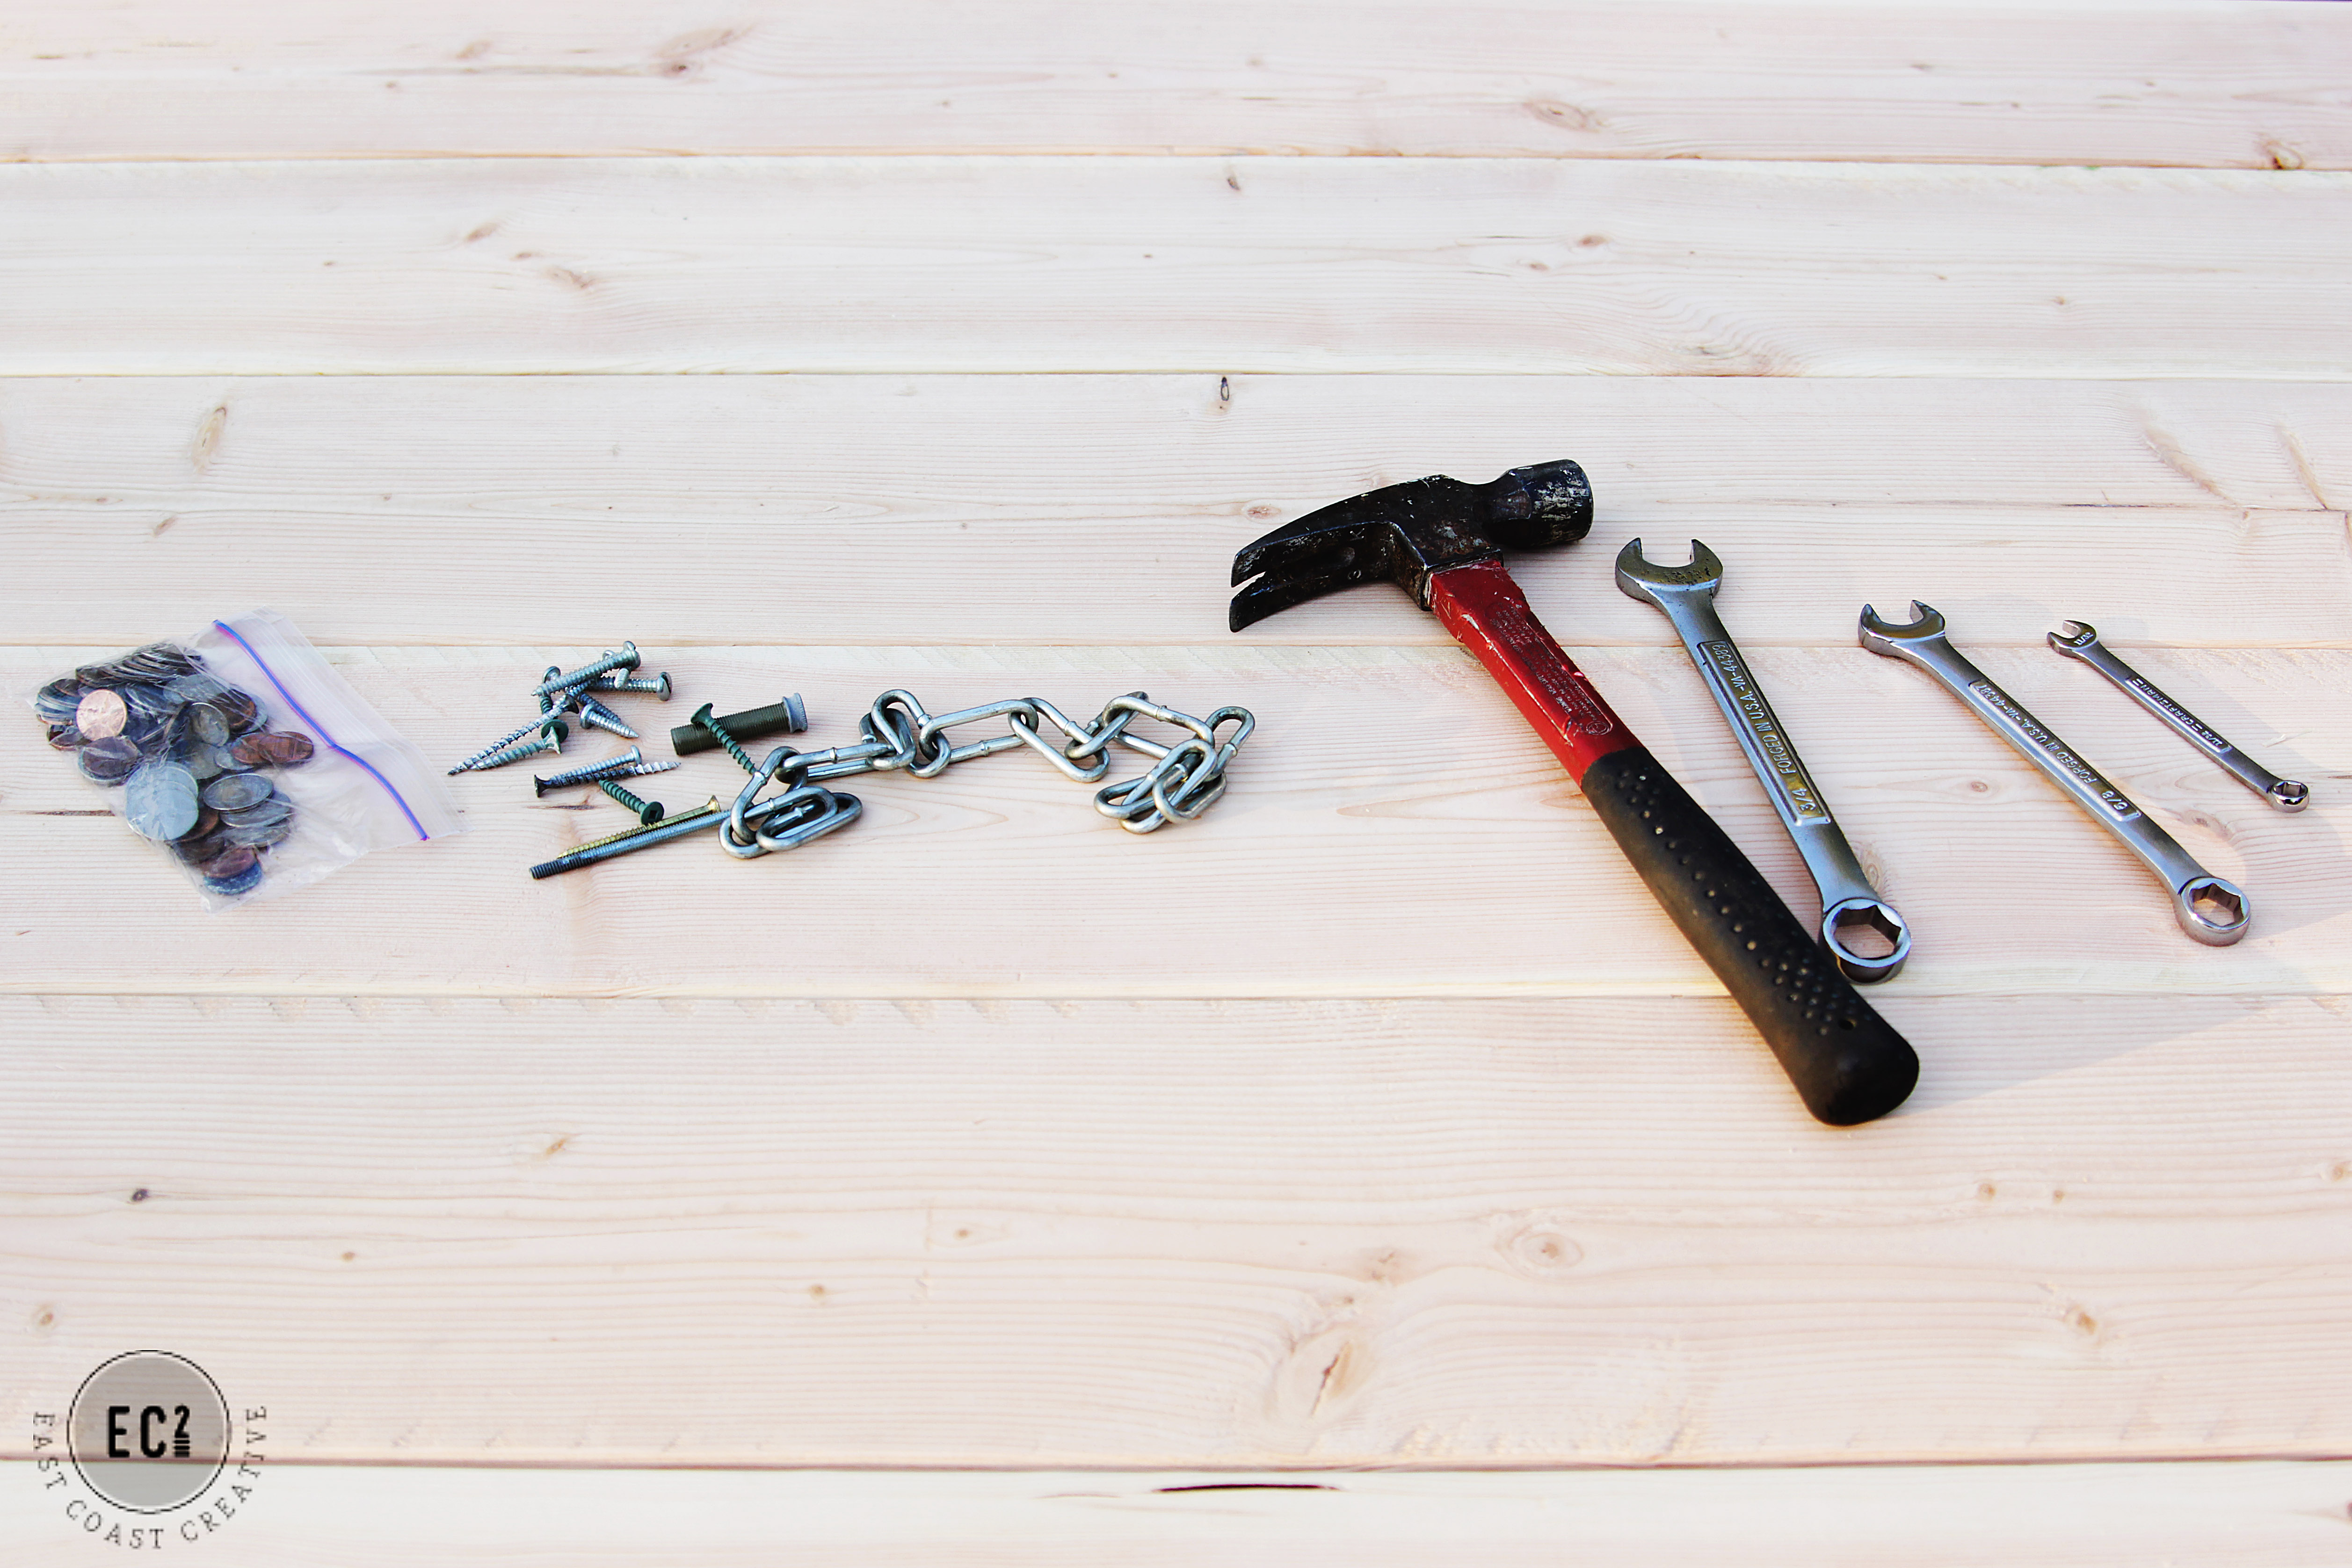
Printable Project Materials Checklist
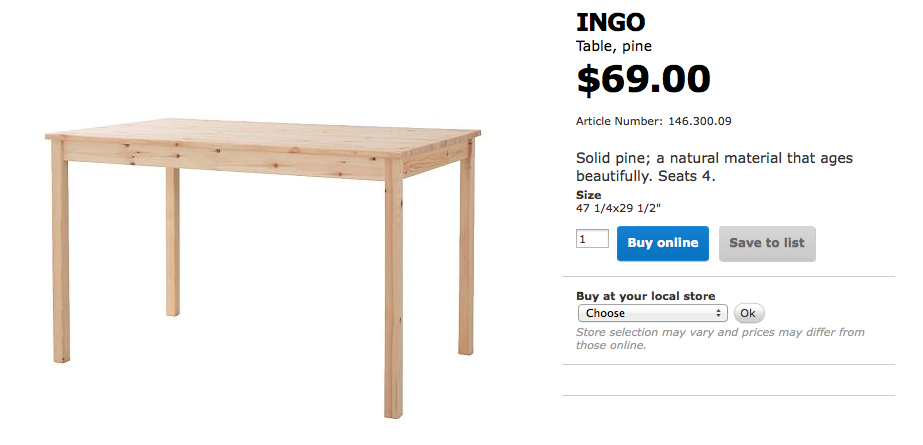
Step 1: Acquire 1 or 2 rectangular tables. One table if you want a little farmhouse table and two if you want a big mama that can seat a lot of people. Rather than trying to thrift two identical tables (which can be really challenging), we went with two wooden IKEA tables (the cheapest ones they sell!) but you can totally thrift two as well- that’s what I did for my personal table.
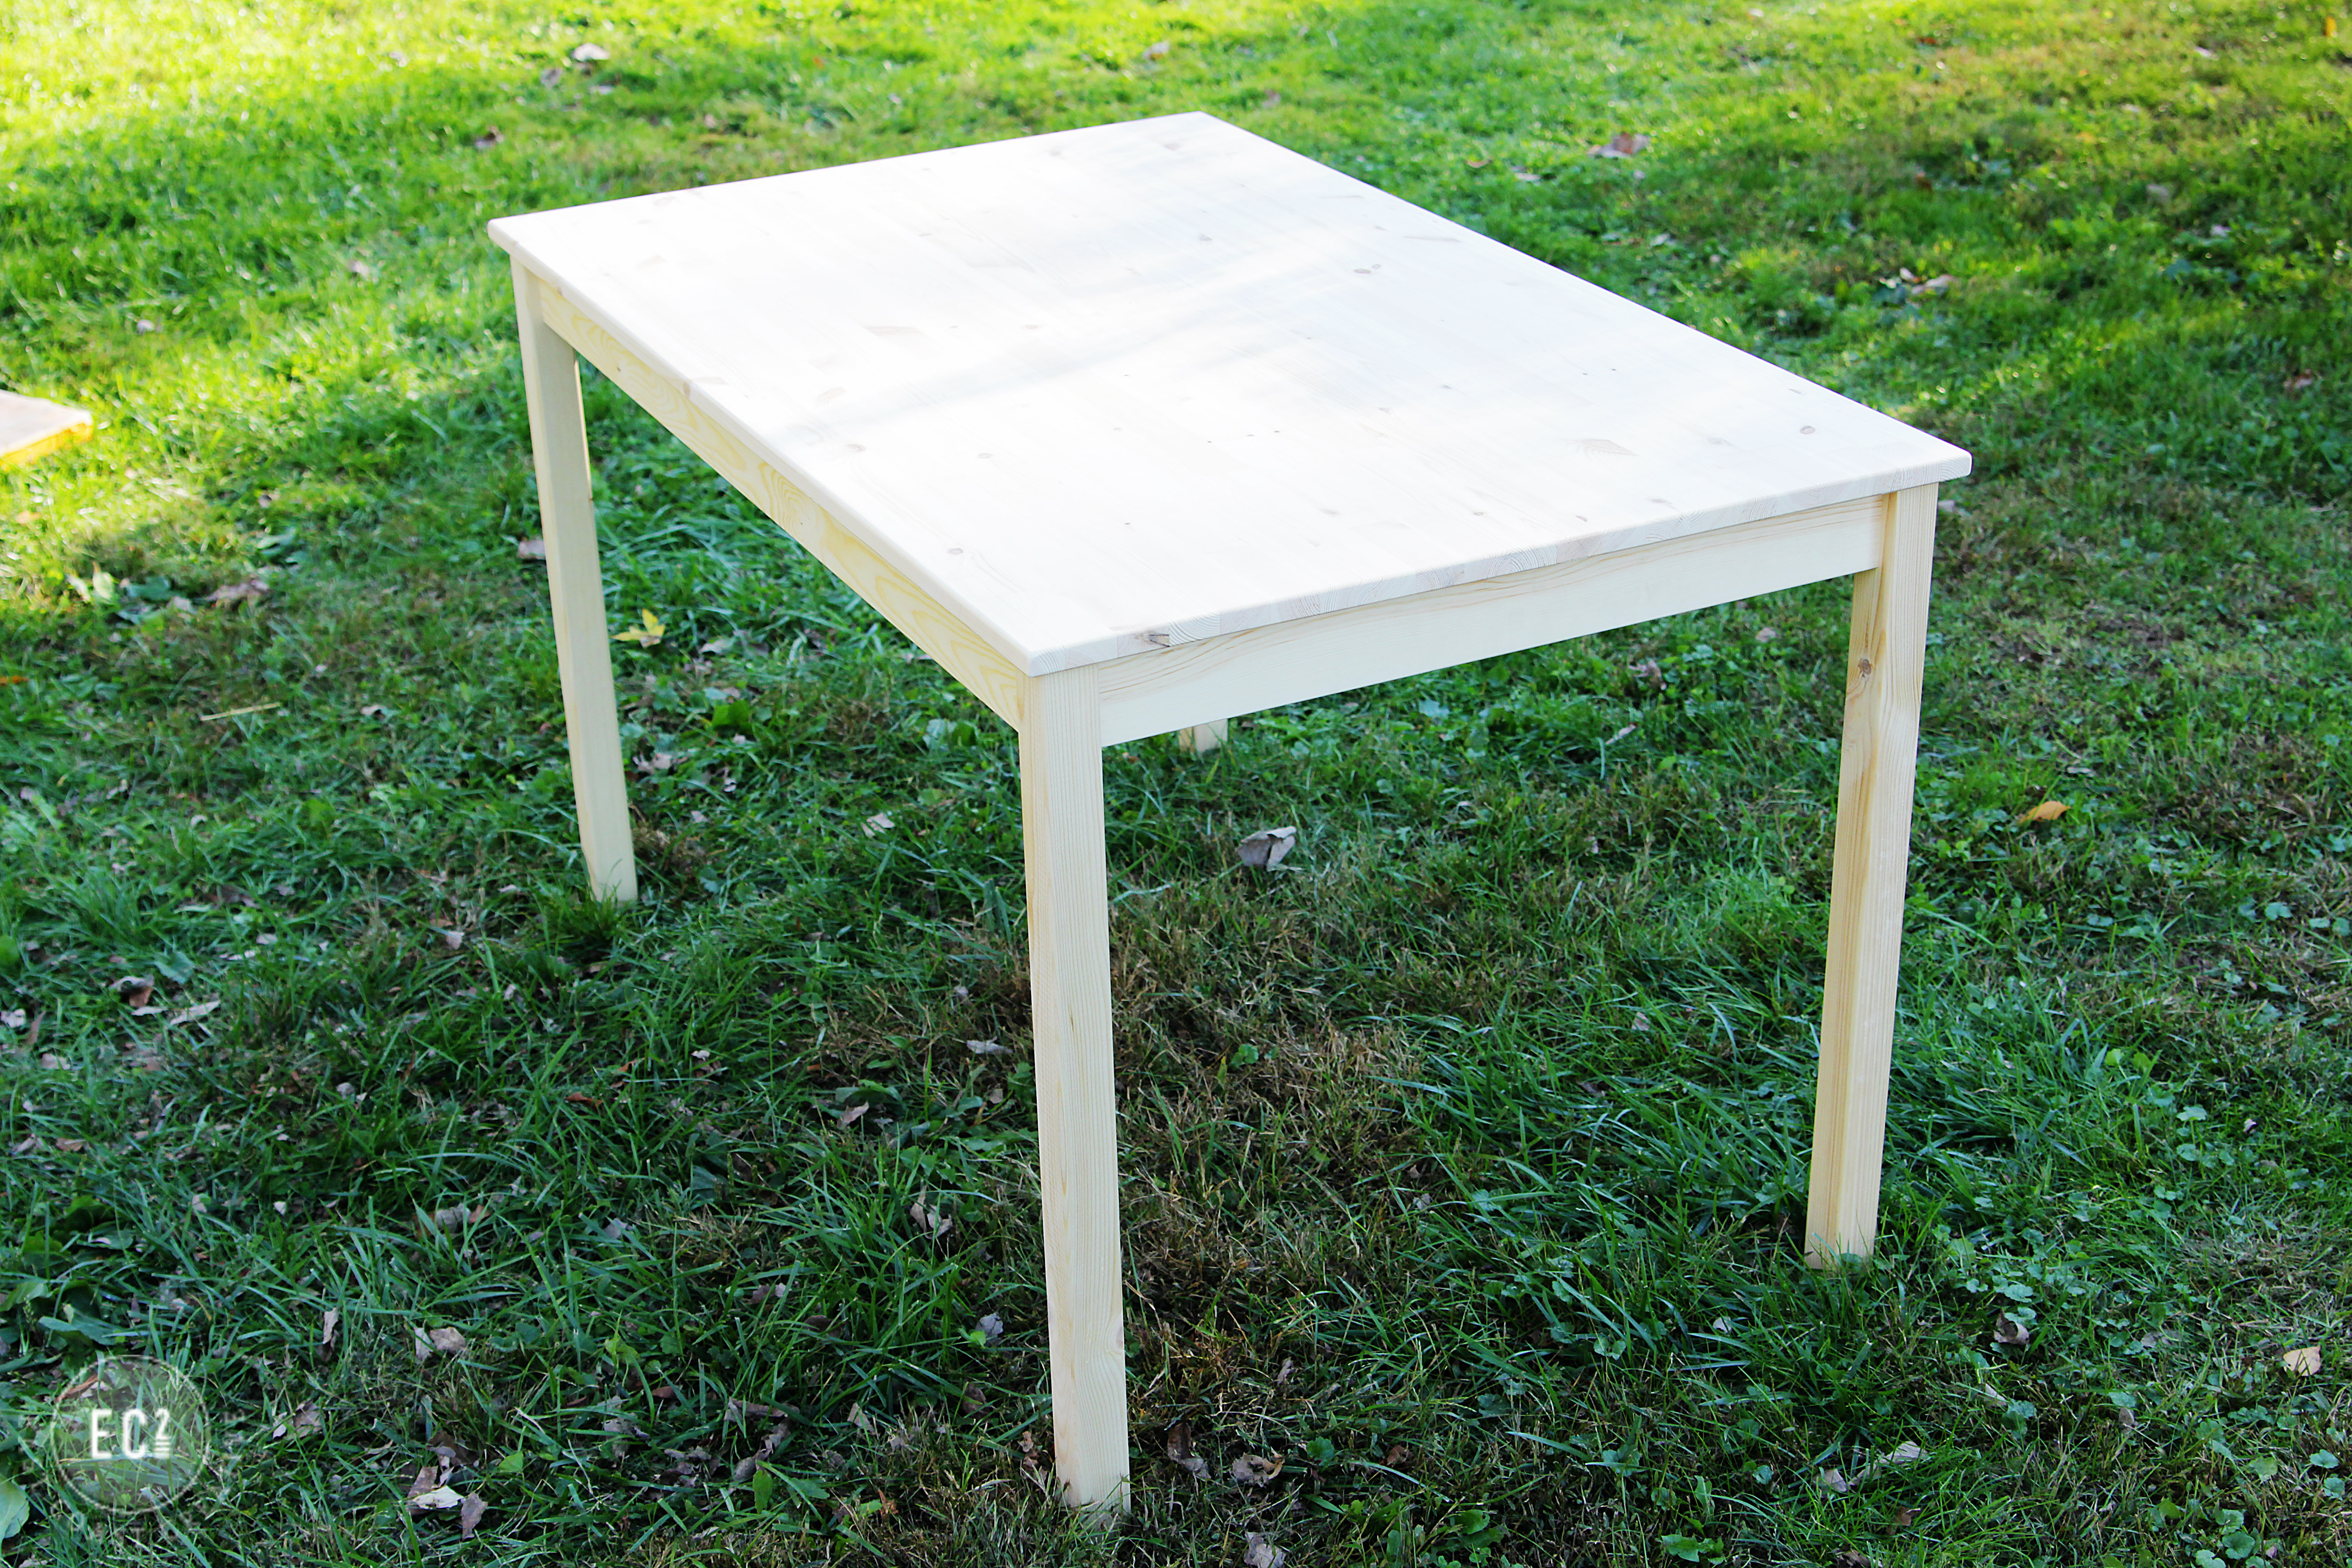
Assemble your tables and put them on a level surface.
Step 2: Attach the tables together using a 1×3 pine plank and screws. It doesn’t matter what the wood looks like, it’s going to get covered up by fancy pine boards a little later. Just make sure the plank is screwed into both tables to connect them.
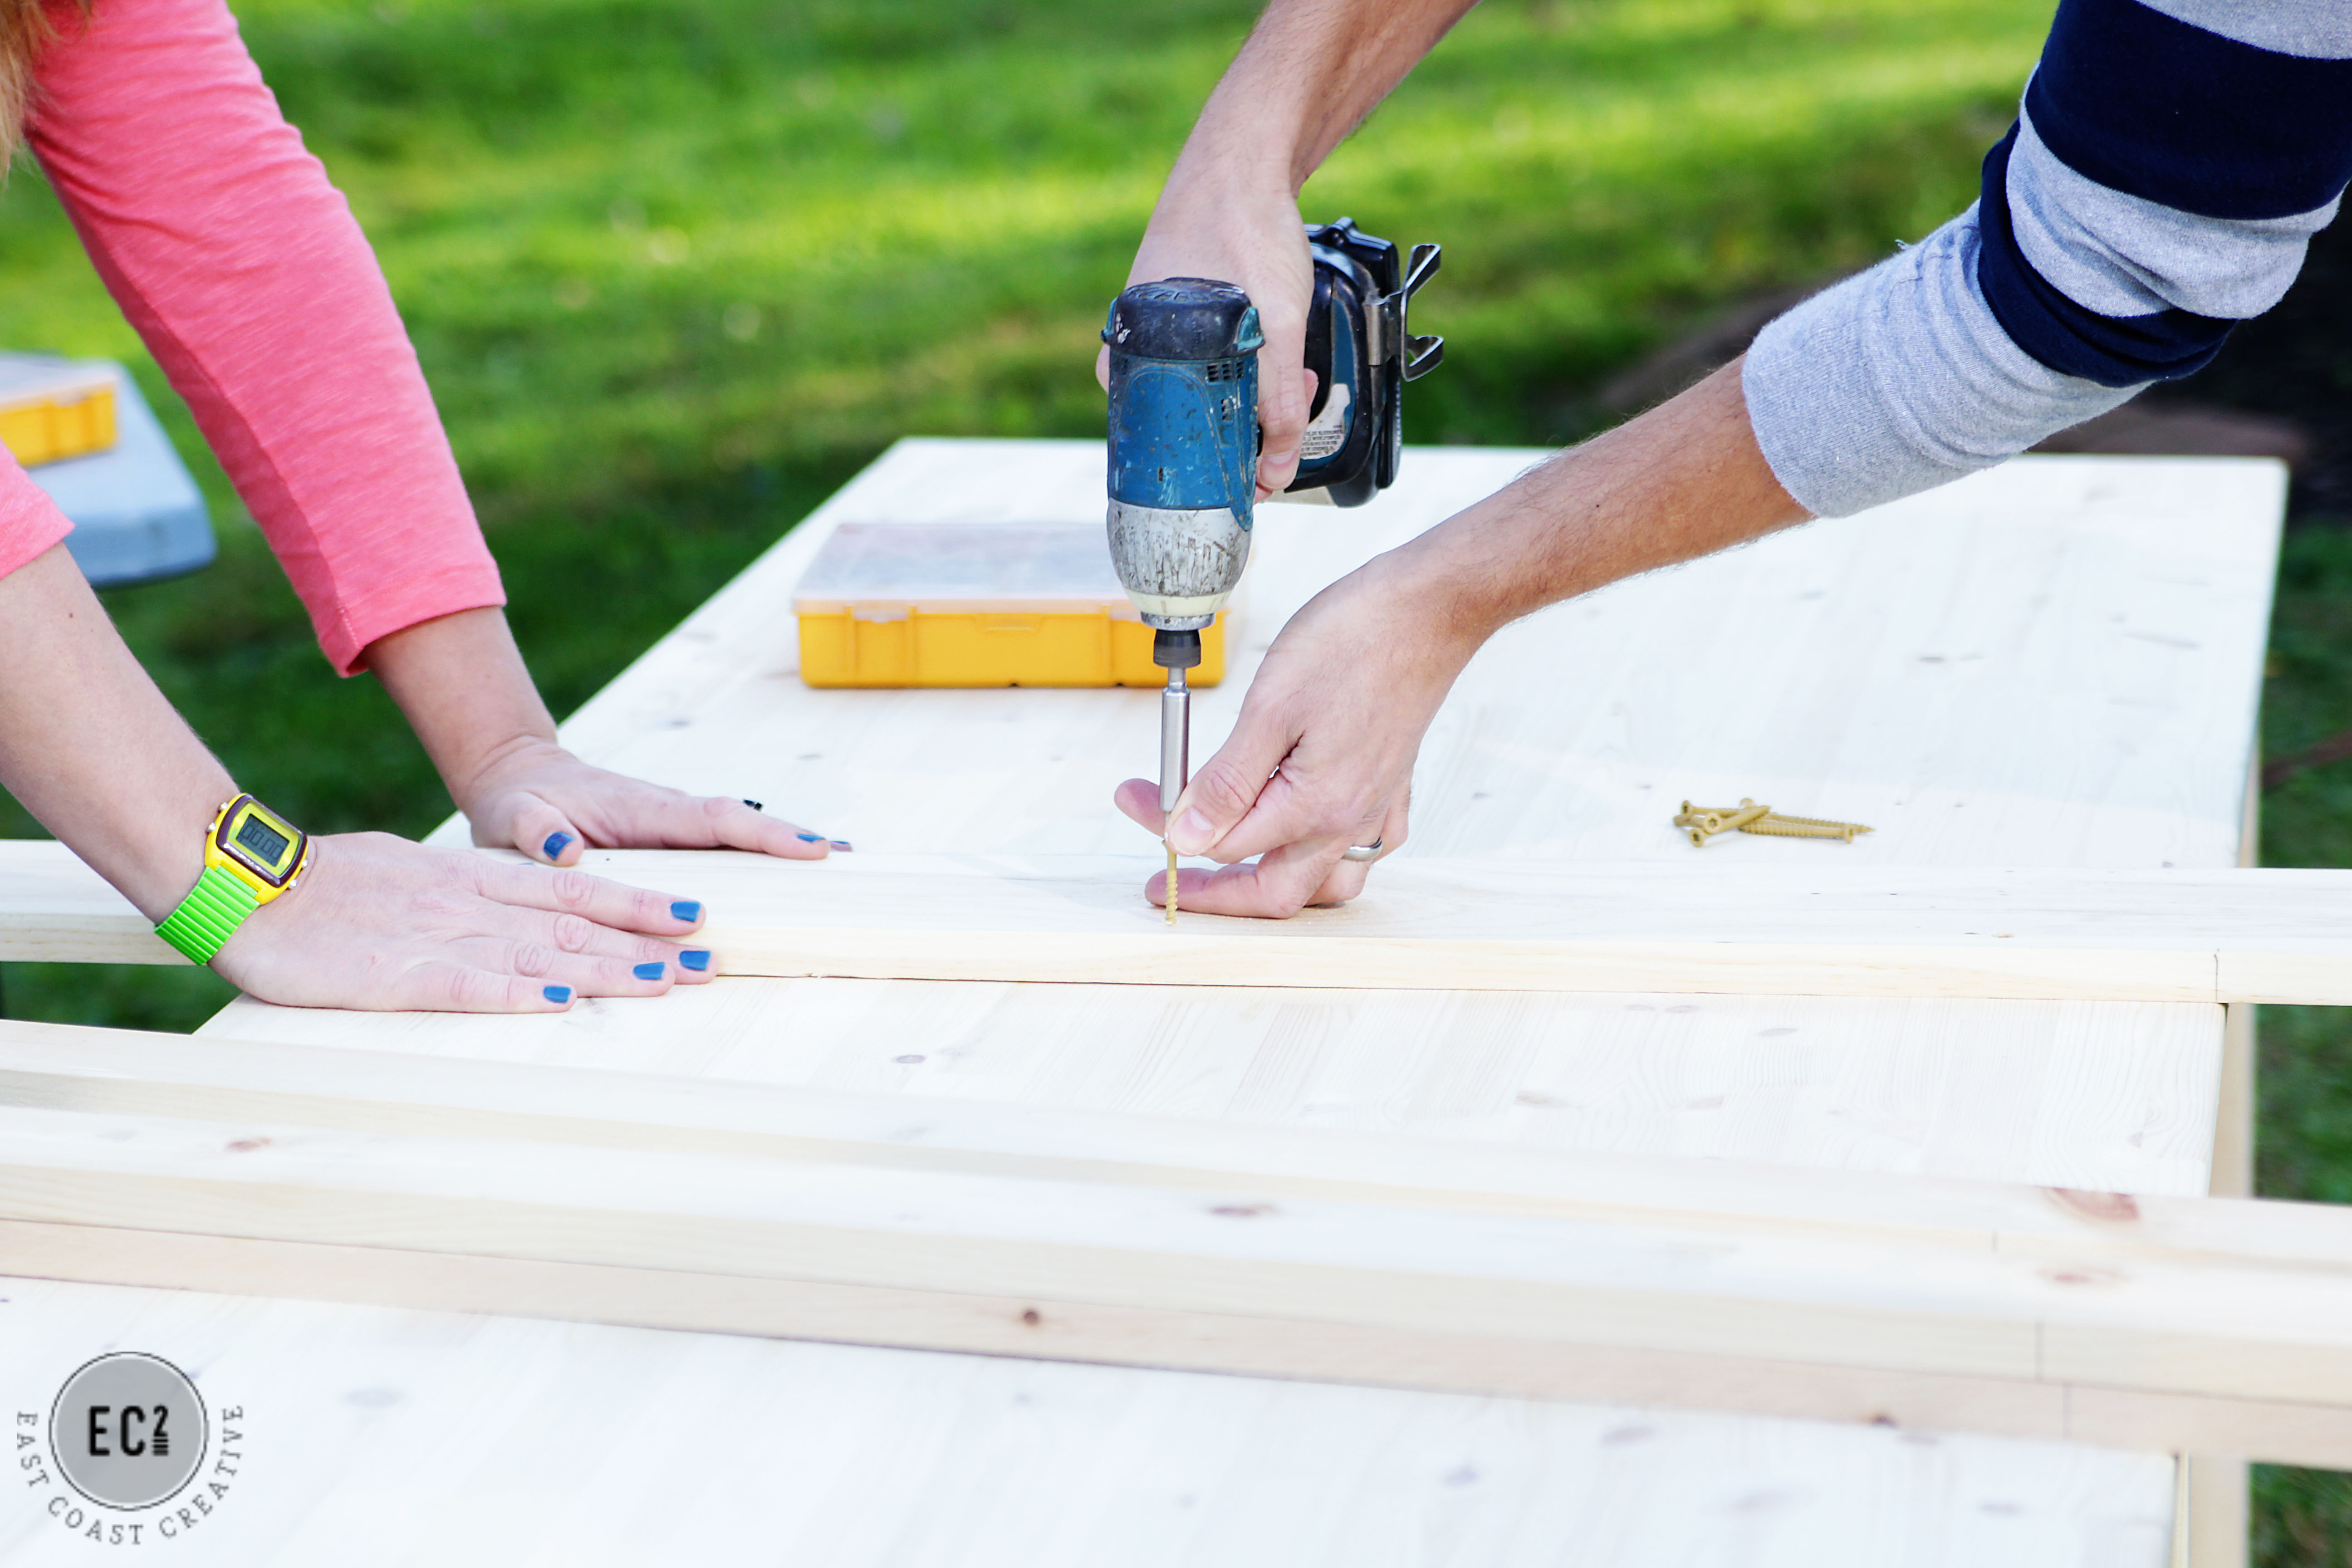
Step 3: Build a subframe using 1×2 inexpensive pine planks. So… cheap tables are cheap for a reason, they’re not made super well and they’re tiny. When I think of a farmhouse table, I don’t think dainty and small, I think big and strong. So, this subframe is going to be your support so that you can make your table wider. The width is up to you, you will attach the 1x2s directly onto the table and they’ll hang over the sides. You’ll want them equal on both sides, but really the width is up to you. The table at my house is crazy wide, but the one we made for this farmhouse dining room was about 48″ when it was finished. Attach each 1×2 with screws directly into the table. We used about 3 screws per board.
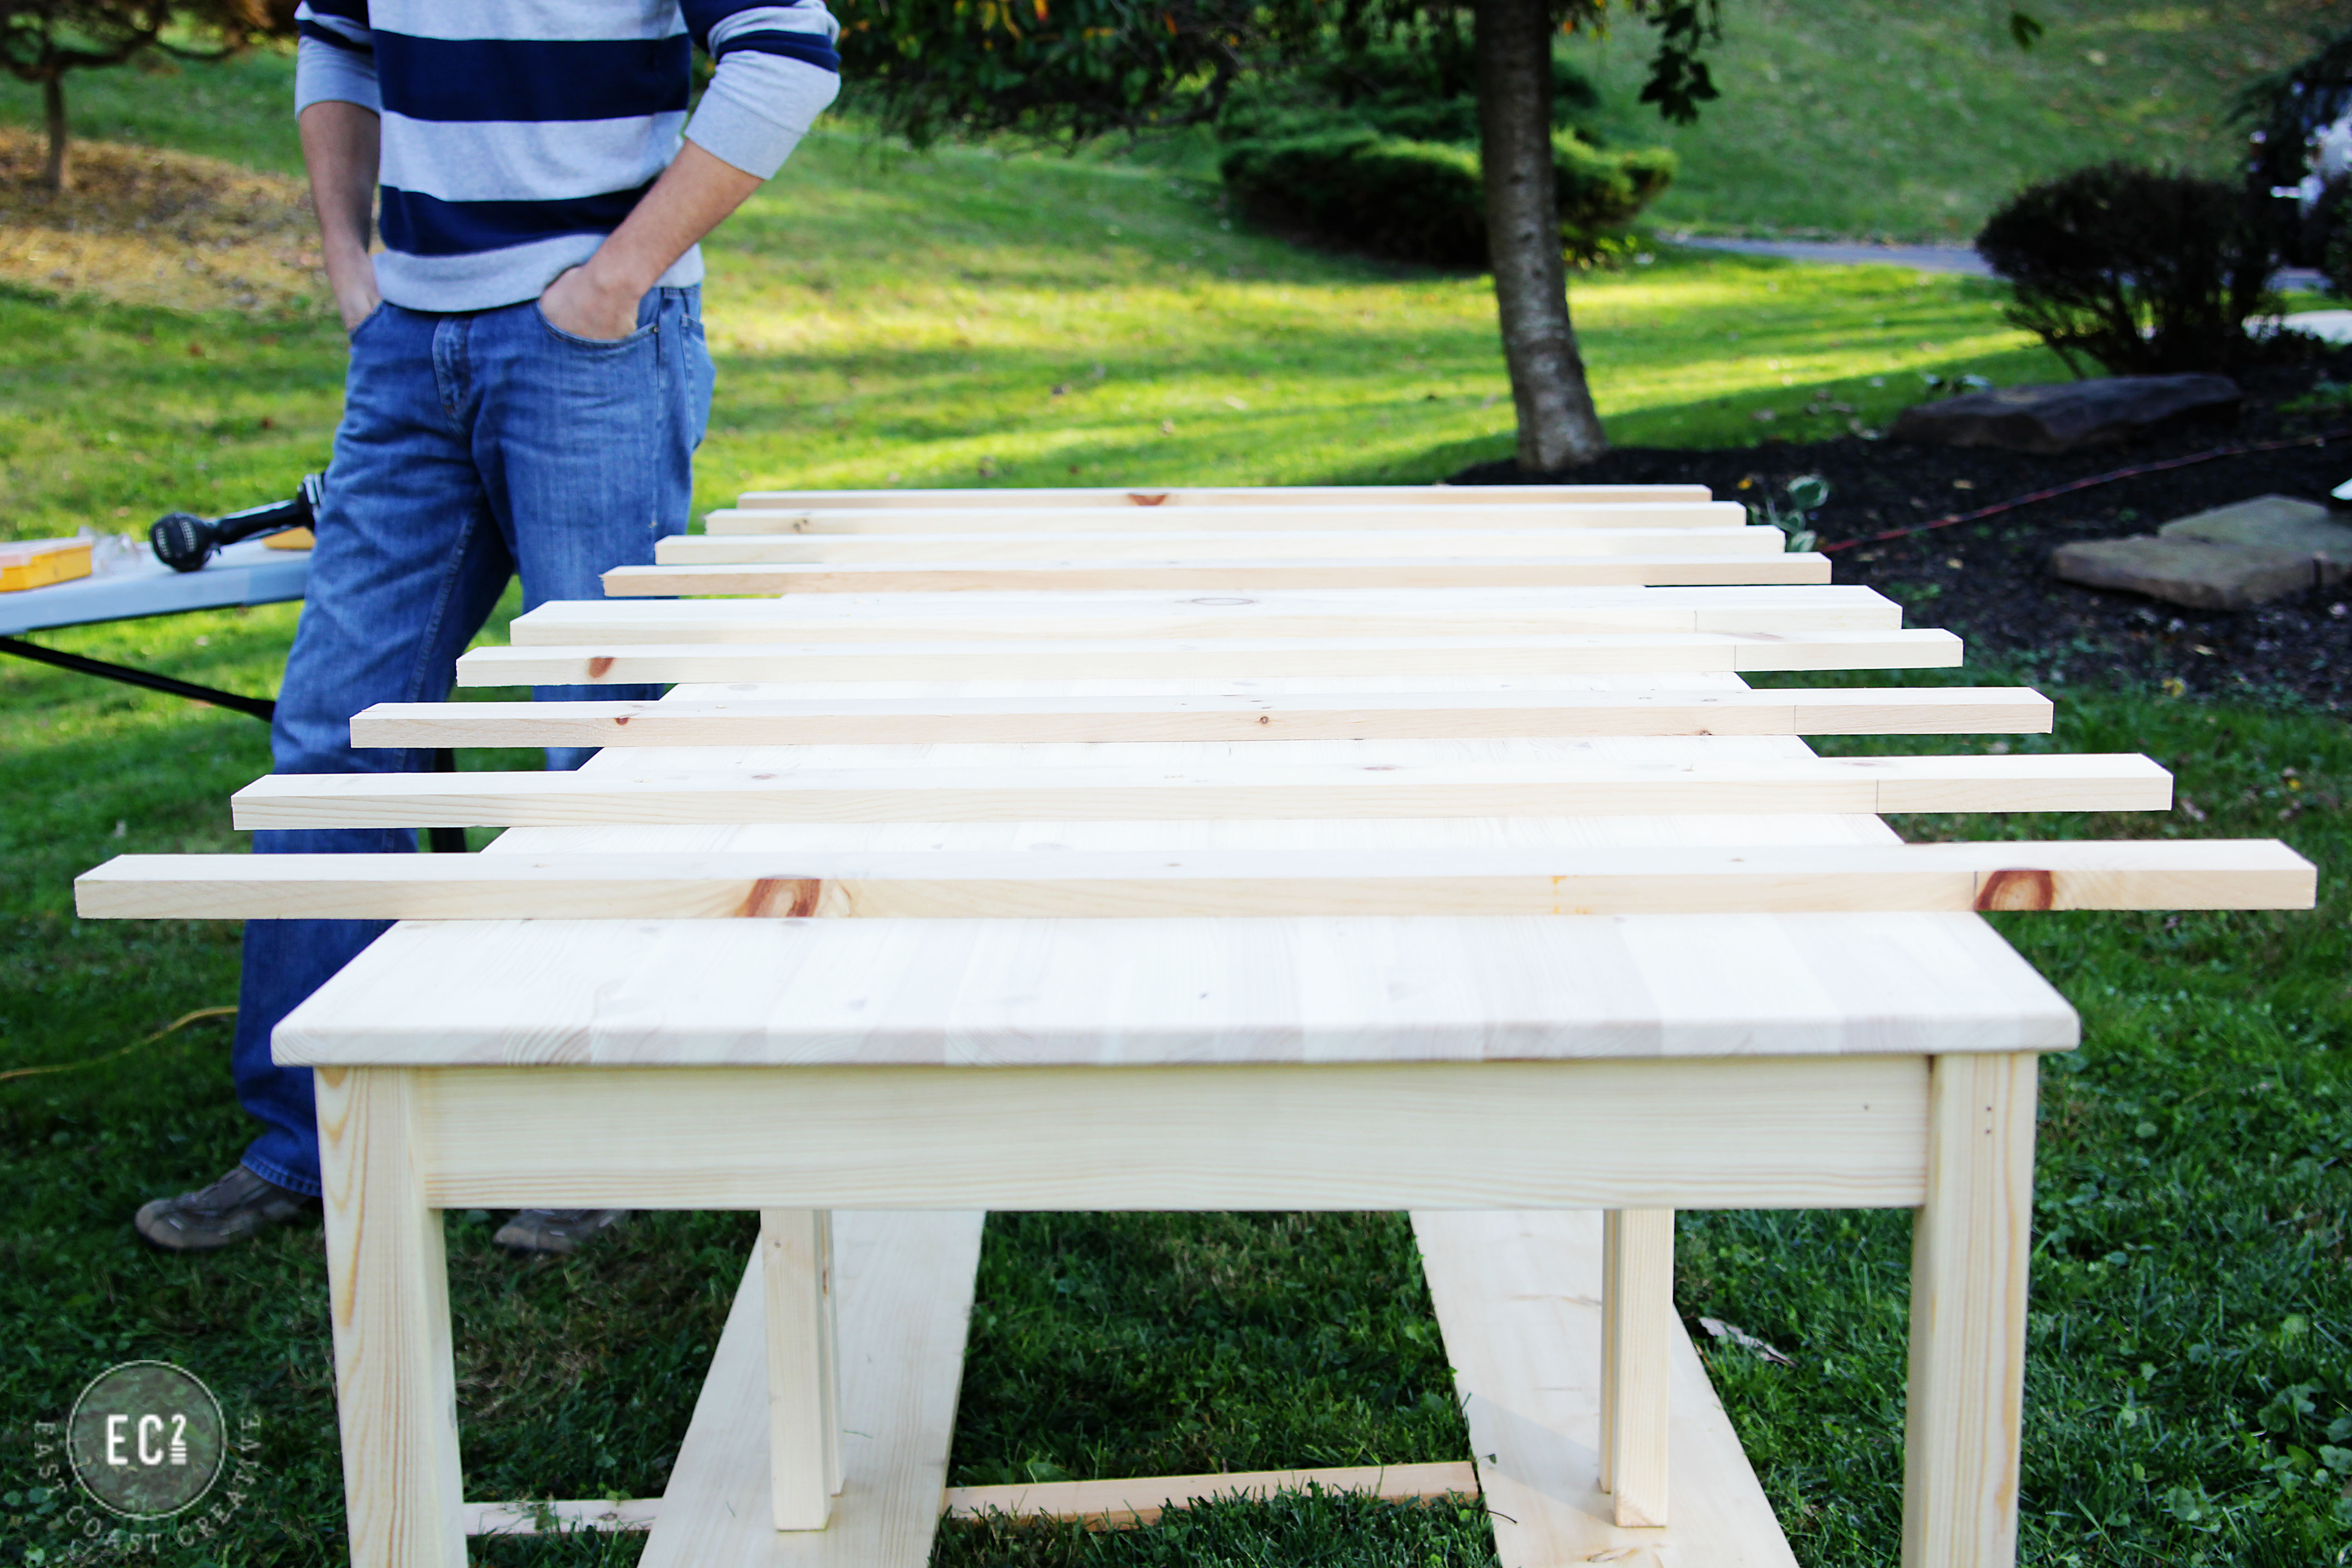
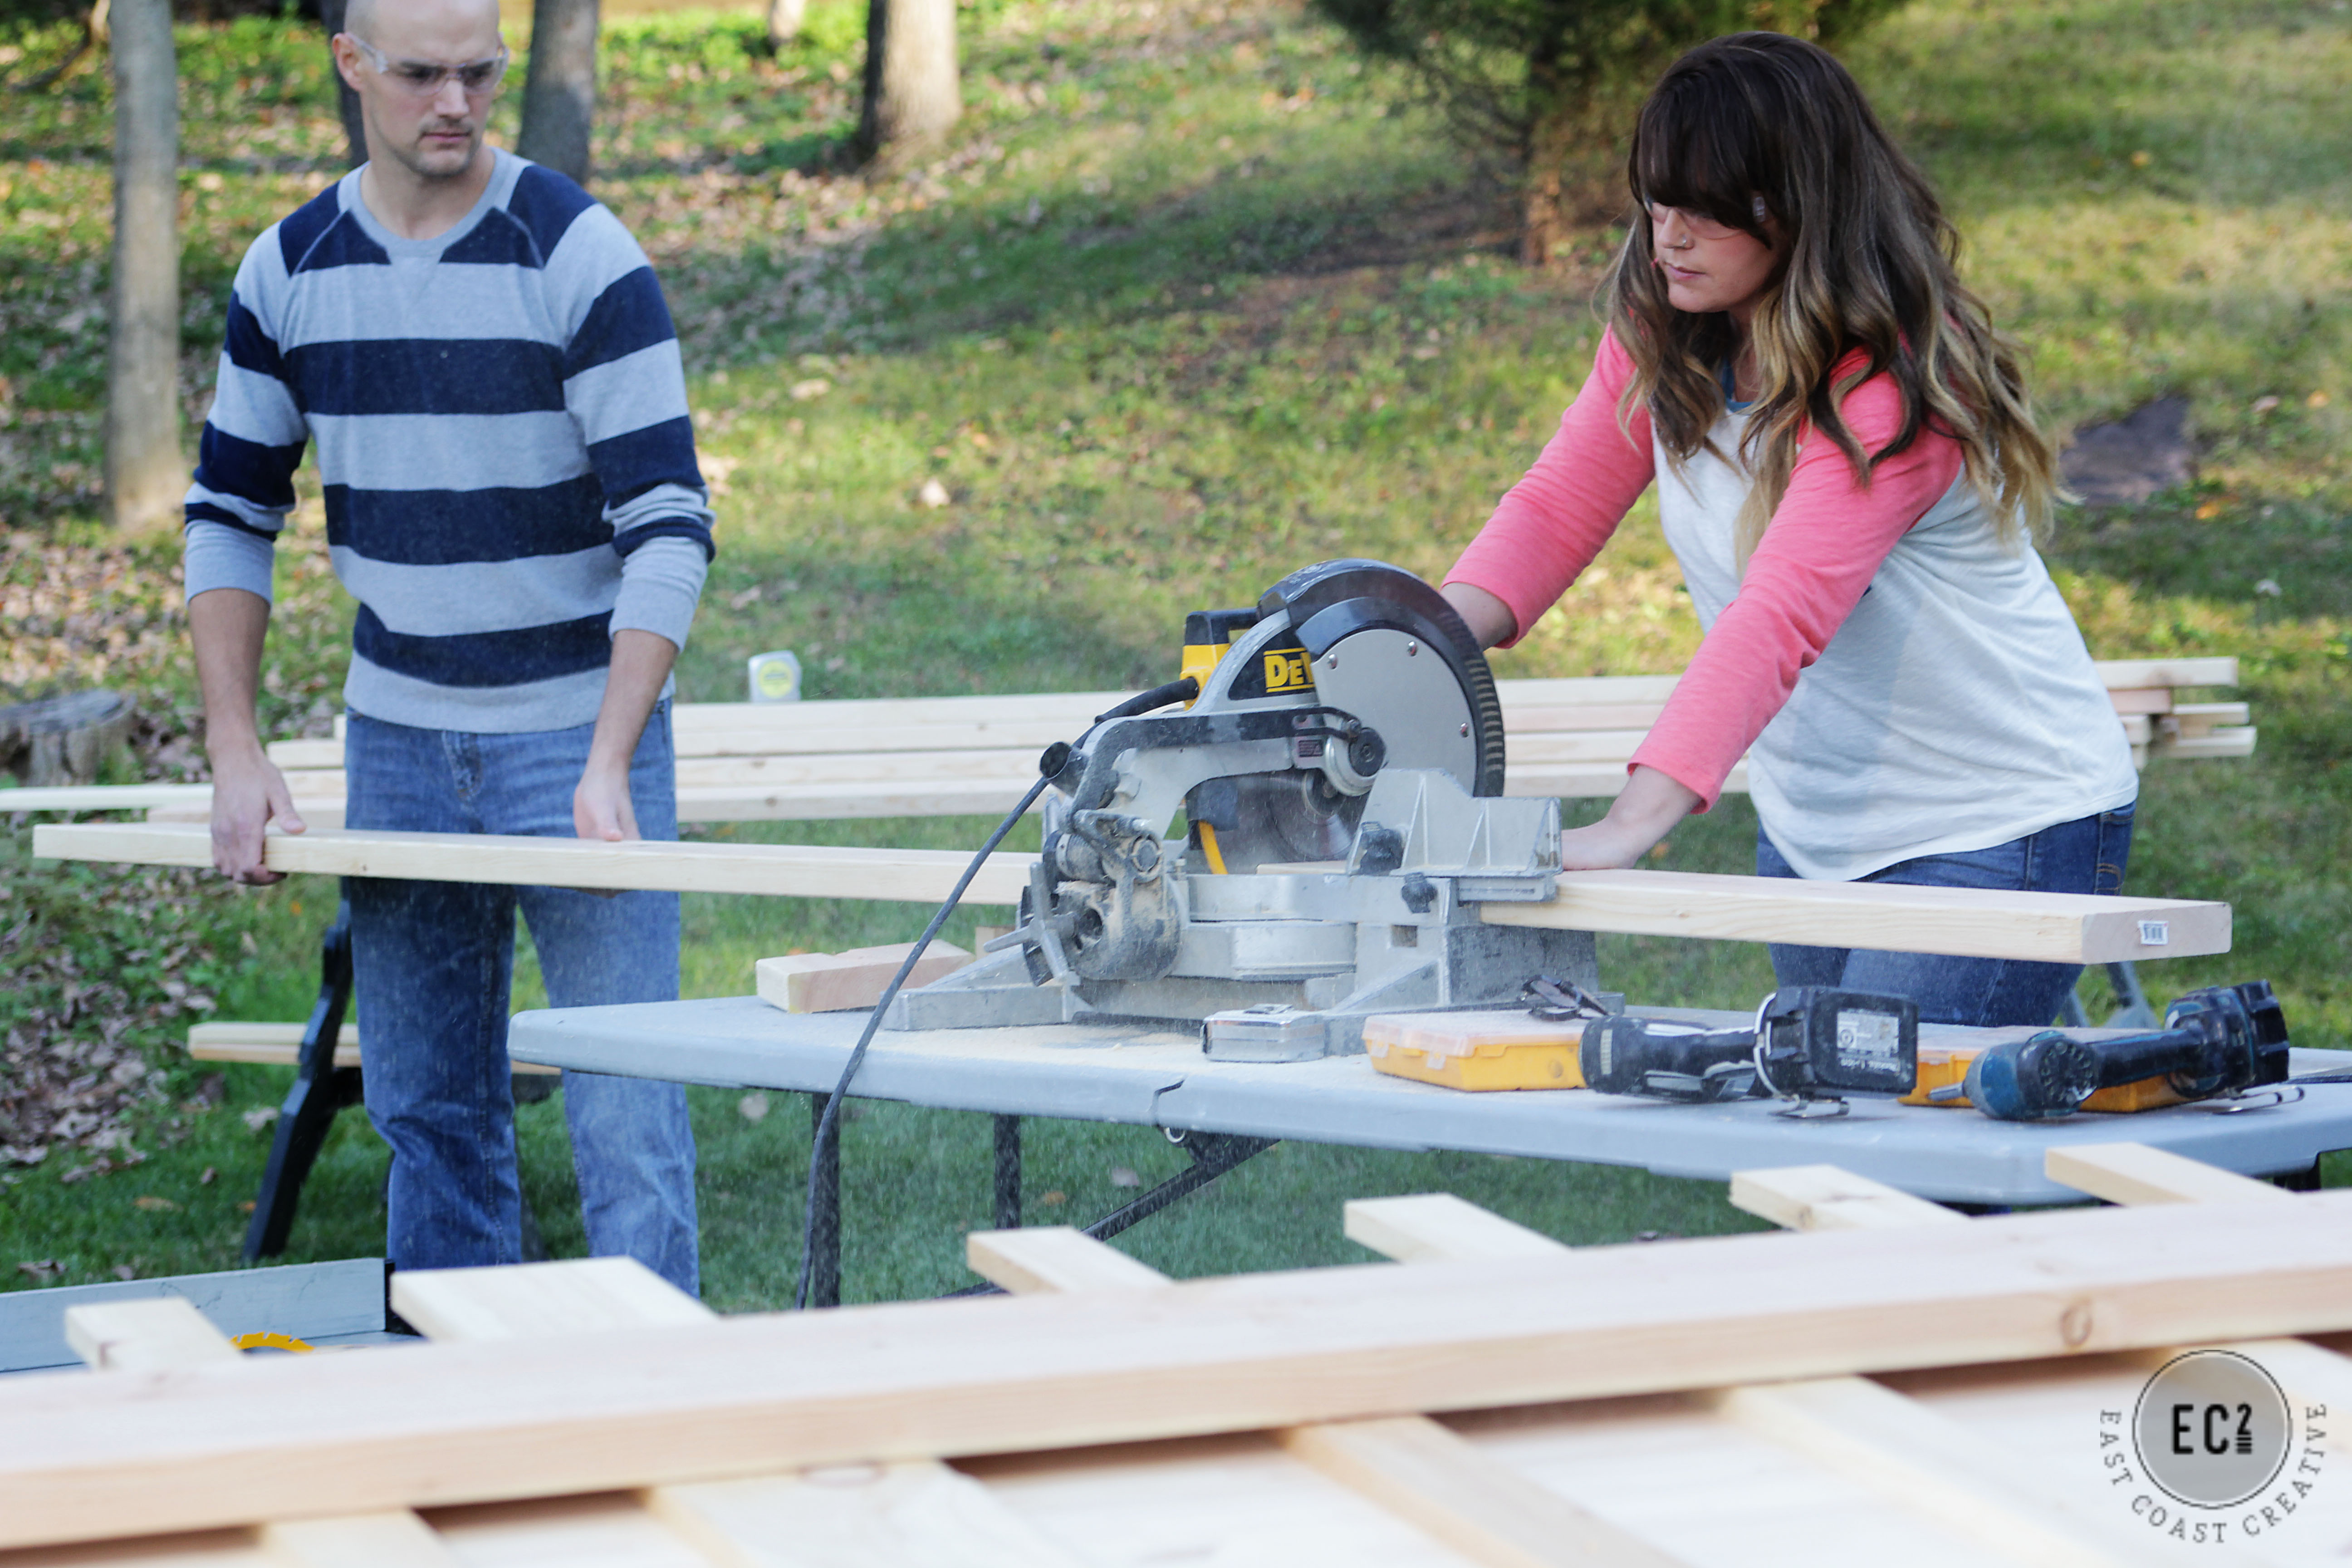
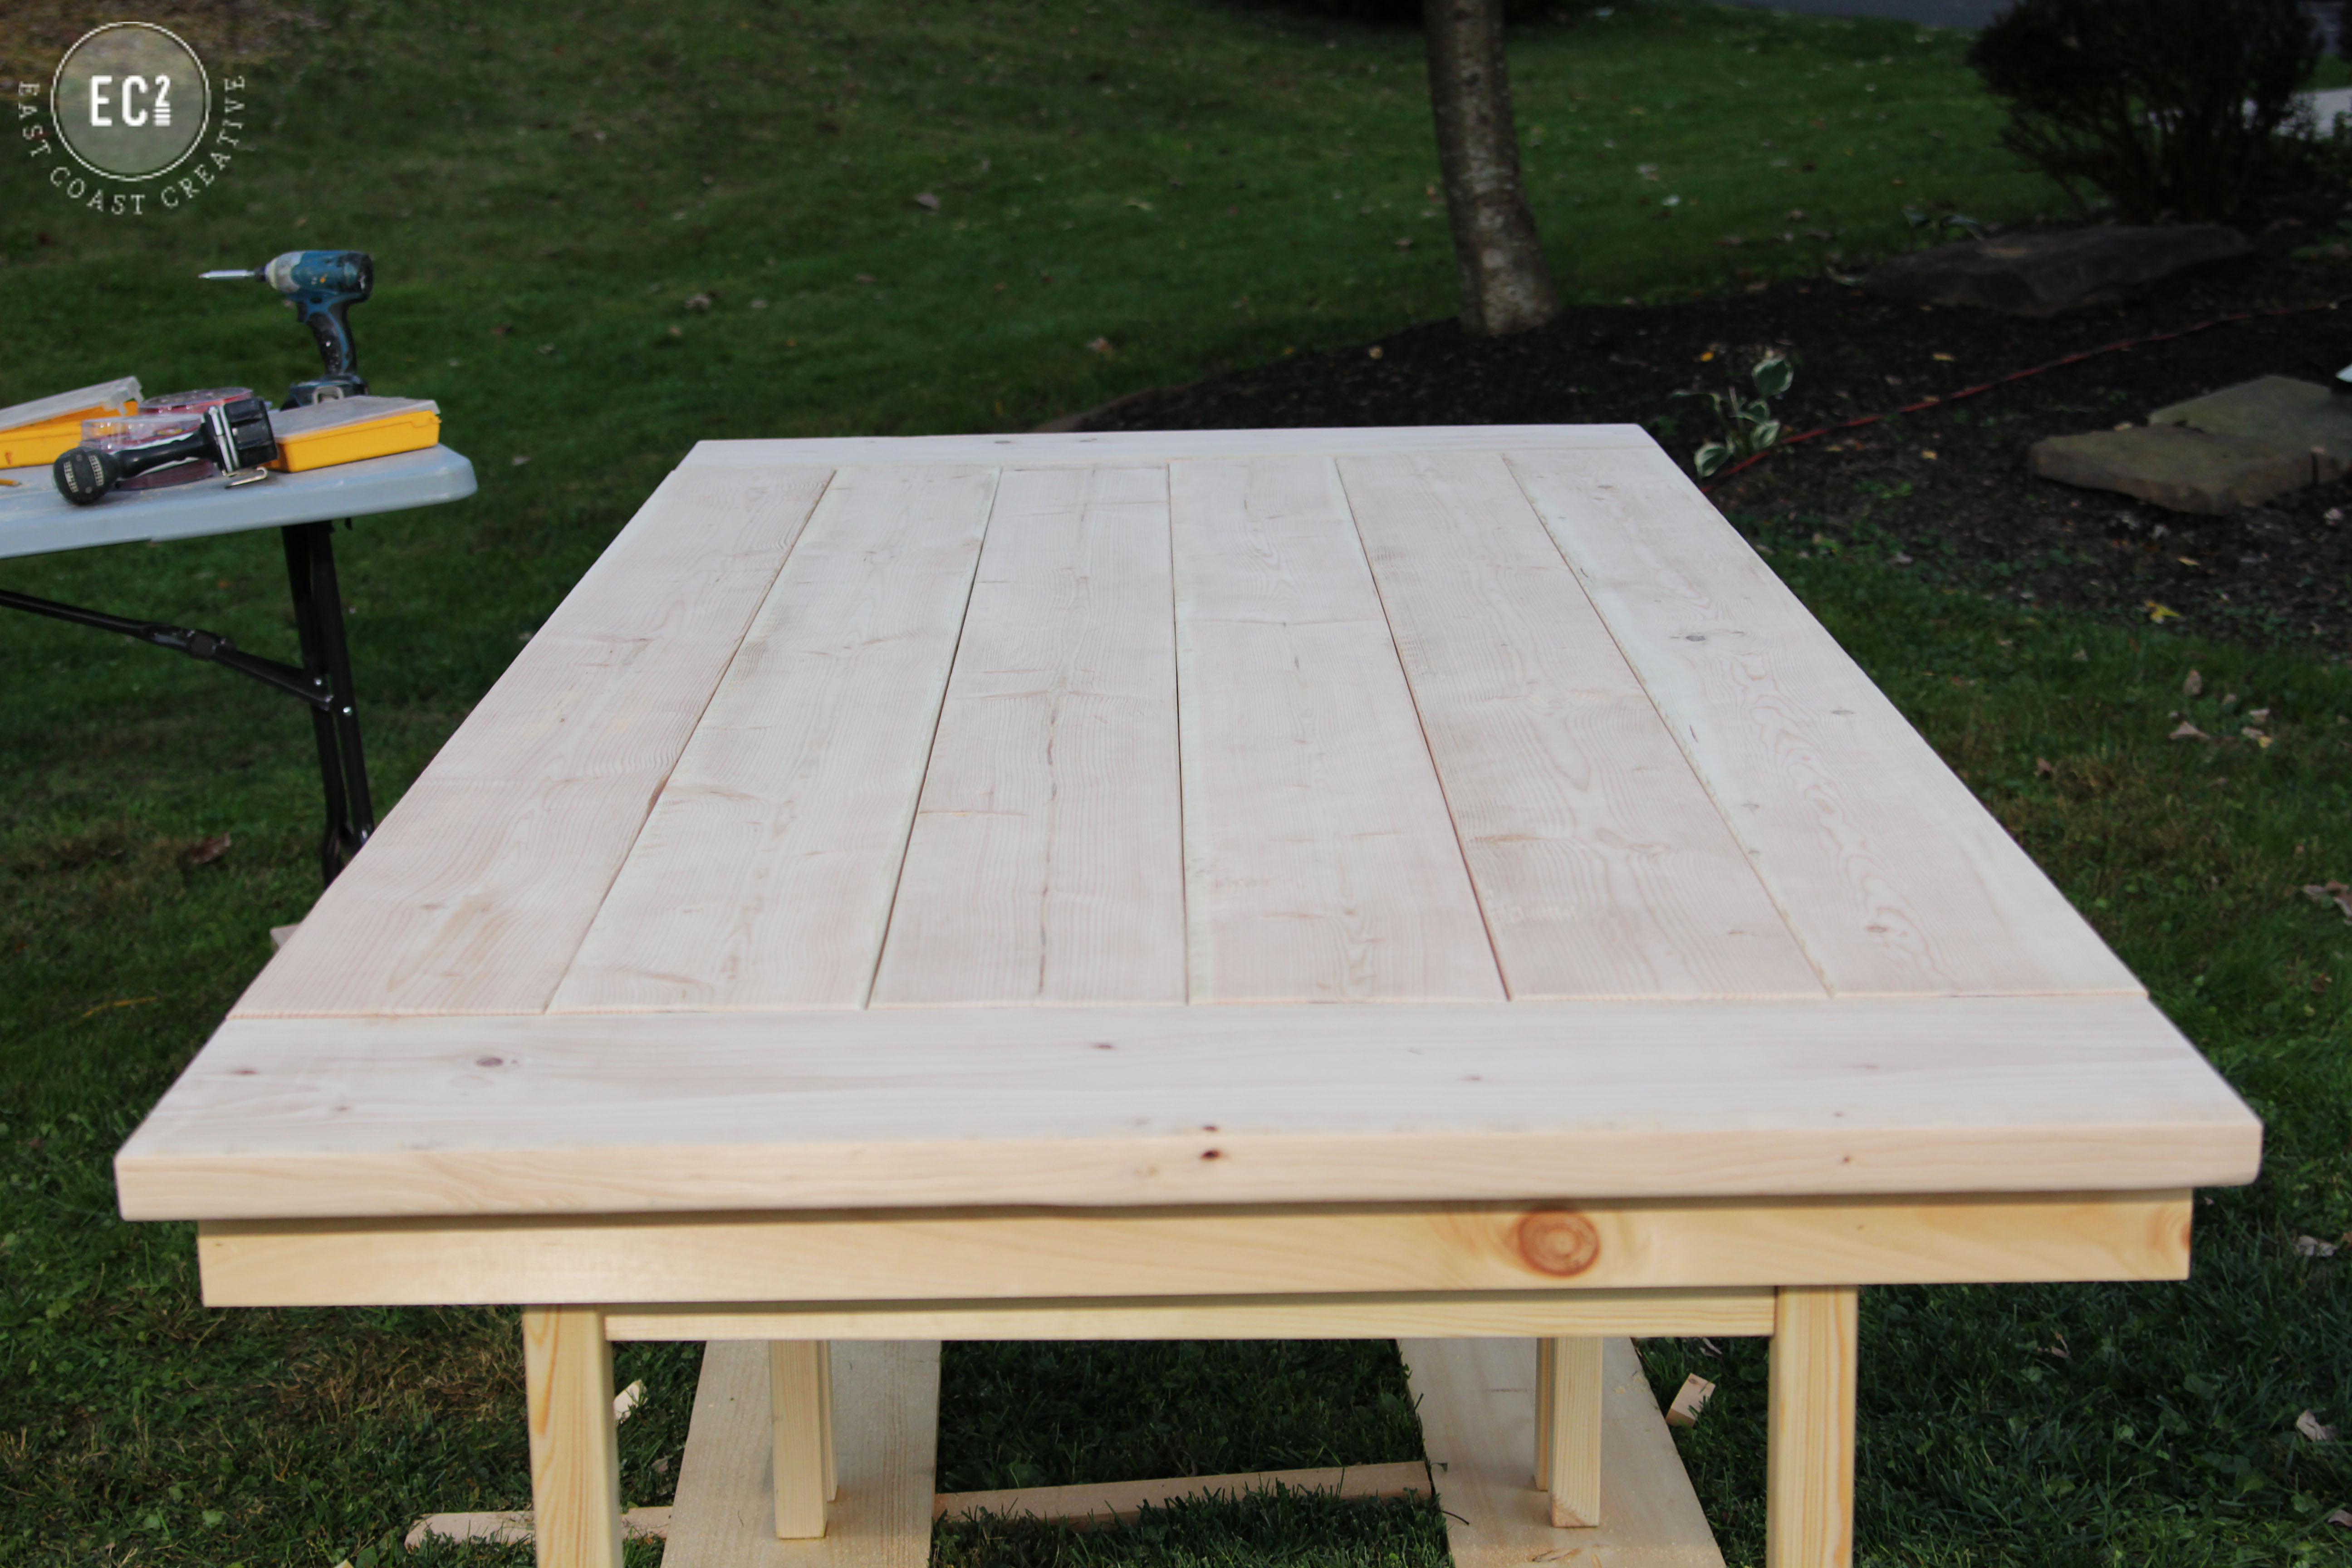
Step 4: Cut your “new” tabletop planks. Once the subframe is prepped, cut your 2×8 boards to length. When planning the length of your vertical boards, take into account that each end will have a horizontal end piece, so subtract about 8″ off of each side.
See how the vertical boards are “capped” with a horizontal?
Step 5: Sand down your boards, rounding the edges a bit to give it a finished look.

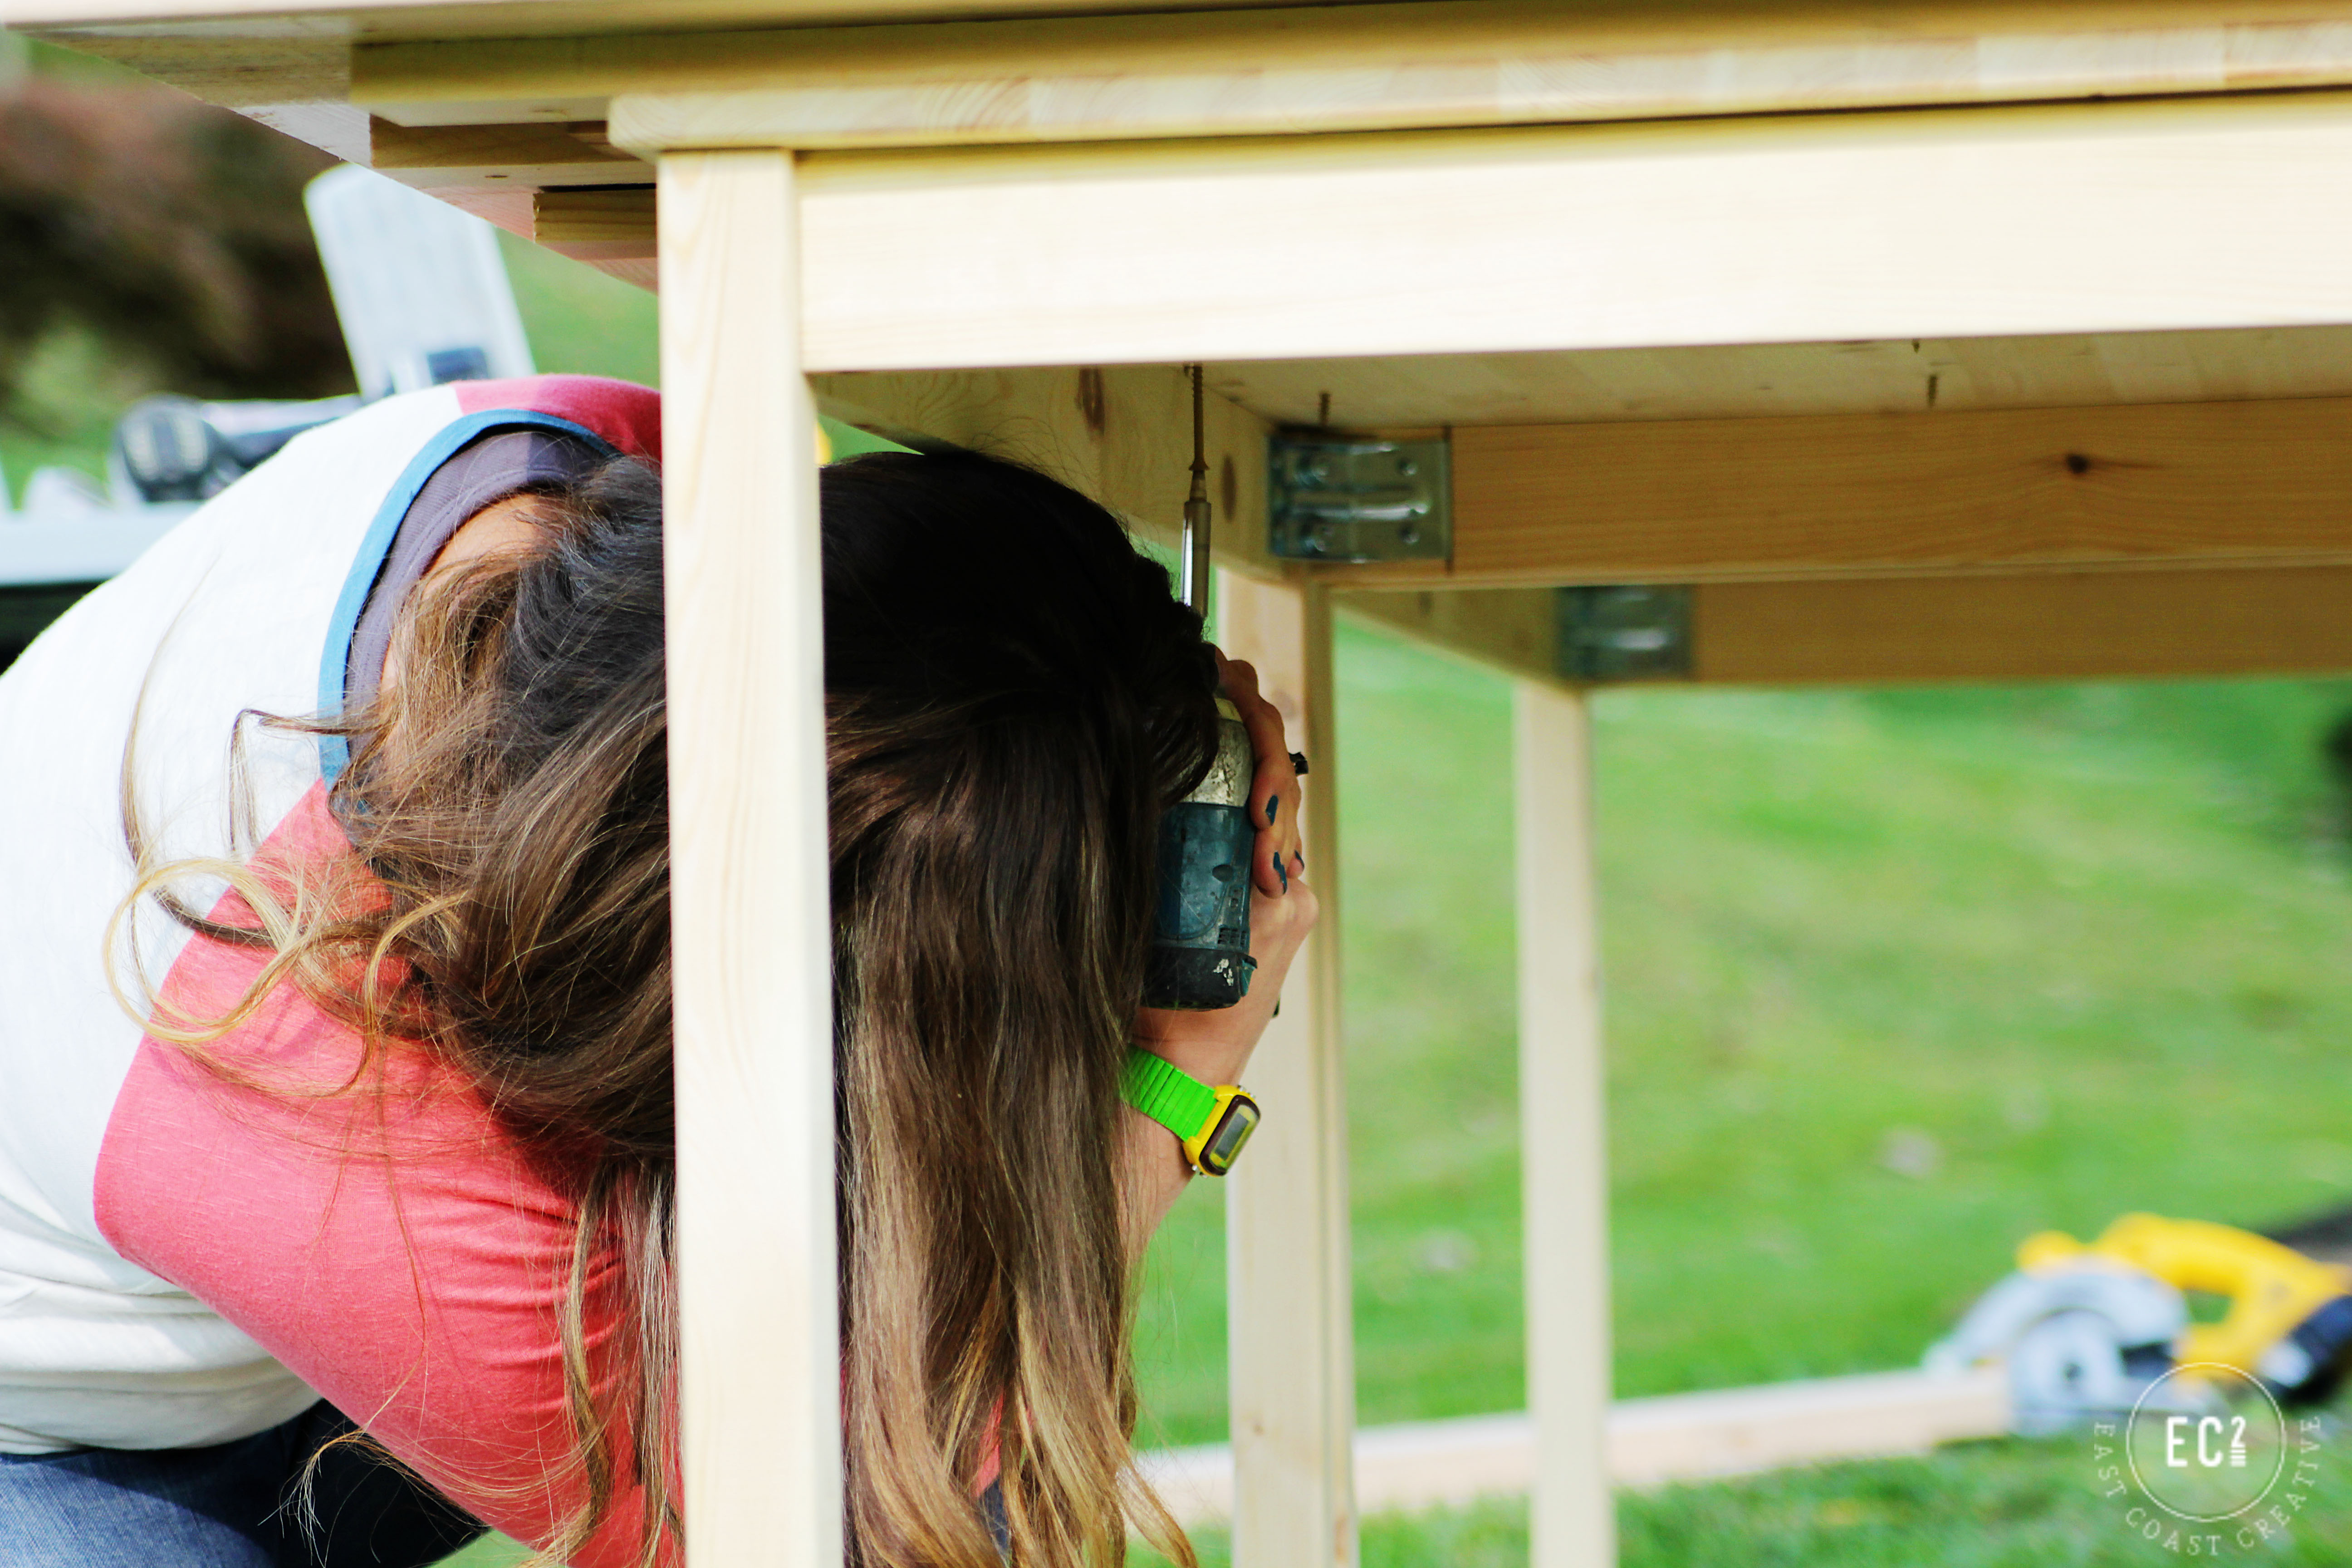
Step 6: Place your boards, and get your layout set. Once you’re happy with your spacing, attach each board from the underside of the table using screws. Make sure your screws are long enough to go through the table, subframe, and top planks, but not so long that they pierce through. 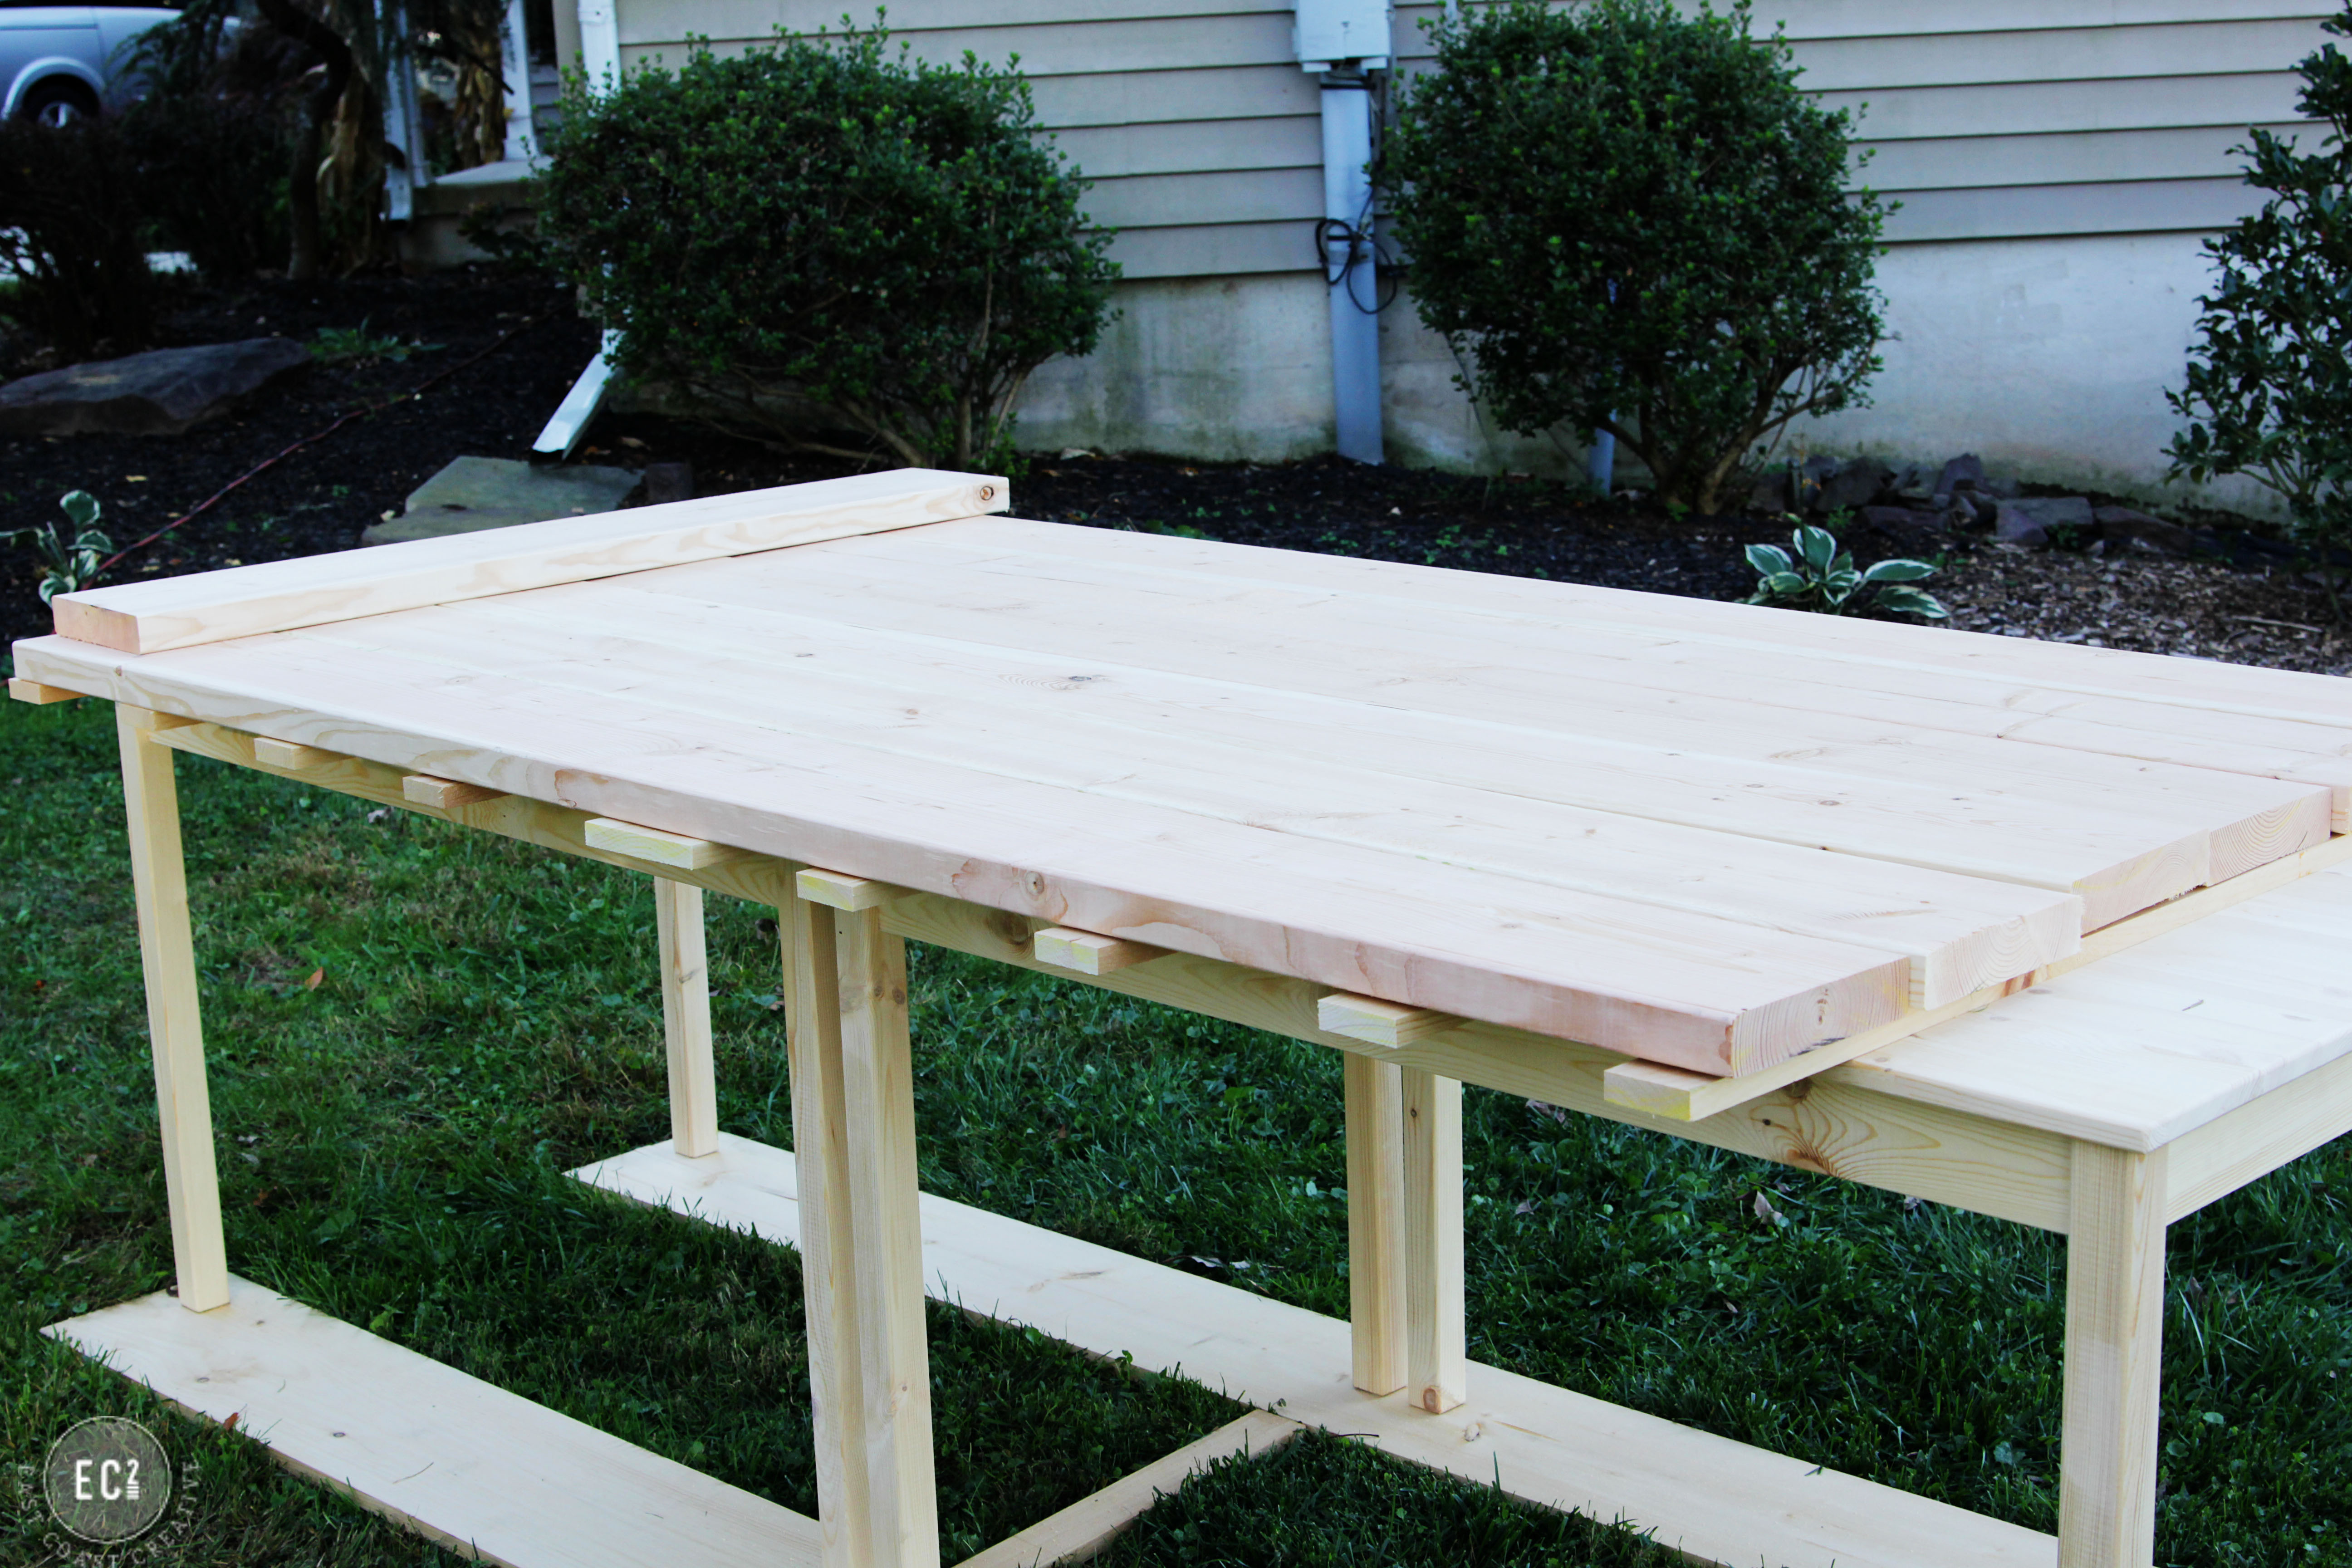
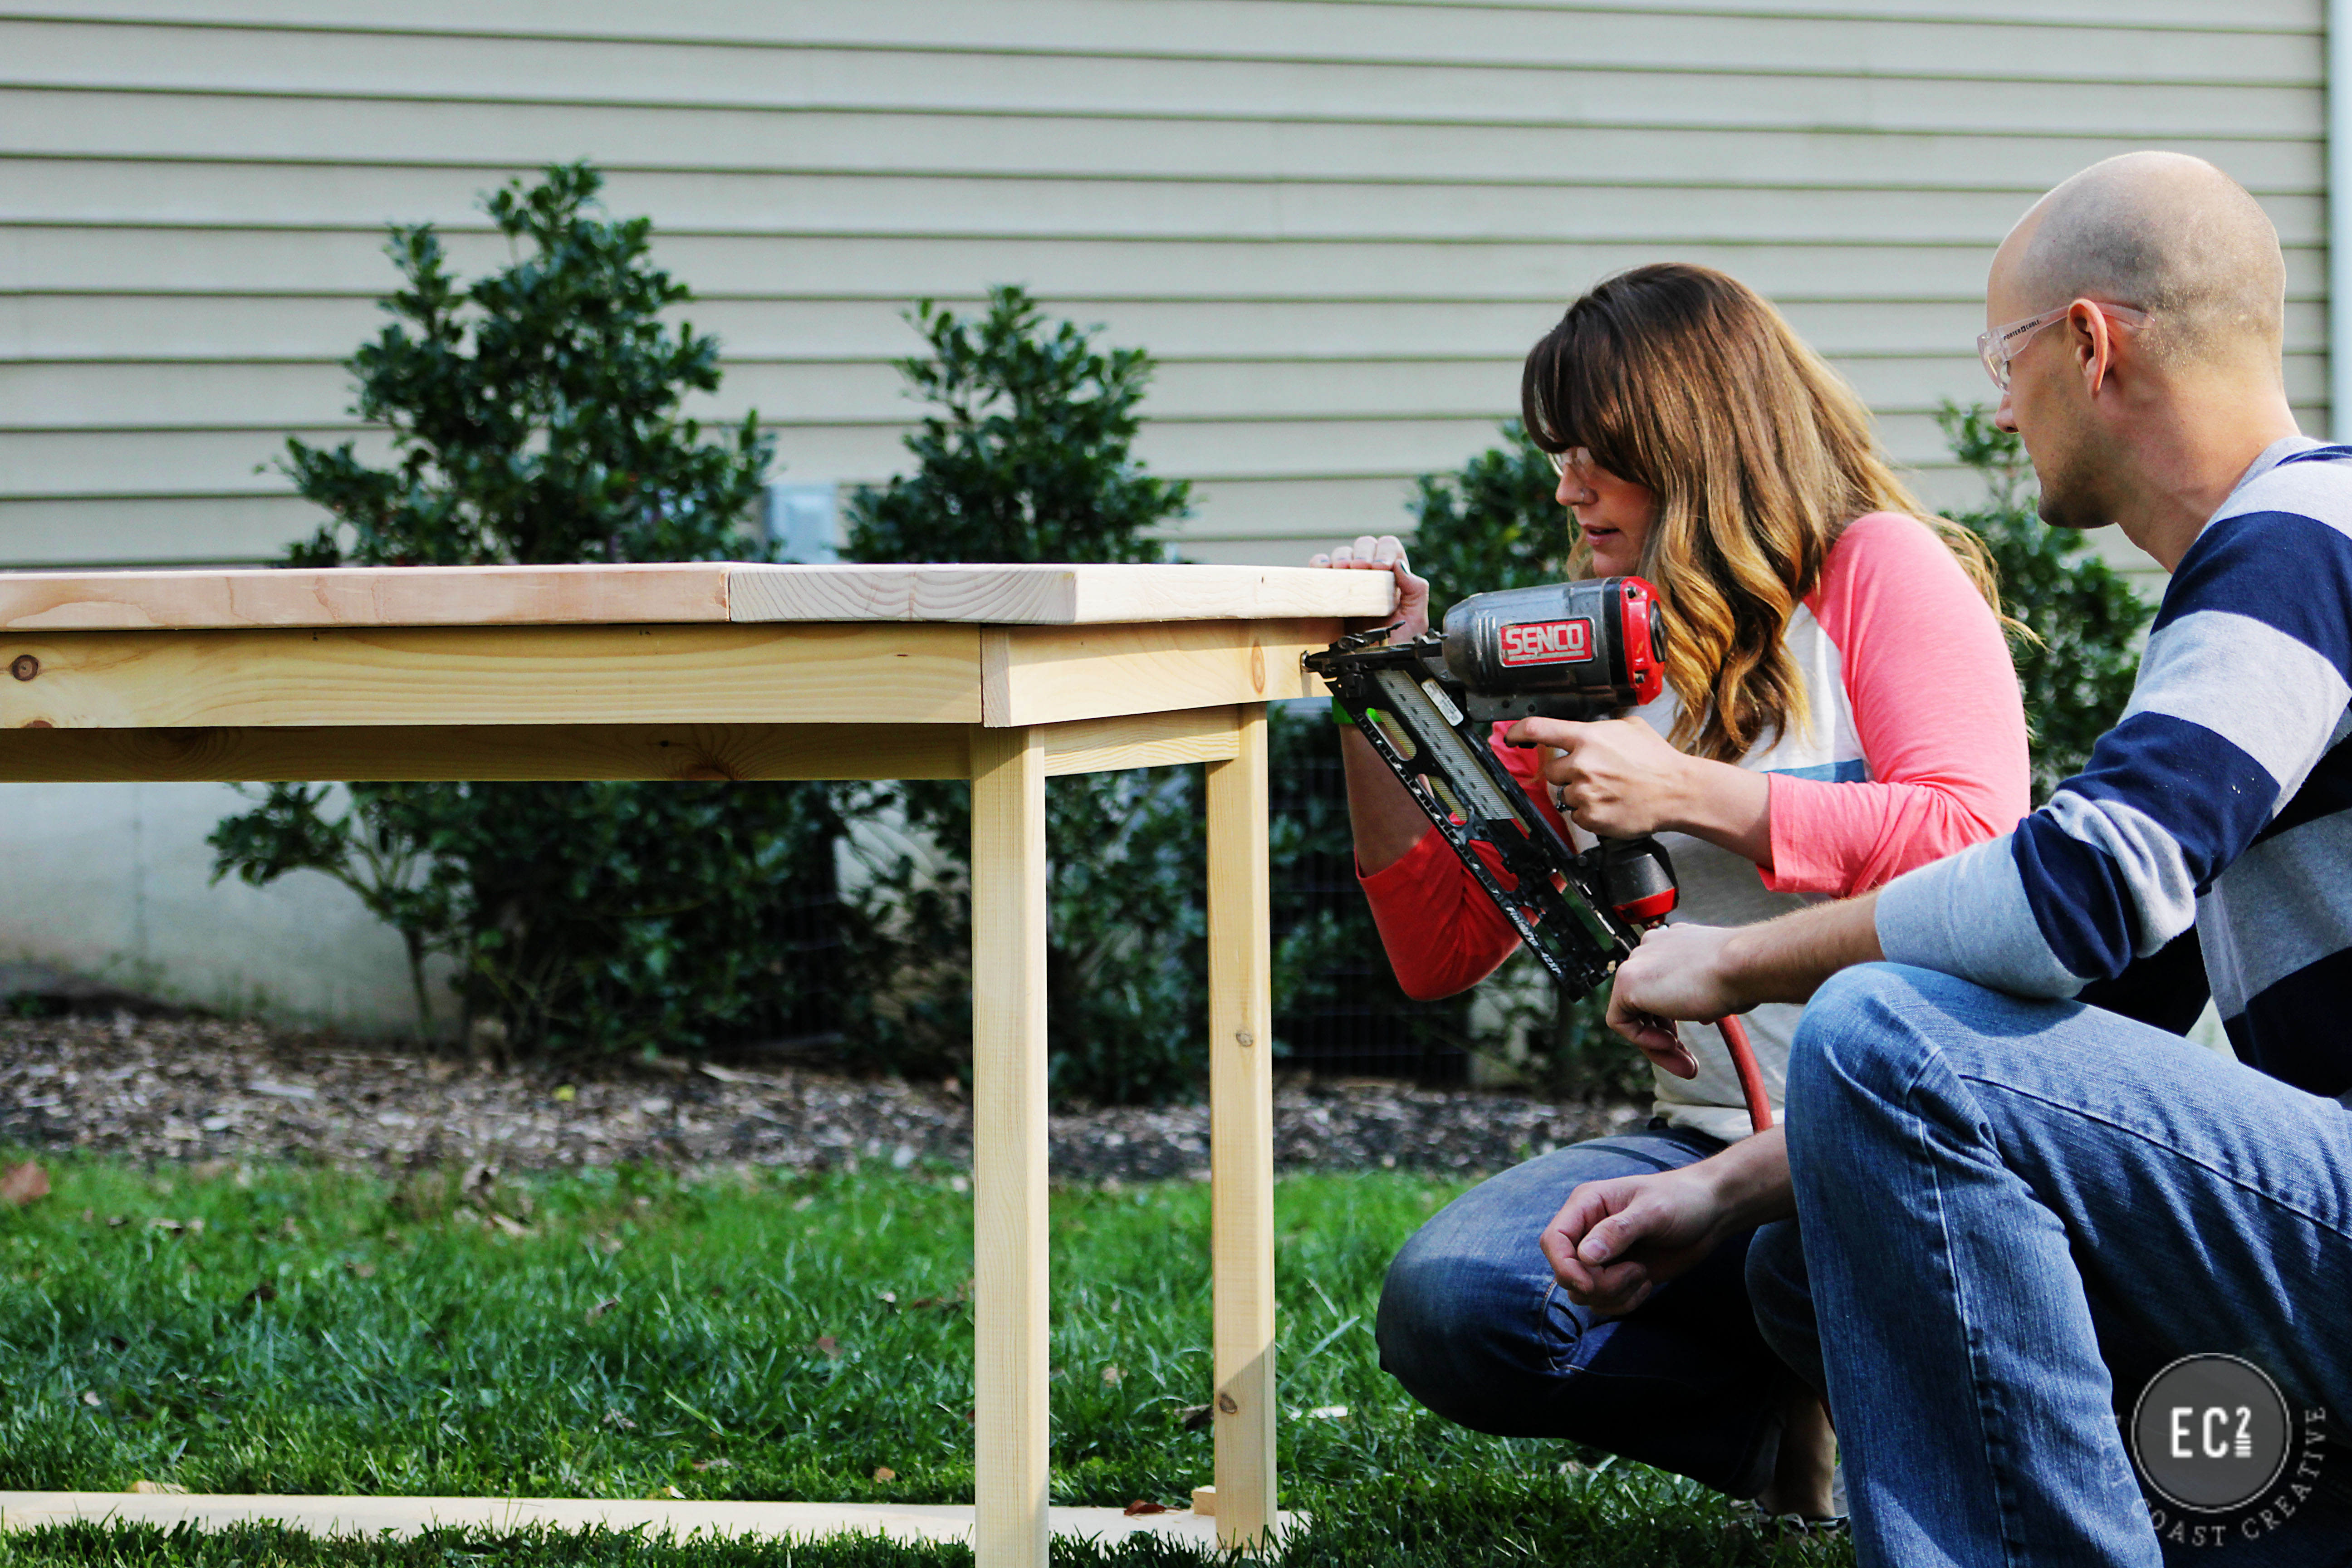
Step 7: This is an important step- you need to create an apron to hide the subframe and give the table a finished look. Measure and cut four 1×3 pieces of pine down to the size of each of the table’s sides. Attach the apron onto each side, under the wide top planks, hiding the frame. This step might sound confusing, but if you think of it as hiding the evidence of your IKEA hack, then you’ll be golden!
See how it makes the table look like it’s always been a farmhouse table? That apron works wonders!
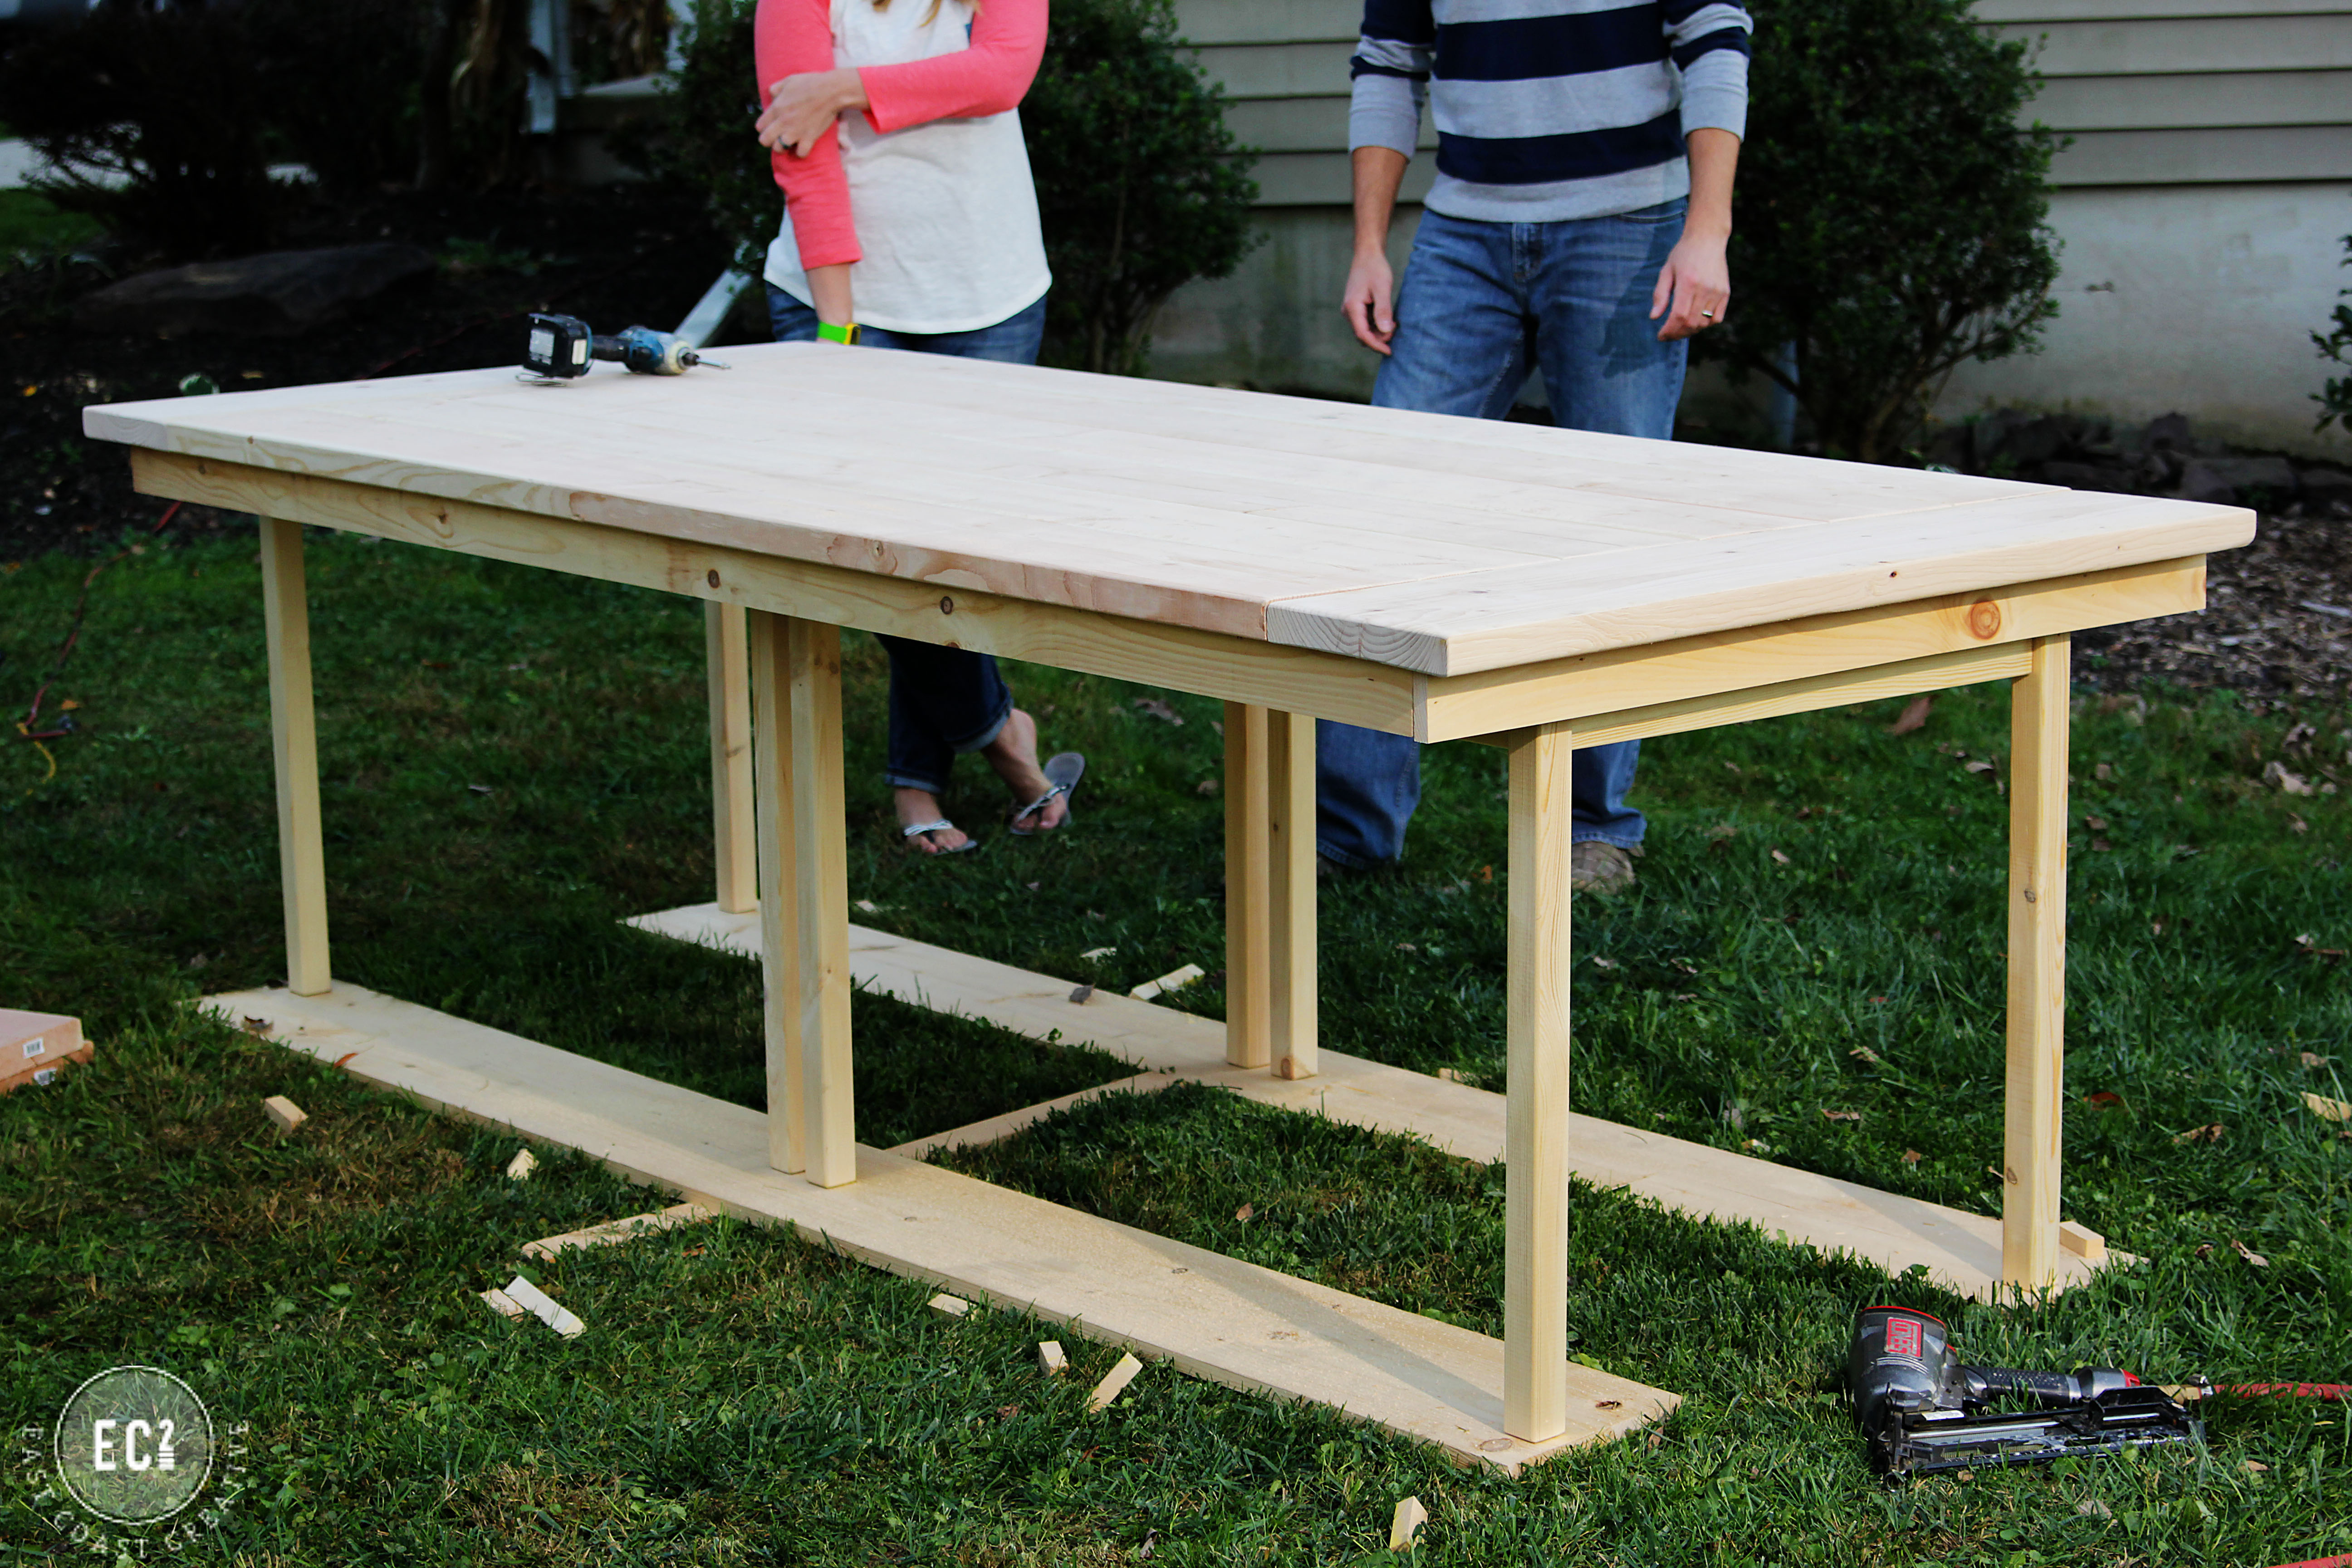
Now, let’s talk about those skinny legs for a second shall we? While I’d kill for legs that thin, it’s not the most attractive on a farmhouse table. For this episode of “Knock It Off” we were on a tight budget, so we let the skinny legs remain (knowing our benches would cover them up), but it would be really simple to chunk out the legs by boxing them out with 1×3 pine. It’s totally up to you.
Step 8: This step is optional, but if you’re using inexpensive pine like we did, I’d suggest distressing your wood. It’s going to get dinged up eventually, so this way it looks intentional and like it has loads of character! Plus, it’s kinda fun!
We usually distress with some household items…
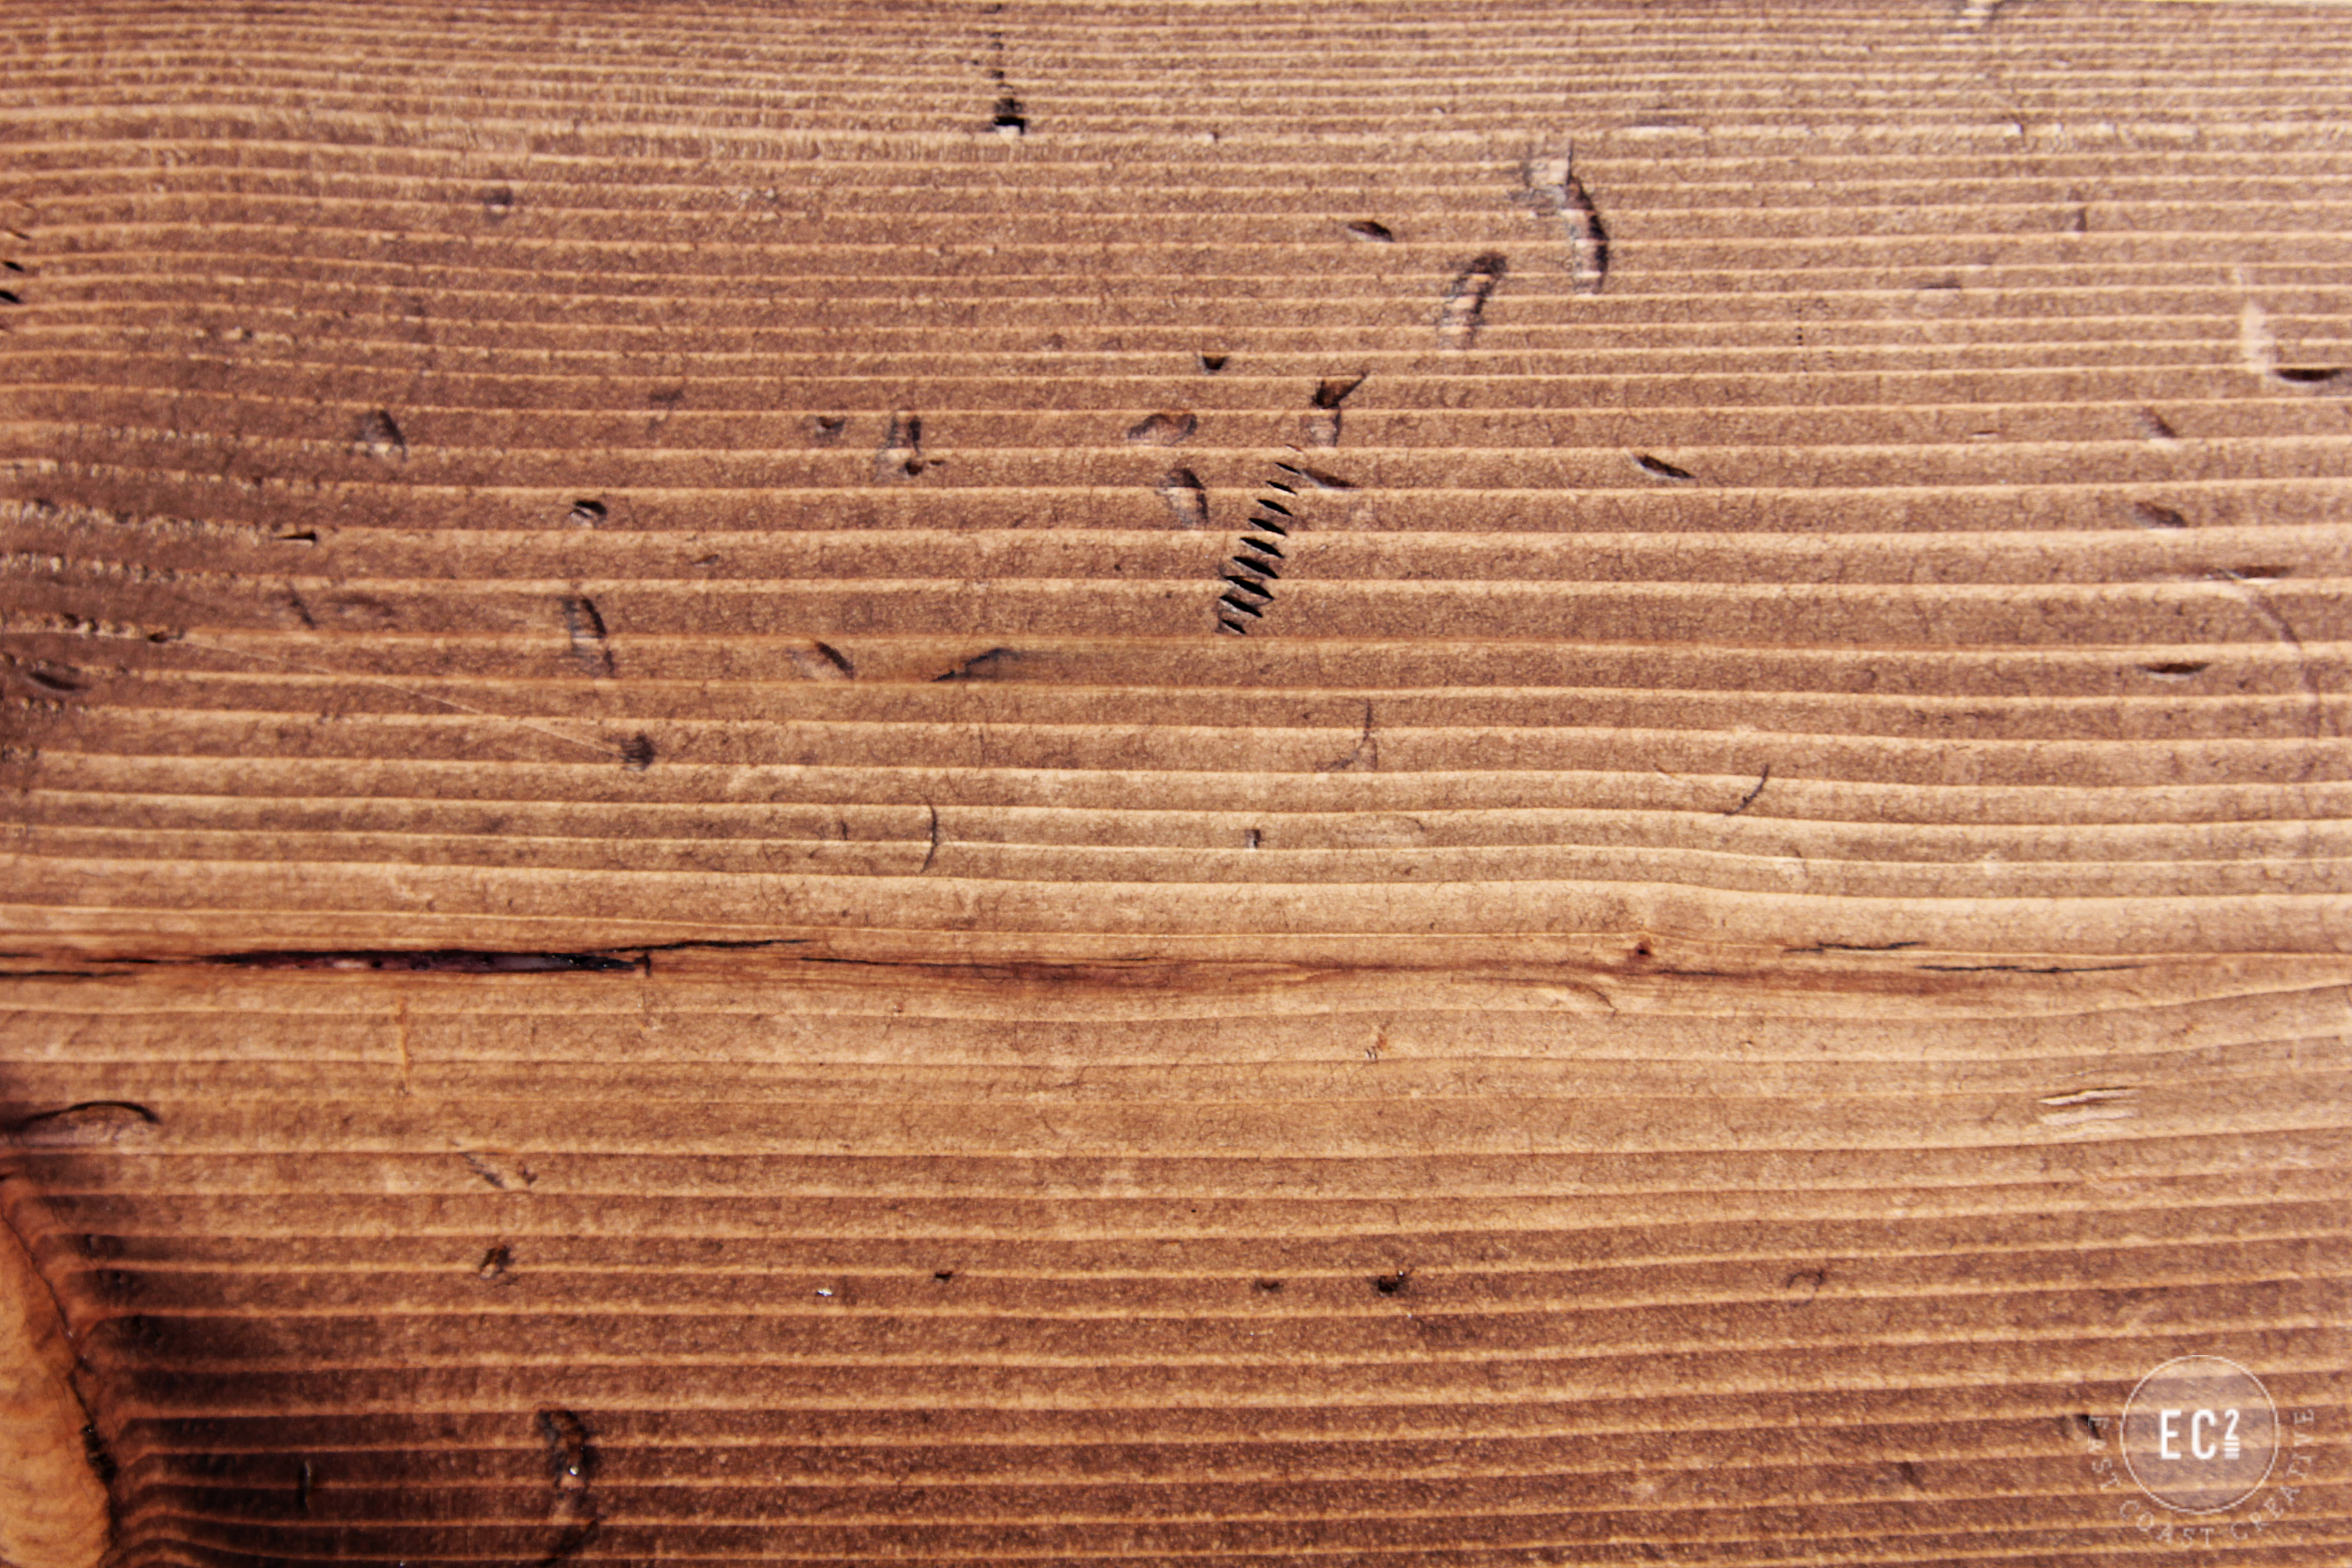
The little screw marks are my favorite! I love seeing the thread lines- we pressed the screws into the wood to achieve that look. After the wood is stained the distressing really pops!
Step 9: Stain your table and then apply 2-3 coats of polyurethane to seal it.
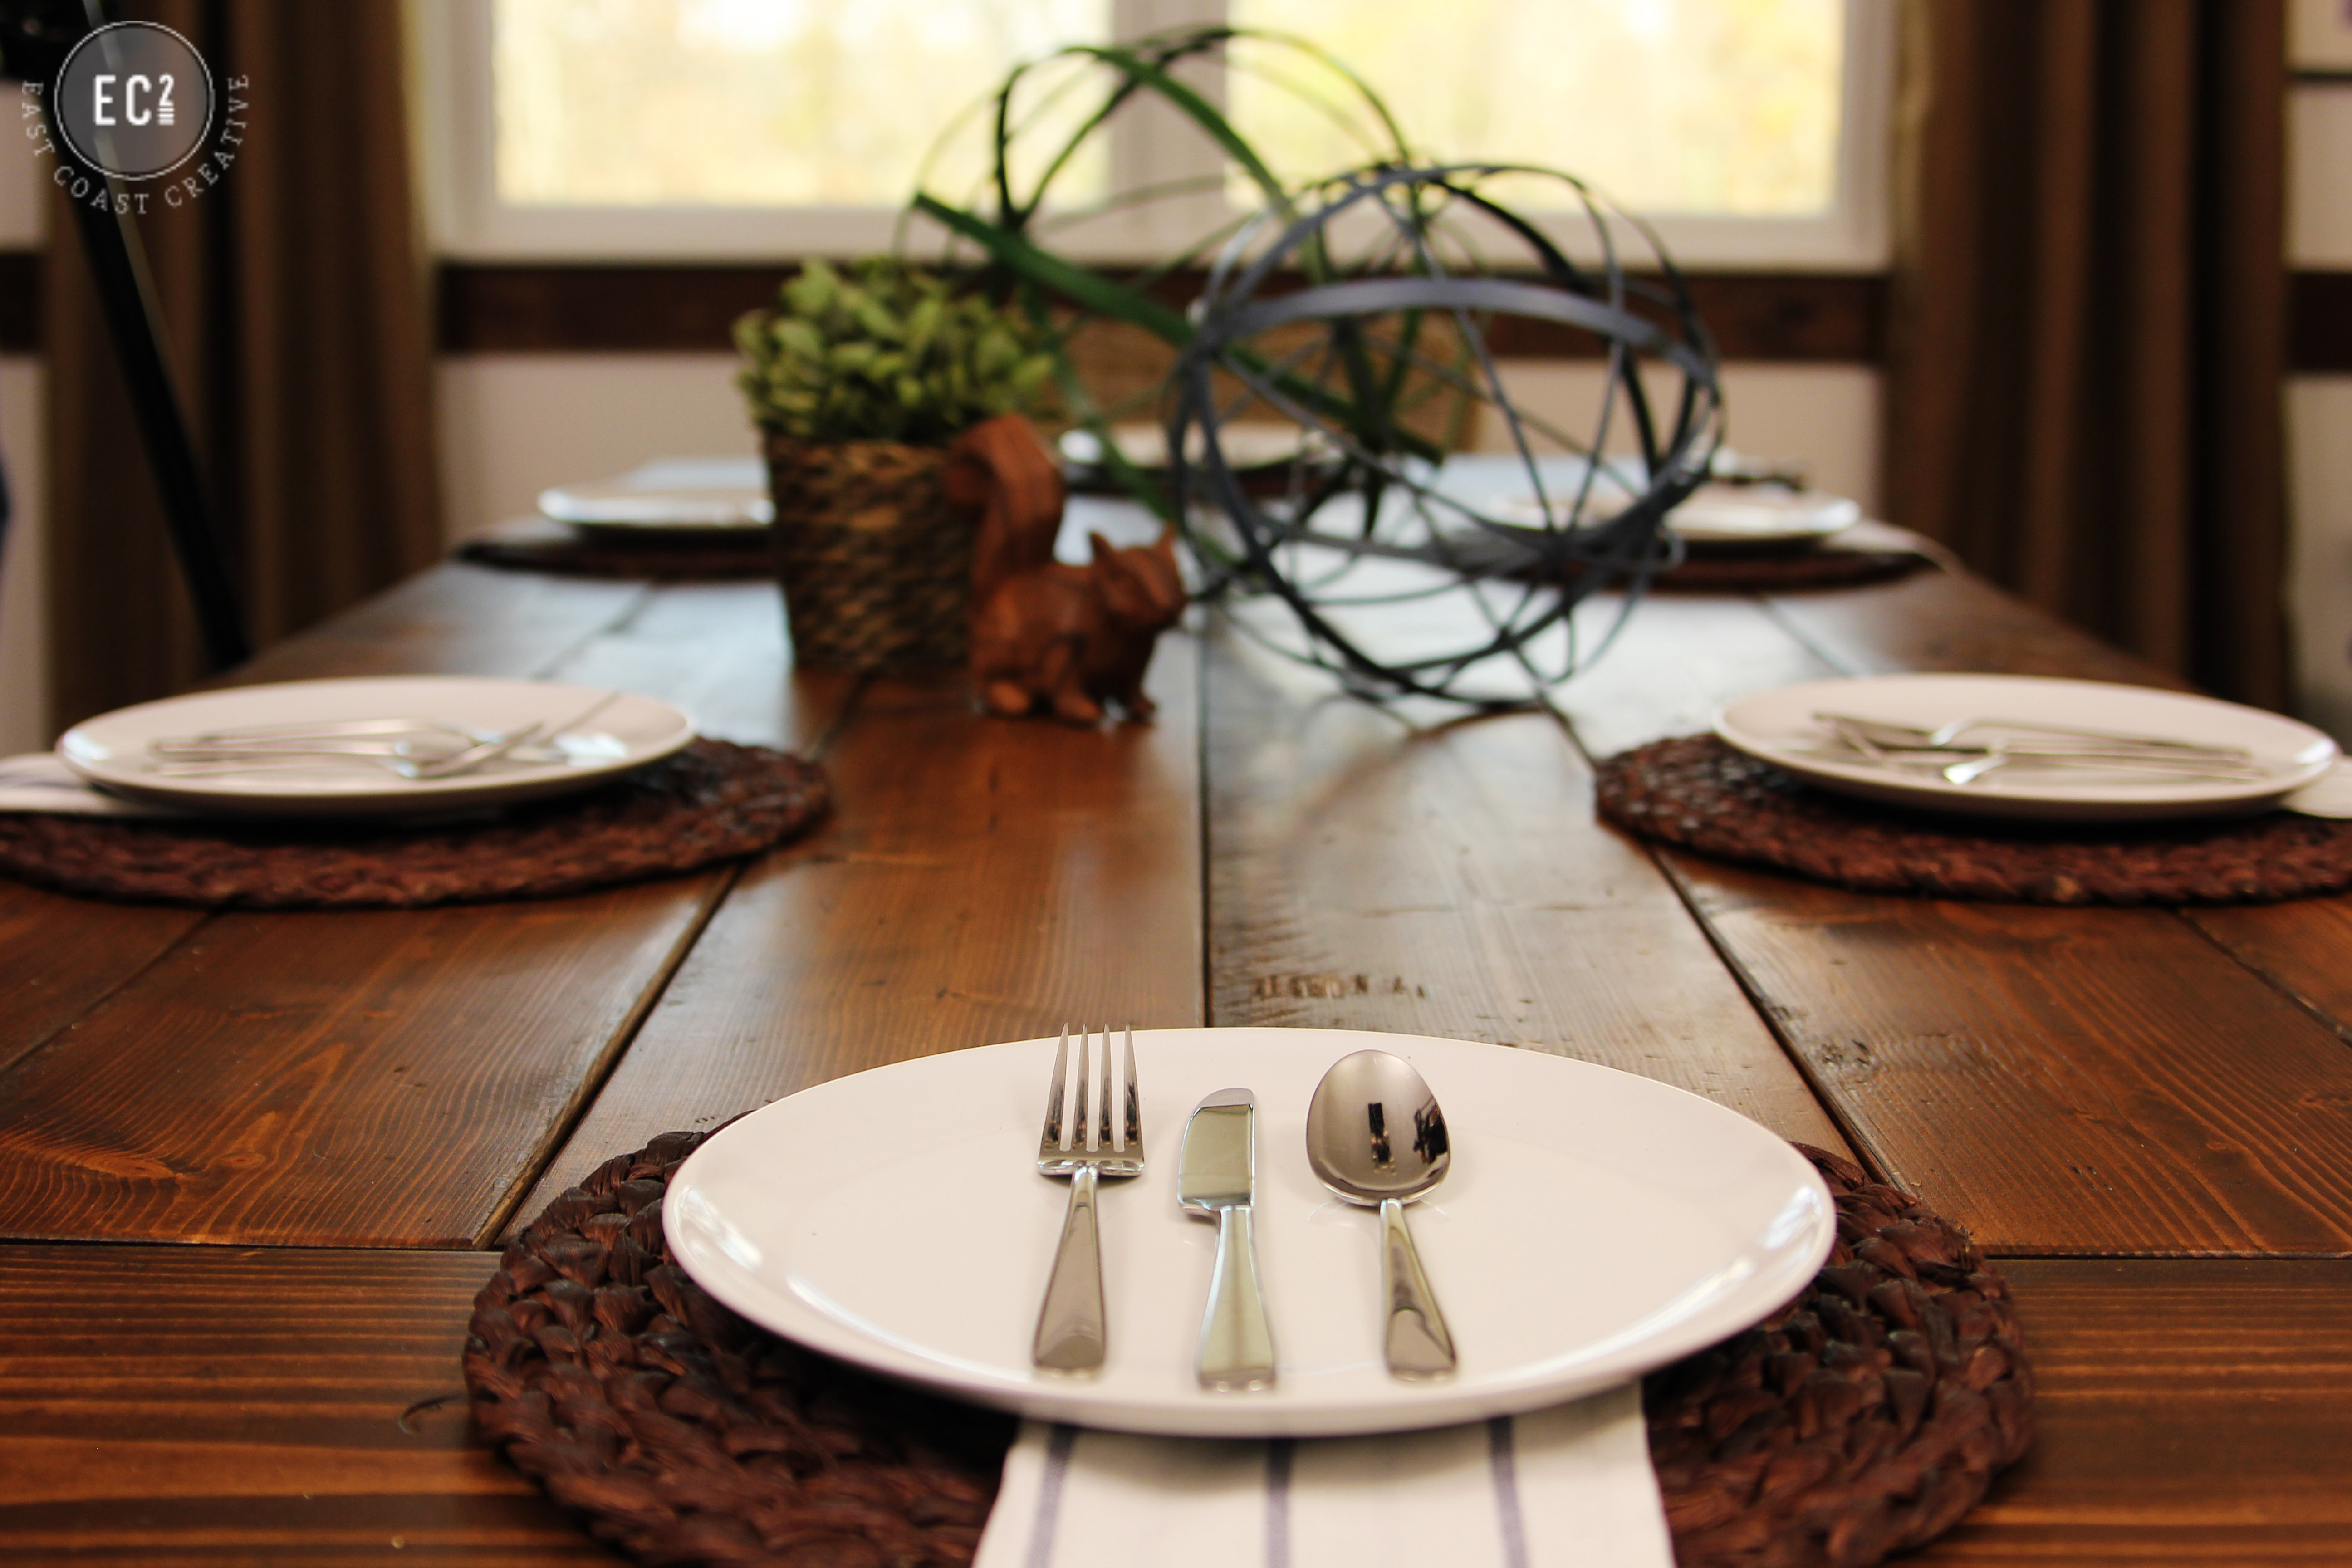
Seriously, can you believe this is an IKEA table? (well, two actually!)
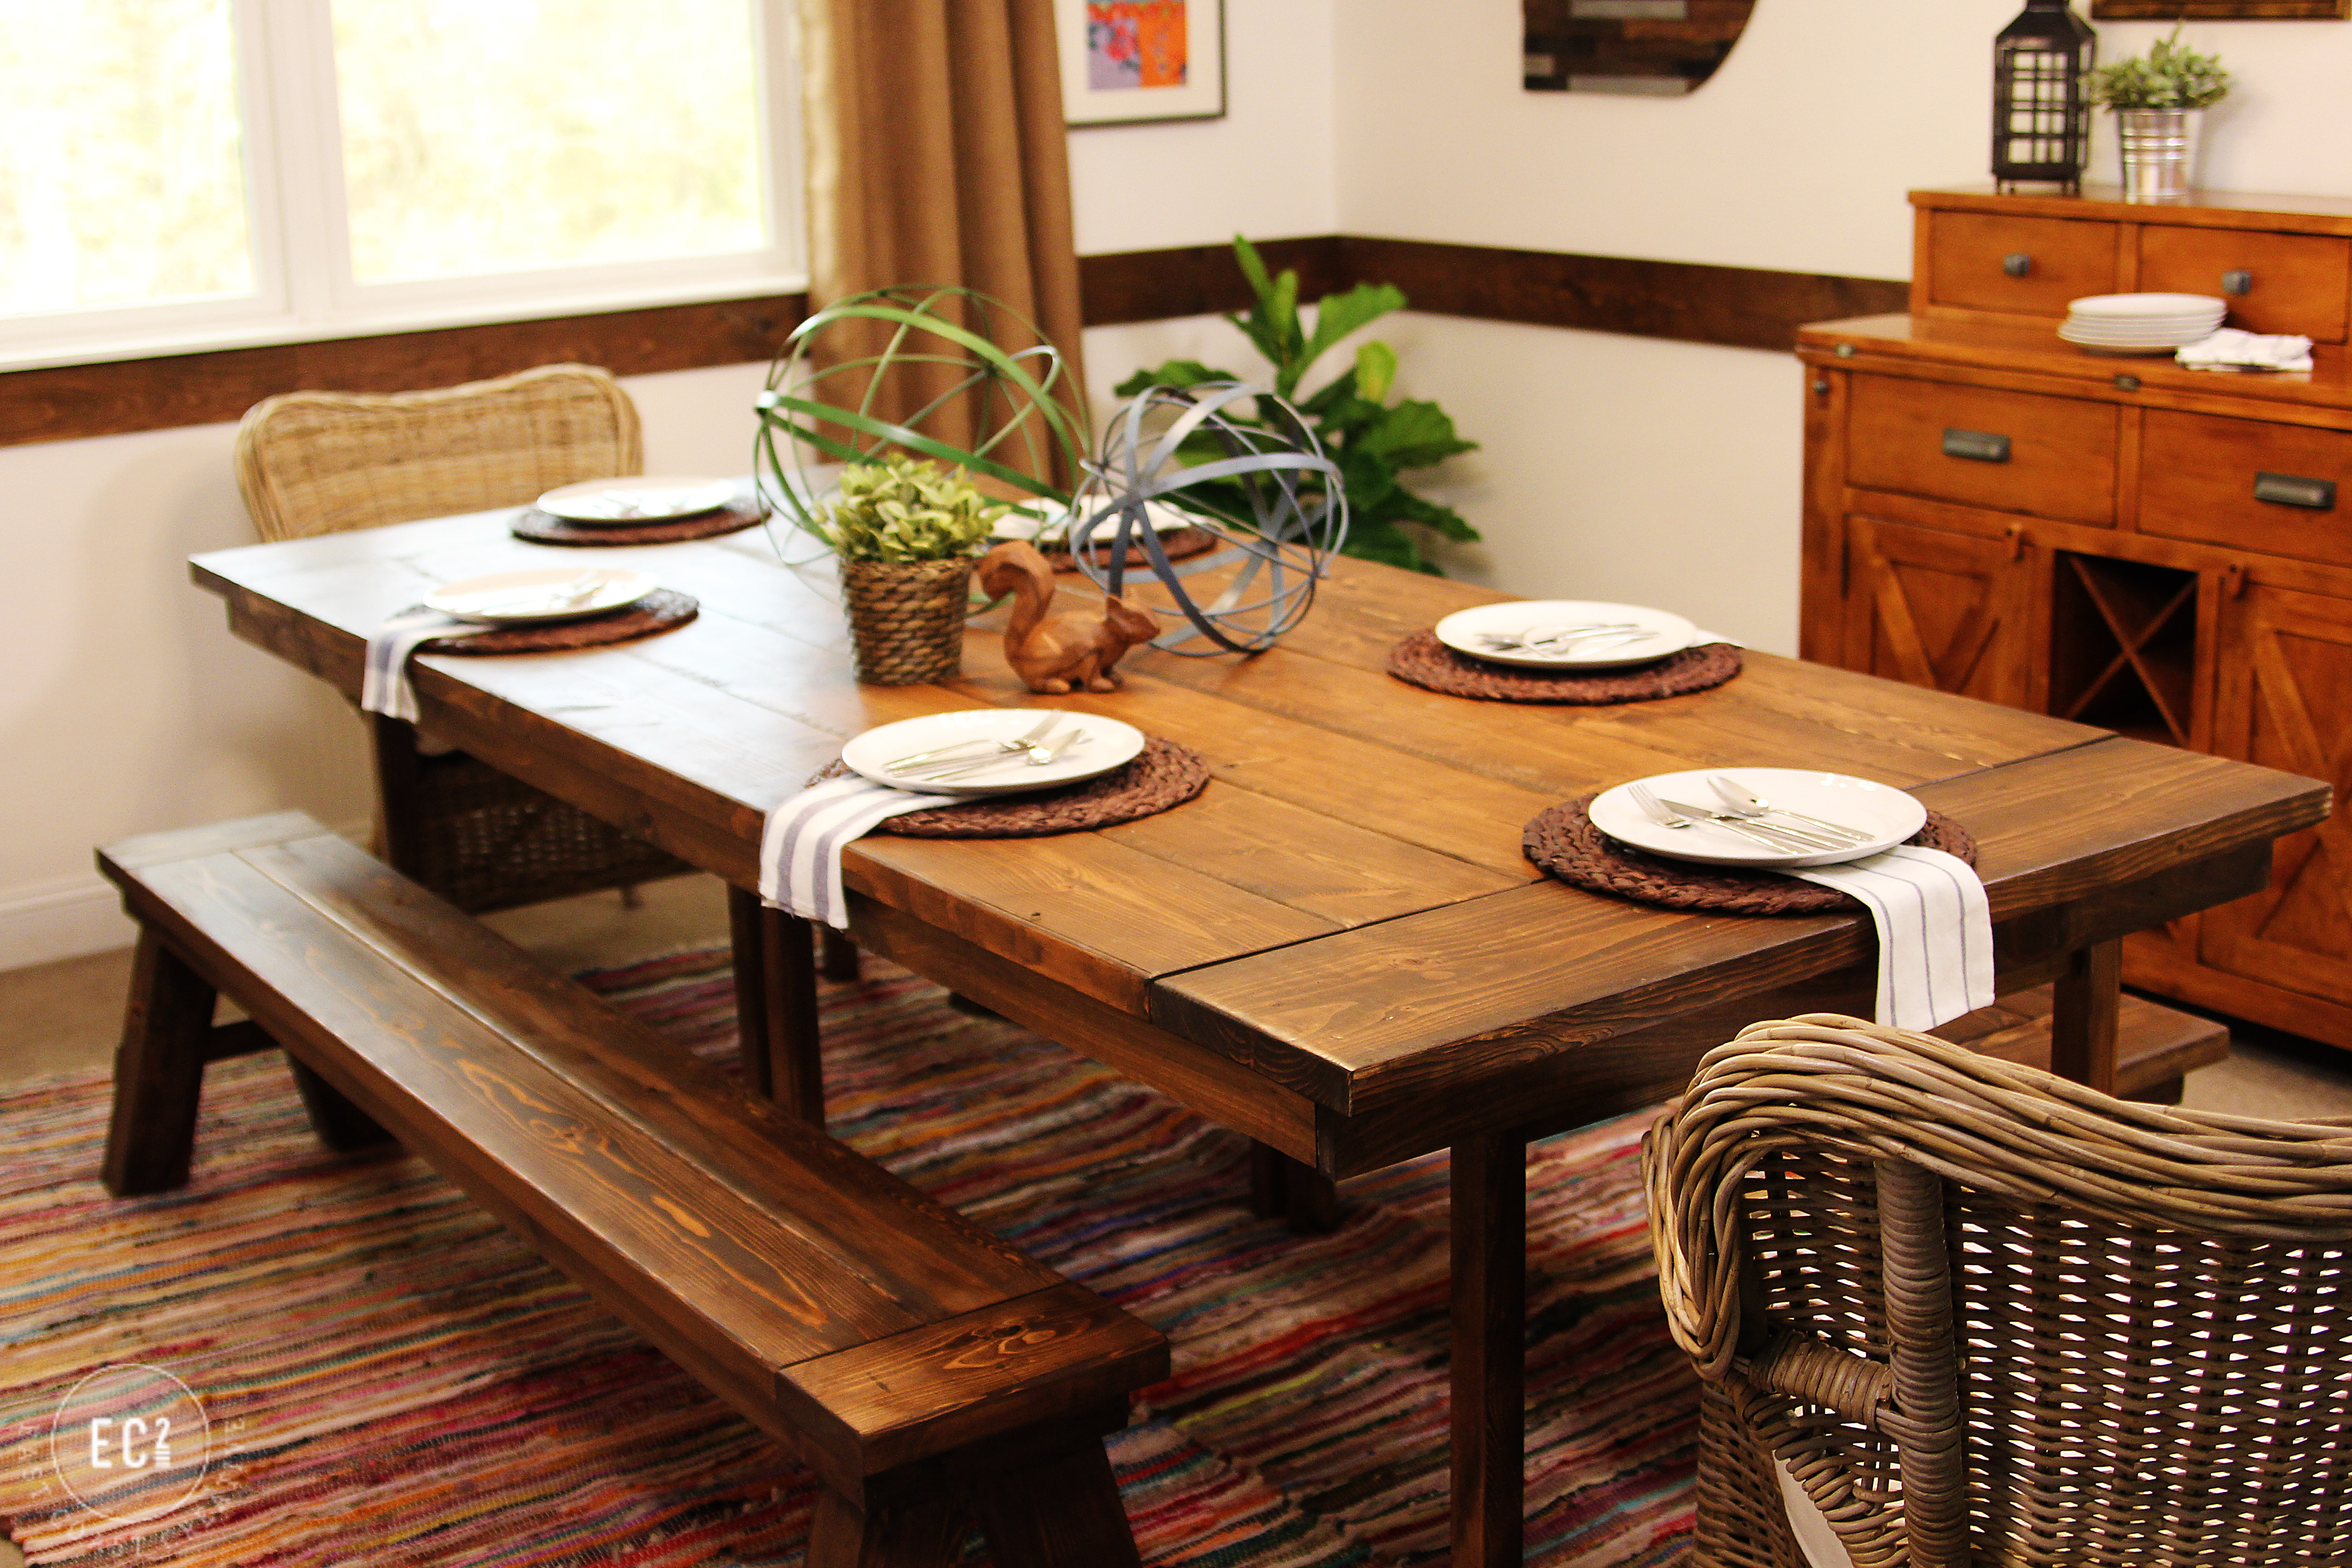
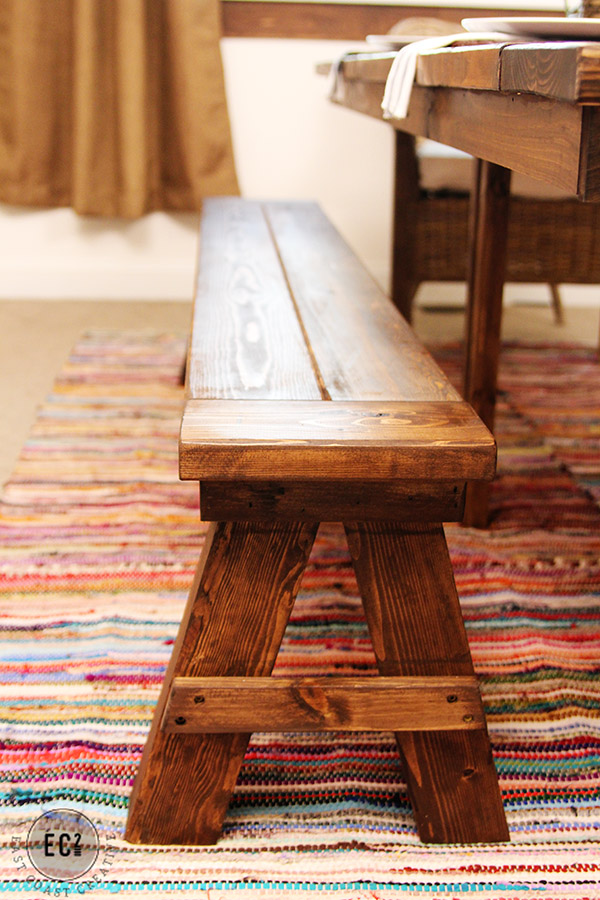
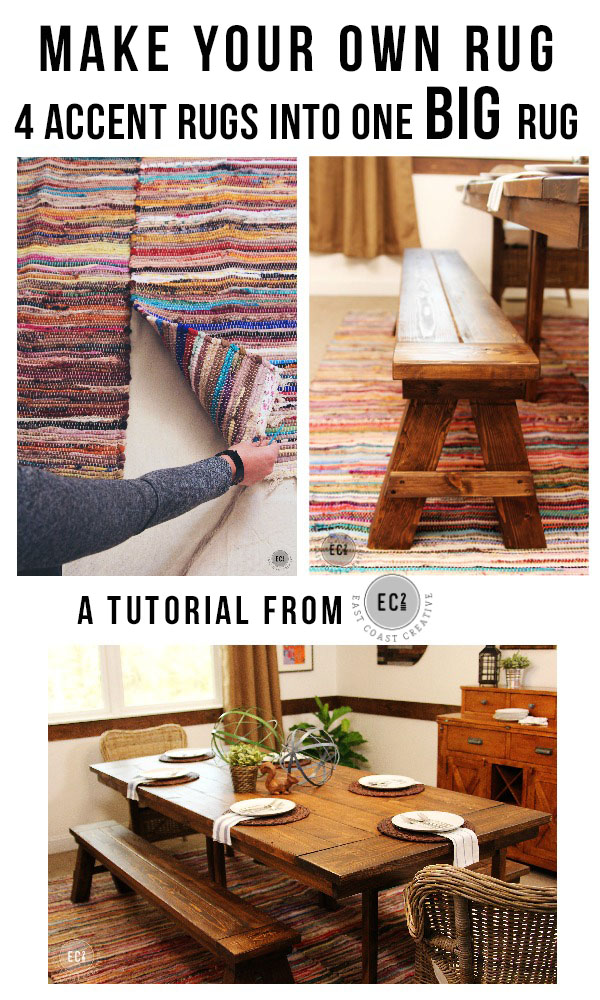
We used 2x4s and built simple benches rather than dish out a ton of money for chairs. I also like that they hide the skinny legs! Win-Win!
Under $200 for a HUGE farmhouse table that looks like it cost thousands.
And really, this is a great beginner DIY project. No complicated cuts and fancy tools required!
(now that you’ve seen the tutorial here’s that materials checklist again!)
Printable Project Materials Checklist
You’ve also gotta check out the other tutorials for this room!
Check out the DIY Mason Jar Chandelier HERE

Check out how we made our huge Rag Rug for under $50 HERE!
So, what of you think of this IKEA hack? Do you think anyone would know it cost just $69 per table?
We don’t think so!
If you missed this episode of “Knock It Off” you can watch it online HERE.
![]()
Q&A About this Project
Since this project is really popular- we’ve gotten a lot of questions. Here are some answers- hope they’re helpful!
Q: Why would you work off of existing tables? If you can make this you can make one from scratch…
A: Umm… we disagree! After working with over 65 homeowners on our TV show and countless more just in life, we’ve found that the idea of build furniture can be intimidating. We love that this project is more like giving a major makeover to an existing table and you don’t need to be the one making sure your table isn’t going to crash down on Grandmom at Thanksgiving!! Also, this requires simple tools and cuts. But, if you want to build from scratch- more power to ya! We love that too!
Q: Can I just use one table?
A: Totally!! You’ll use the exact same method, just skipping the part where you combine two tables together. I have a semi-ugly table in my breakfast nook and I’m thinking it’s almost time for it to get a makeover!
Q: Is the table sturdy? Has it held up over time?
A: Yup! We’ve had the original version of this project for 4 years now and every Tuesday we have about 25 people over for dinner- if it can survive that, it can survive anything!! We used cheap pine wood, so it’s distressed nicely, but if you wanted a harder wood- that would work great too!
Q: “Easiest DIY on the Planet??”
A: Okay, one thing you need to know about me (Monica)… I exaggerate things for dramatic effect. I’m constantly telling Jess that my stomach is eating me from the inside out when I’m hungry. I’m never just tired, I’m so tired that I’m going to die, and when something is “simple” it becomes “the easiest on the planet!” So, sorry if you were really expecting it to be made with tape and glue… I had already posted the graphic live when I realized the entire world didn’t quite know about my tendency for exaggeration 🙂 It is pretty darn simple though, wouldn’t ya say??
Did you know East Coast Creative’s Most Popular Blog Project of all time is now for sale?!?
Get Ready to Break Up with Your Bedtime Routine!
Check out our online store!


You are my hero. We have been racking our brains trying to decide how to make a farm
table. thank you for posting. Happy anniversary to me…
Lol Happy A-Day Stacey! This is such a great build bc you’re not starting from scratch. My husband and I built our first one when we were major DIY rookies!! Hope it’s awesome!
Looks great! I’d love a tutorial on how to make the benches!
Thanks Lisa. I can whip something up for the benches soon. We kind of just made them as we went. I know Shanty 2 Chic has a lot of bench tutorials if you want to check theirs out too! 🙂
Yes, I’d like a tutorial for your benches, as well! The whole table and benches look great! Nice job!
Hello! Love the table and bench. Any way you can send the plans for the bench?
Thank you
Did you ever do a tutorial for the benches? I would love to know please.
I really like this and it is so reasonable. My brother made us a farmhouse table for our wedding gift out of wood from a really old barn that I passed by on my way home every day and was getting torn down. I truly cherish the table but I know one day when we have kids I am going to want this table to go to our dining room or maybe bar area in our basement and get a different table. This would be super simple to make and I wouldn’t mind what the kids spilled on it or if it got dinged up. Thanks for a great tutorial!!!
Looks SO great!! I chuckled at your picture of ‘distressing’ tools… something about it seemed so gruesome! But a DIY gal’s gotta do what a DIY gal’s gotta do. 🙂
Haha Charlotte. I never thought about that, but it kind of does look like a bad episode of Criminal Minds! Thanks for reading!
[…] love a great IKEA hack, this rustic farmhouse table was constructed by East Coast Creative with two IKEA Ingo tables as a base, distressed and stained, […]
So after the tables, lumber, and supplies were purchased, what was the approx. final cost on this?
I didn’t read any of the other comments so it might be already said, but you wouldn’t have to buy the tables new from ikea. You could find an older table that has a top that is rough shape and do this too. It is a great idea either way but with a little thrift, you could get by with a $100ish total investment. I’d look into free stuff on Craigslist, garage/estate sales, or a local auction house. I’ve bought some tables and chairs for $20. Without the benches and if you have all the tools, I think you could get by with $240 total investment.
Great tutorial. Did you find the table a bit high ? as you added several inches of wood by the time it was complete, or did you make it up in height of benches? I was thinking you could cut the legs a bit but that may well compromise leg and lap room. I really do love this look!
This project is AMAZING!!! I never would’ve thought of that and it turned out so great. I love the rug too. The texture of those is great and it really adds a cool, bohemian vibe 🙂
Wow…….that is one beautiful table! I really love it, and I’ve pinned it so I can hopefully convince my husband we can do this, too! Thanks for the tutorial, and the inspiration!
Debbie 🙂
YAY, you def have to give this one a go Debbie! Thank you for pinning and reading our blog! 🙂
Dear Monica & Jess….I love this episode also with the Farmhouse Table & Dining Room Makeover…I have been wanting a newer one also, but would like one of the newer ones that are the High Top, like in the Coffee Shops…We have been looking
at them for several yrs. We have a lot of hand-me down things or garage sale specials in our house, too…..I think I have talked my hubby into making one…I’m hoping it won’t be too hard, since
you gals did the long one in a few days….my only problem will be the chairs to go with it….
Do not know if it will be worth our time to try to make them or buy them…either way I am hoping we can
attempt it when it gets warmer back here in the Mid-West…too cold in Indiana right now!!…lol…..If you have
any ideas, feel free to post!…lol……Can’t wait till it gets WARM!!…..Keep Up the Great work…Love the Show!
Hi Raejean,
Thanks for stopping by our blog, we love hearing from the viewers of Knock it Off, we appreciate the support. You can certainly transform these measurements for a higher, coffee shop type of tables. You might even be able to find an inexpensive high table and then just add the wood like we did. Good luck and please come back to share with us.
[…] Ikea Hack: Farmhouse Table […]
[…] hack: IKEA Hack Farmhouse Table. I would be all over this stunning IKEA hack farmhouse table if it fit in my dining room. […]
I have been searching for a farmhouse table for YEARS. Went to those fancy furniture stores that will remain unnamed, and they wanted at least $4,000 for the table alone!! Thank you! Thank you! Thank you! I have never done anything like this before but I will make this my project over the next few months. Here’s hoping I get my dream table!
Do you have the tutorial for making the rug? Love it!
[…] If you missed the world’s coolest IKEA hack- our farmhouse table- check out the tutorial here […]
Awesome post – thanks!
I was wondering what stain you used – I love the depth of colour!
yes I want to know which stain you picked as well!
I would also love to know what stain you used. It’s beautiful! can’t wait to tackle this project!
This looks incredible! I’m pretty new to DIY and am looking to undertake this task (with relatively little knowledge on woodwork). Where do you recommend getting the wood from? I don’t think this looks like your typical Lowe’s or Home Depot trip…
I also would love a tutorial on the benches! They look great. Thanks for your help!
awesome- thanks for the farmhouse table tutorial. My husband and I have been planning on doing this once spring hits for our outdoor space. any recommendations for sealing it with something weatherproof? Also- do you have a tutorial for the bench?
You are very creative and talented; that table looks so classy and amazing.
That said, I found this on Pinterest and I get mildly cranky about how people claim stuff is SO SIMPLE! Thenen you go into the simple thing and it’s like 50 steps and they’re all complex for the average Joe.
This is only the “Easiest DIY Project On The Planet”. If you live on a planet filled with people that are all super artistic and good at wood working. And if you have a table saw. And an electric sander. And a nail gun.
I’m sure there are work-arounds to having all that stuff accessible and it might take about a day’s worth of time to put together after that (not including a trip to the hardware store for supplies) but that’s already way more effort than I personally want to put into a project.
Gotta disagree with “easiest ever” I’m afraid. 😀
Hey Lucy! Thanks for your comment! I actually 100% agree and if you saw when I posted this on my IG account I totally made fun of myself for writing that. I honestly have no idea in the world why I captioned it that way, but it went kinda viral, so I couldn’t change it! LOL. I mean, I’m pretty sure there are 6.4 million easier projects than building a table! Thanks for the feedback and I’m totally right there with ya!
If you don’t own those tools, you could skip the project, all together. As far as building a custom table in a super cheap manner that takes loads of time and steps off of building an actual farm table, this becomes relatively easy. Cuts are not overly detailed or involved. IDK why people feel the need to be so negative all the time. If you see a project that will not work with your skill set, no need to say anything, just find a different project.
[…] East Coast Creative Blog: Ikea Hack: Build A Farmhouse Table The Easy Way […]
shopping comparison app
IKEA Hack – Build a Farmhouse Table the Easy Way – East Coast Creative
[…] 10. Ikea Hack: Build Your own Rustic Farmhouse Dining Table […]
I am stating this project on my existing ugly table. Can you tell me what stain you used? I couldn’t find it while combing through the comments. Thank you for the tutorial! -Kathy
Hey! So glad you’re trying the farmhouse table!You’ll love it! I believe we used Rustoleum’s American Walnut. It’s a nice medium, rich stain. Send us pics when you’re done!! -Mon
[…] Ikea Hack Farmhouse Table by East Coast Creative […]
Love this table! What are the finished dimensions?
Continued
IKEA Hack – Build a Farmhouse Table the Easy Way – East Coast Creative
i was wondering if u could get me the measurments for the benches you made. thank u
Hey Chasity- Thanks for your comment! Actually, we build the benches exactly to fit the homeowner’s room and table size, so we didn’t keep the exact measurements. However, there are some great bench plans on other blogs. Check out Anna White’s blog if you want a few different options. Sorry! During these fast makeovers, we usually don’t have enough time to jot down all our measurements. Good luck!! -Mon
I love the farm house table.wish I had one.
thank you for sharing this.I have been trying to make a Farmhouse dining table that i want to give as a gift to my grandpa on his upcoming birthday.He is very fond of unique things that is why i want to make a dining table that will be unique but i don’t have any idea but now i got one.
Thank you..i just love your post.
This looks so awesome! I am going to try this, though I have no DIY experience at all. I want to somehow modify it so I could have a higher area with bar stools attached.. any ideas on how to go about that? Thanks for this great post and all the step-by-step pictures
[…] here via […]
Ayda
IKEA Hack – Build a Farmhouse Table the Easy Way – East Coast Creative
event-ology.net
IKEA Hack – Build a Farmhouse Table the Easy Way – East Coast Creative
Alanna
IKEA Hack – Build a Farmhouse Table the Easy Way – East Coast Creative
This is the best idea we have come across to make our existing table wider and longer. I wish you could post some basic plans on how to build the bench. It is something we will be building shortly. Thanks so much. Blessings to you.
This tutorial is amazing and I’ve been wanting to buy a large farmhouse table for quite some time. So much better to save money and make it though. Just came from IKEA and headed to home depot now to get the rest of my supplies. You’ve truly inspired me. And my hubby is going to be super surprised that I had a part in making this ( His best friend is helping me) He will be super surprised on Christmas Eve. Thank you for this!
Good luck! You’re going to love the end result and it’s so fun that you’re surprising your hubs!! Send a pic when you’re done!
Love the table…just got my ikea tables today…anyway of getting the how-to on the benches?? I’ve never made anything like this so speak slowly. 😉 Sorry if you have already answered this question. Thanks!
[…] actually built & stained the table & bench ourselves, (using these tutorials- table -bench) as well as painted & reupholstered the chairs. It was our first ever project like this […]
[…] Image Source […]
I love the table but some really heavy duty equipment is being used here; not run of the mill supplies. Some strength and skill in woodworking is also required. So a very miss-leading heading.
This was super easy to do and the table looks AMAZING!
[…] I love that you can buy an affordable table at Ikea and turn it into something gorgeous like this farm table via East Coast Creative Blog. […]
[…] hier hoe je zelf zo’n tafel kan […]
Thanks for sharing this great Hack! I love it as many others do. My question is I would love to make a very large table for outdoors and yes it would be in the weather. I live in a northern state so rain and sunshine in the summer it would have to handle. I can put it up in the winter or cover it.
Would this work with a different finish to protect it?
Thanks!
Our house is too small to have the farmhouse table up all the time. We move our furniture around to accommodate a crowd.
I’m thinking we would make the table as you did, but instead of drilling into the tables, we would make the top as a separate piece. The top could be stored behind some furniture and instead of one long bench make two for each side. For every day I can have the tables in separate rooms – dining area & play room/craft space. Would do you think?
[…] East Coast Creative […]
[…] East Coast Creative […]
[…] Click here to read full article […]
[…] love the idea of a farmhouse table. maybe i could convince jerry to make this one for […]
I am planning to build this table but would really like to hear how you would chunk out the legs please.
Hey Trei! I would recommend using maybe 1×3 or even 1×4 wood if you want it really chunky and basically cutting 4 pieces to surround each leg. I’d basically wrap the leg in wood, using my nail gun. You could add some decorative trim if you wanted to add some detail! Good luck!
Is the top you created designed to just lift off for when you want it bigger?
[…] IKEA Hack – Build a Farmhouse Table the Easy Way – East …. Jan 13, 2014 – It has all the wood measurements, tools, my stain recommendations etc, so you can print it out and … Step 2: Attach the tables together using a 1×3 pine plank and screws. … Check out the DIY Mason Jar Chandelier HERE. […]
[…] INGO (59,99 euros) y algunos listones de madera de pino, tal y como lo explican en el tutorial de East Coast Creative Blog. Después, sólo queda envejecer la madera con algunas herramientas para darle ese aspecto de paso […]
Did you also make the sideboard in your dining room? If so, is there a plan you would provide? If not- where did you get it?
What was the length of this table finished?
If you just use one table and you made the width 48 inches wide wouldn’t it be more of a square table since it’s about 49 inches long? What would recommend doing for length and width for one table?
Finished table looks great — close to those big heavy farm tables they have at Pottery Barn, etc. One thing, though — you’ve added I think over 2″ in height to the original IKEA table. Did you cut the legs by 2″ to even it out? IMO tall dining tables are very uncomfortable (I like heights of 28-1/2″-29″ and I’m almost 6′ in height). Most IKEA tables are in that range, but most store bought tables are 30″ which are noticeably too high (makes you feel like the table is intruding vertically into your eating space, plus blocking out more of the people you may be sitting with). There’s plenty of leg room in an average size chair for a 28″ table, so that shouldn’t be a concern. Thanks for sharing those ideas.
Amazing. Absolutely amazing Job! The stain really does bring it to life.
Beautiful and essential!
Do you think there is a chance you could make one with a removable leaf, for times you don’t have to feed a crowd. I’m excited about making this.
But just thought about adding a leaf.
Would love to hear your thoughts.
Hi,I read your new stuff named “IKEA Hack – Build a Farmhouse Table the Easy Way – East Coast Creative” like every week.Your humoristic style is witty, keep it up! And you can look our website about love spell.
Thank you for this DIY….. Husband and I have been searching projects for an outdoor table. I really like this one. Can you tell me what we can do to make sure this table can weather the outdoors? If that’s possible! We live in the San Francisco Bay Area (so, hot summers – wet winter/springs). Thanks!
I made one for my outdoor patio as well, and the key would be multiple coats of exterior poly as your finish coat! Should work like a charm!
I would love to do this to a coffee table I have. How would I convert the materials to something smaller? And since the top of my coffee table top lifts up I’d need lighter wood. Maybe a new video idea?
Also, the printable materials list button goes to an error page.
[…] Farmhouse Table East Coast Creative […]
Hey this looks beautiful and not too intimidating! If I didn’t want the table much wider, could I just put the wide planks directly over my existing table with maybe just an inch or two overhang? Any tips if I were to do that?
[…] It really does make a truly beautiful and timeless piece of furniture. So perfect for your farmhouse kitchen or dining room! See the complete tutorial here. […]