
How many times can we say we were floored by the Round 2 projects? Not enough, apparently, because, people, those projects were incredible. If you missed the Round 2 projects, you can see all of them right here. To see the bloggers you chose to move on to Round 3, click here. We’re sure these girls are already working hard on their Paint challenge this week- ack! We’re loving the suspense. 🙂
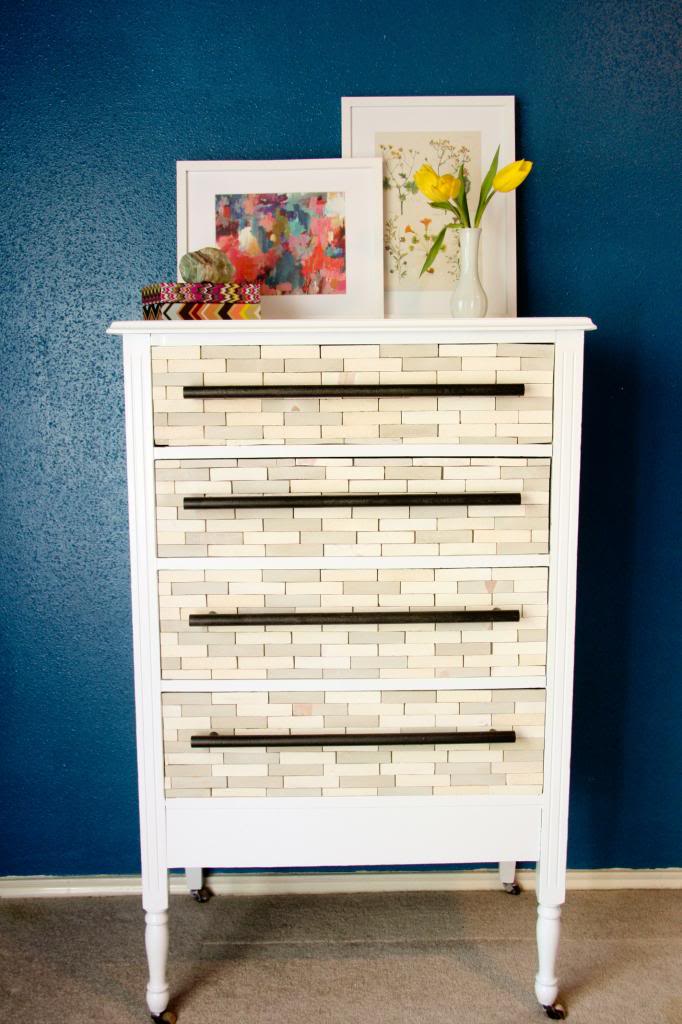
 We have been anxiously awaiting the tutorial for this wood-tiled dresser since we first laid eyes on it. I’m not sure you guys realize this, but the contestants get about 3-4 days to complete their projects, photograph them and submit them to us. That is a crazy turnaround, but you would never know it with this one! It was so well-executed and came out beautifully. Love it!
———————————————————————————————————————
Is it awkward for me to admit that I knew I would be knocking off this dresser before I even got into this competition? I’ve been in love with it for a while now, and I remember a week or so before I even found out I was in the competition I stumbled on it again and my husband Corey and I decided right then and there that if we got in and if there was a knockoff round, we’d be doing this guy.

(The inspiration – via West Elm)
Luckily, we did, and there was, so here we are! Like I said, this dresser has been on my mind for a while because it’s just so beautiful, but if you know me at all you know I’m not the type to spend $900 on a piece of furniture. It’s just not gonna happen. So, Corey and I set out to re-create this dresser as affordably as possible, all while putting our own little spin on it.
What we used:
-
An antique dresser
-
Scrap 1×4 wood – we used maybe one board total
-
White paint and Gray paint
-
Gorilla glue (or any wood glue you like)
-
3/4″ dowel rods (for drawer pulls)
-
1/2″ dowel rod (for drawer pulls)
We started off with this beautiful antique dresser that we found at a local flea market. We loved the clean lines, the tall frame, and (of course!) those casters. Drool. Our style is a pretty good mix of modern and more traditional/vintage furniture, so we liked that this would lead to a slightly less sleek and modern look than the original, which fits right in with the rest of our house. It was basically perfect.

The first step for us was figuring out a way to inset the drawers a bit so that when we added the wood tiles they wouldn’t stick out. We wanted the entire front of the dresser to be flush (the West Elm one has the drawers slightly inset, but we thought a flush look would be a bit more fitting for our dresser). Our original plan was to just move the drawer slides back a few inches in the dresser, which would hopefully make the drawers sit the way we wanted them, but thankfully it was an even easier fix than that with this particular dresser – there were little metal pieces on the inside of the drawers that stopped them from going all the way in. All we had to do was pull those out and make some new stoppers with some little dowel rods and we were good to go.


Next up was cutting all of our wood tiles. Let me warn you – this project isn’t for the faint of heart…it took forever! But, I think the end result is totally worth it, so I won’t complain. For the tiles we took a few 1×4 boards that we had already laying around and cut them down to 1/4″ thick tiles. It was the quickest way we could think of to do it, and it also meant that the end-grain of the wood would be showing, which added some fun texture. It was a pretty quick job to cut the tiles – we just used a chop saw with a piece of wood clamped to it to make sure all of the tiles were the same size. Our stack quickly grew, and soon enough we had a giant pile of wood tiles.


One they were all cut, we gave them a quick whitewash. I wanted a bit of variety within the tiles, so we did a whitewash on some of them and a gray wash on others. It was a subtle difference, but it makes the end product look a bit more random and varied, which I like.

Once our tiles were all dried and ready to go, it was time to attach them to the drawers. We didn’t want to nail them in because then we’d have a billion different nail holes to fill, so we just used some wood glue. We glued ’em on in a subway pattern and then clamped a board to the drawer while it dried to ensure they all stuck. As the tiles got wet with the glue, some of them started to bow, so clamping it down also kept that to a minimum. We let it all dry together for about 12 hours (just to be sure!) then removed the clamps, sanded down the edges, and that was all there was to it!

 The
Thelast step was creating the drawer pulls – we knew we wanted ones similar to the inspiration piece, but we also knew that actually finding and buying those pulls would be challenging (not to mention expensive!) so, we decided to make our own! Corey bought a 3/4″ dowel, drilled two holes in the back, and inserted a small, 1/2″ dowel piece . We then spray painted the whole thing with some oil-rubbed bronze spray paint, and screwed ’em in!


Once we put it all together, it looked a little something like this:


And that, my friends, is how we created our own version of West Elm’s wood-tiled dresser – and under $200, to boot!
——————————————————————————————————————–
Isn’t that fabulous?! An amazing knock off that even West Elm would be impressed by. 🙂 We were peeking around at Amanda’s blog and found these adorable DIY Animal Magnets. Another knockoff, and we are obsessed.
——————————————————————————————————————–
Isn’t that fabulous?! An amazing knock off that even West Elm would be impressed by. 🙂 We were peeking around at Amanda’s blog and found these adorable DIY Animal Magnets. Another knockoff, and we are obsessed.

This Dresser turned Media Console isn’t too shabby either, is it?

Check back tomorrow because we’re pulling a Young House Love on ya, and posting TWICE!! We’ll be sharing the tutorials for the super fun Anthro-inspired plate wall and the Anthro Ikat Console!!
Also, do you want to be a part of Creating with the Stars yourself? You can link up your favorite knock off project right here until tonight at 10 PM EST for a chance to win a great prize package and be featured on EC2!


Simply genius…love it!
It’s great! I didn’t know you made the handles too. Very nice! You’ve convinced me to look for a dresser I can do this to.
absolutely love this piece! great job!
Great ideas! Dresser is really wonderful.
Very nice…
Very nice…
I have been ogling that West Elm one and trying to work out how to knock it off too! So glad I found your tutorial first.
A really great blog post! Love the idea! The dresser turned out great. However, instead of wood glue you could have used a tile adhesive like Bondera to prevent the wooden tiles from bending. Here’s how it works http://www.bonderatilematset.com/.
Also, you can like us on Facebook to stay in touch with future updates – https://www.facebook.com/BonderaTileMatSet.
I’m obsessed with the print to the left on the dresser. Can you tell me where you purchased it from?
I love it!!! Think I’ll try it. thanks, joyce
[…] Get the full tutorial here. […]