
If you missed the announcement about which nine contestants made it through to Round 2 of Creating with the Stars, click here! We’re dying to see what those ladies come up with for this week’s Knockoff theme!

————————————————————————————————————————–
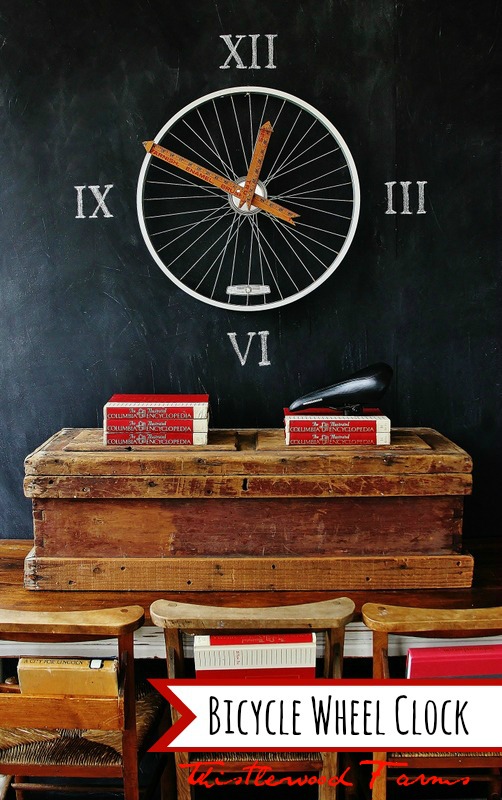
We fell in love with Karianne’s clock the moment we laid eyes on it. It’s so orignal and creative, not to mention perfectly placed on that chalkboard wall. *Swoon* I’m already brainstorming how I can use this idea somewhere-anywhere- in my house. Because Karianne took the number one spot, this project is going to be featured on Hometalk and Homes.com. Woohoo! Take it away, Karianne!

There are clocks. And then…..there are clocks. There are clocks that tick and tock and ring and jingle and tell time underwater and sound an alarm. And then there are clocks made from a bicycle wheel with yardstick ruler hands perched on a chalkboard surrounded by roman numerals above a table strategically styled with a bicycle seat. That is one fine clock. And the best part?

I got the bicycle wheel for free. Can you even believe it? I walked into a bicycle shop and randomly explained to the resident bike expert that I wanted to make a clock and I needed a cute bike wheel that had preferably been around the block a time or two. Wordlessly he stared at me. I don’t really know why. I’m sure they get that request all the time.
And then he went to the back where they keep all the spare wheels for people who come in with clock requests and he handed me this bicycle wheel.
I totally wish he could see his wheel now. He’d probably charge me for it. 🙂 
Bicycle Wheel Clock with Yardstick Hands
Supplies:
Bicycle wheel
Paint stick
Can lid
Weights Clock kit specifically designed for large hands
Yardstick

Step 1: Purchase a kit from any craft store specifically designed to power big hands.
Remove torque, insert a AA battery and attach to center of bicycle wheel using wire or adhesive tape
.

Step 2: Drill a hole in the center of a paint can lid.
The hole should be large enough to fit over the center mechanism of the torque.
Place over center spoke of torque.

When you are done it should look something like this.

Step 3: Cut out yardstick hands
I used a vintage yardstick. Cut longer hand 16″ and shorter hand 8″ long. You may need to adjust length depending on size of bike wheel. Notch out the end of each hand to resemble and arrow and cut small triangles of yardstick and attach to the other end of the yardstick hand to form an arrow.

Step 4: Drill holes in yardstick and attach parts of clock hands
Drill a hole 5 1/2 inches from the notched end of the longer hand.
Drill a hole 1 inch from the notched end of the shorter hand.
Cut circles from the hands of the clock kit and hot glue around the holes that you just drilled.

Step 5: Attach yardstick hands to the center spoke of torque
The center spoke on the torque is designed to have a space between the two hands. This is critical to make sure the hands turn properly. Make sure there is a space as shown in the picture.
Attach the washer from the kit to the very top of the center spoke of the torque. Tighten the washer until hands are fastened securely.
Depending on the thickness of your yardstick, you may have to countersink the washer to ensure everything fits properly on the center spoke.

Step 6: Attach weights to the back of the longer hand
Hot glue washers to the back of the longer hand until the hand is balanced properly on the center spoke.
We attached four washers, but you may need more or less depending on the weight of your clock hands.

Step 7: Adjust your hands to the right time using the tiny dial on the torque.
Hang on a chalkboard and chalk in some roman numerals.
Telling time has never been so fun!
PS Monica and Jess….thank you so much for hosting such a fun contest and a big shout out to the amazing creativity of all the contestants!
If you have any questions about this project be sure and e-mail me at thistlewoodfarms@yahoo.com!
————————————————————————————————————————–
Isn’t that awesome?! And that bike tire was FREE! That makes this project even better, in our humble opinions. Have you seen Karianne’s blog? If not, you definitely should. It’s chock full of awesome projects like this Herringbone Paint Stick Table….

And this Butler’s Pantry. We’re sorry, but we can’t stop drooling over it. We are embarassed about the drool, but we just can’t stop.

Thanks so much for sharing with us today, Karianne! Don’t forget to check back tomorrow to see how Sarah made that awesome trendy tire table. Also, do you want to be a part of Creating with the Stars yourself? You can link up your favorite upcycle project right here until Friday evening for a chance to win a great prize package and be featured on EC2!


I’m so in love with how this turned out – amazing job!
Very cool project! Congratulations, Karianne!
I love it as well, and am already contemplating where I can hang one. And I won’t forget hands made for high torque!
Bliss
Most awesome project ever! Which is why I cast my vote for this project!!! Way to go Kari!
🙂 Linda
I absolutely love this. Just when I was thinking I had seen everything done. So cool!
Amazing projects, all of them! Incredibly creative. Just wow.
Great job as usual karianne! You have such amazing ideas……
Karianne… that bicycle clock is amazing!!! I’m pinning it for sure. Little Bit
[…] that word for so many reasons. If some parts are too rusted to reuse, why don’t you make a bicycle clock, or better yet, a chandelier? The possibilities are endless and we going head over wheels for all […]
[…] DIY & Photo credit to: EastCoastCreativeBlog […]
[…] Source […]
[…] source […]
[…] source […]
[…] source […]
[…] source […]
[…] source […]
[…] source […]
[…] source […]
[…] source […]
[…] source […]
[…] Fotó: eastcoastcreativeblog.com […]
[…] Source […]
[…] lo que queréis es crear elementos decorativos o muebles a base de piezas recicladas de bicicletas, aquí y aquí encontraréis muy buenas ideas. Por un lado, un reloj de pared chulísimo: fácil de […]
[…] te parece este do it yourself de upcycle vía eastcoastcreativeblog? ¿Se te ocurren más ideas de manualidades para reutilizar una rueda de bicicleta en el […]