
Ok, are you ready for our last guest post for the Summer? We are thrilled with all of the projects our bloggy friends have shared with us, and this one from Christina of Christina’s Adventures, is no exception! Christina is a local girl and has a sweet heart and some serious DIY skills. And oh my goodness, this nautical summer wreath of hers made my heart skip a beat. A.dor.a.ble.

She’s a regular commenter on our posts, for which we are eternally grateful! Welcome, Christina!
——————————————————————————————————————–
Hey East Coast Creative readers! I’m super excited to be here! I live just a short drive away from Jess & Monica – and I share so many of their DIY passions! I have a blog (Christina’s Adventures) where I share my stories about thrifty decorating, DIY upcycling, and creative living.

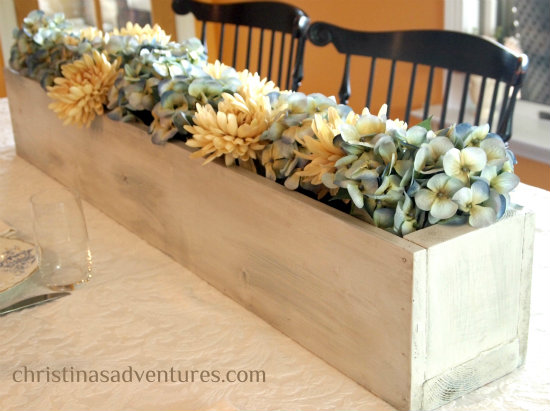
I am a former Autism Support teacher (just resigned from my job in June!) who lives with my husband & “dog baby” in an apartment attached to my parent’s house while we save money to buy our own house (so we can have real babies)! This summer has been filled with all things wedding! I am a bridesmaid in one wedding, attending a great friend’s wedding next weekend, and my brother is getting married in a few days! We hosted a shower for my brother and his fiancée, and I had a lot of fun decorating for the shower. One of the guest’s favorite DIY items was this trough:

And YOU can easily make your own! Seriously! Added bonus – no power tools are required. Here’s how I made mine: I have been dying to make a trough for flowers for ages, and then I saw this one from Thrifty Décor Chick and I fell in love! I just needed the occasion/space to put the trough. When we were looking for something to fill the space at the kitchen table for the bridal shower, I knew this was my opportunity! I first planned out how big I wanted to make it. Our table was just about 6 feet long, so I decided to make this trough 4 feet long. I went to Lowe’s, and found some cedar wood in their lumber section. What I love about Lowes, is they will cut your wood for you! Just give them the measurements, and they’ll cut it. Seriously – best thing ever.

Here were the measurements I used:
-
2 planks: 3/4” x 7 1/2” – 4 feet long
-
1 plank: 1 1/2” x 5 1/2” – 4 feet long
-
2 squares (cut from the thicker piece): 1 1/2” x 5 1/2” – 5 1/2” long
I will be honest – the awesome lumber man from Lowe’s helped me out a lot with this part – he made sure they all fit together correctly and “shaved” off parts so they were even. I first glued them together with some Liquid Nails, and let that sit overnight:

In the morning, I hammered in some nails at the seams, just to make sure it was secure. I then roughly filled in some of the bigger cracks with wood filler, and sanded it down. I didn’t want this to look perfect – I knew I was going to paint and distress it, so I wanted imperfections.

I picked out a blue color I had in my stash (originally an “oops” can for $3). I didn’t prime the surface since I painted right onto the bare wood.


I let that dry, and then I painted with a very light gray over top (the same gray I used on this desk). I did not do this meticulously – I tried to leave some spots where you could see some of the blue coming through:

I then had some fun with glaze and sandpaper. There’s no science to this – I sanded down in certain spots, glazed over areas, and wiped down with a damp cloth. I like to use this glaze, which can be found at Lowe’s or Home Depot. Finally – I let it dry, and it was ready to be filled! I would have *loved* to fill it with fresh flowers, but it just wasn’t practical. We knew we wanted to keep the decoration in my mother’s living room after the shower, so she bought fake flowers from Michaels. I usually hate fake flowers, but these look surprisingly pretty!


What I love about this project is that it wasn’t just a “shower decoration”, but we are now able to use it in my mother’s living room (come follow my blog to see the full make-over of her room – coming soon!)

Of course my little “dog baby” Buckley had to get in the way while I was taking pictures:

A few more glamour shots:

What are your thoughts? Have I convinced you that you can easily make yourself one of these as well? If you want to see more projects like this, come follow my blog! We have so much fun over there, and I’d love to get to know you better!


Very cute! Love this trough idea!! Would look great stained dark grey too – driftwoody….
aw thanks so much for having me, girls!! your kind words are much appreciated 🙂
Hope you enjoyed your little “break”!! 🙂
I LOVE this!!! Another project on my to-do list. 🙂 Beautiful paint job!