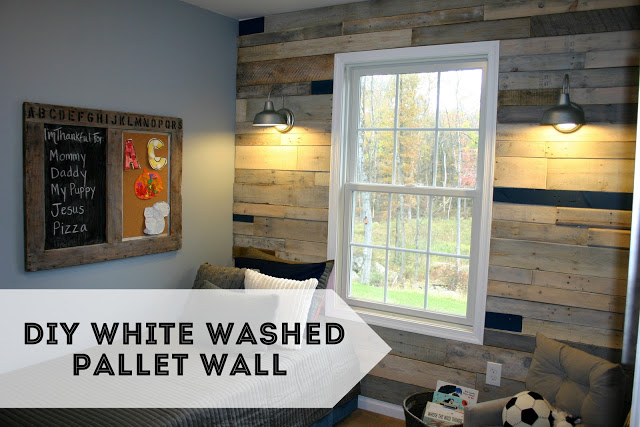

This room makeover all started with a pallet and became the coolest pallet wall ever. This free project made a huge impact with its wooden walls and white wash technique.
We’re so excited to share it with you today!
******************************************************************
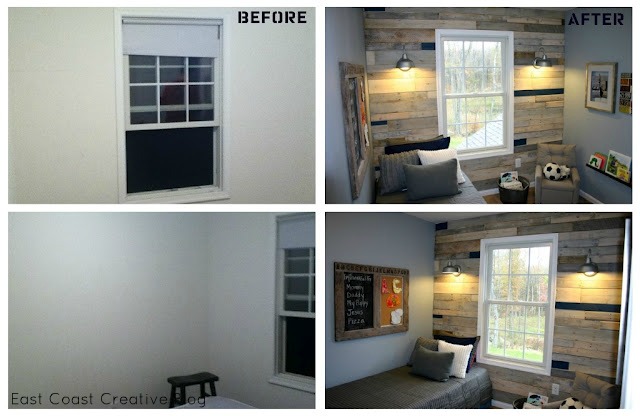
When the hubs and I moved into our house 12 months ago (holy moly it’s been 1 year already!) we decorated 3 out of 4 kid’s bedrooms. I wanted to wait until the little man was out of his crib and into a “big boy bed” before tacking the room.

Well, the crib is history and we were ready to make this tiny space small, but mighty!
Jess and I have a thing for pallets. We’ve written a Pallet Possibilities post and Jess shared a pallet shelves post. Well, this time we thought we’d take it to the next level and do an entire wall of pallet wood!


Here’s how we did it: (Shhh… don’t tell, but this was super easy and the wood was free!)
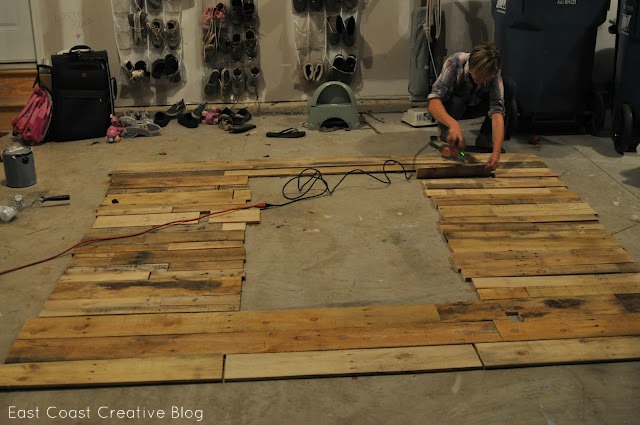
We called around and found places that were okay with us taking their pallets. The hard part is taking them apart and not cracking the boards. We started with a hammer or two or three… TIP: don’t buy cheap hammers. Then, we moved to a sawsall. It worked okay, but not great. Finally, the hubs pulled out his circular saw and we were in business!

We separated out the keepers and made sure we had a good blend of various lengths and widths. We took out most of the nails for safety, but left a few for character (we put those pieces up high on the wall so the little man would be safe and sound)

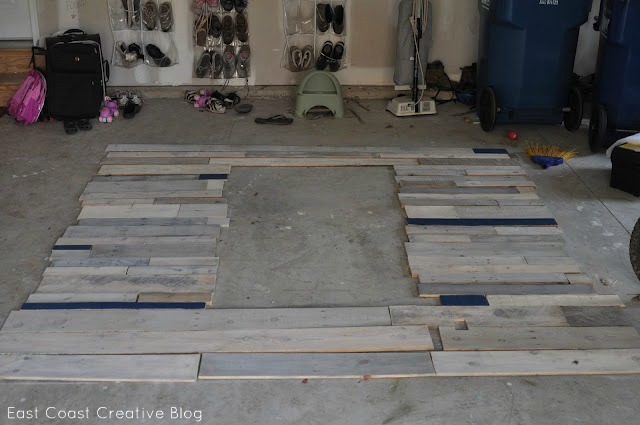
Thankfully my hubs is pretty darn smart and helped me and Jess figure out the layout. We placed each piece on the wall temporarily (one nail in each board) just to see the layout and get all the cuts out of the way. We don’t have any great tips on this step, just find someone that likes doing puzzles and invite them over to help!
(You might notice that between breaking apart the pallets and doing the wall that I moved from a blonde to a reddish brunette. 2 hair colors in one post… is that a blogger foul?)
Once we had the layout, we took each piece down and labeled it so we’d know where to put it back. We gave each row a number and a letter going from left to right… 1A, 1B, 1C, 2A, 2B etc… Then we brought all the wood down to the garage to begin the fun part… sanding and whitewashing!

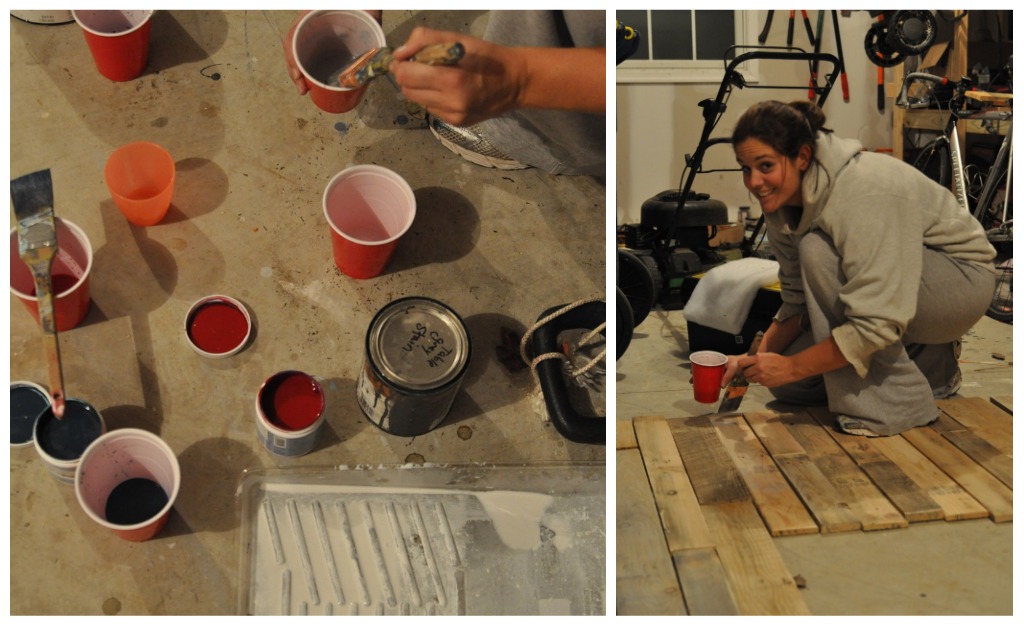
We sanded the wood lightly… we didn’t want to lose cool character, but we didn’t want splinters for the little man either. We arranged the wood as it would look on the wall, so that we could figure out how we wanted to whitewash the wood.
Some of the “blonde” pieces of wood needed some grey stain to make them look a bit more weathered, so we put in on randomly and rubbed it in a bit.
To make our whitewashing colors we just filled cups with water and added a few dabs of paint. It was trial and error. We used the grey-blue wall paint, white paint, and some navy (which we used full strength). We wanted cool tones, not the warm honey ones it originally had.
(Will I ever remember NOT to wear sweatpants for all our projects?)
Once it was all dry, we were so thrilled with the colors and couldn’t wait to put it back on the wall!
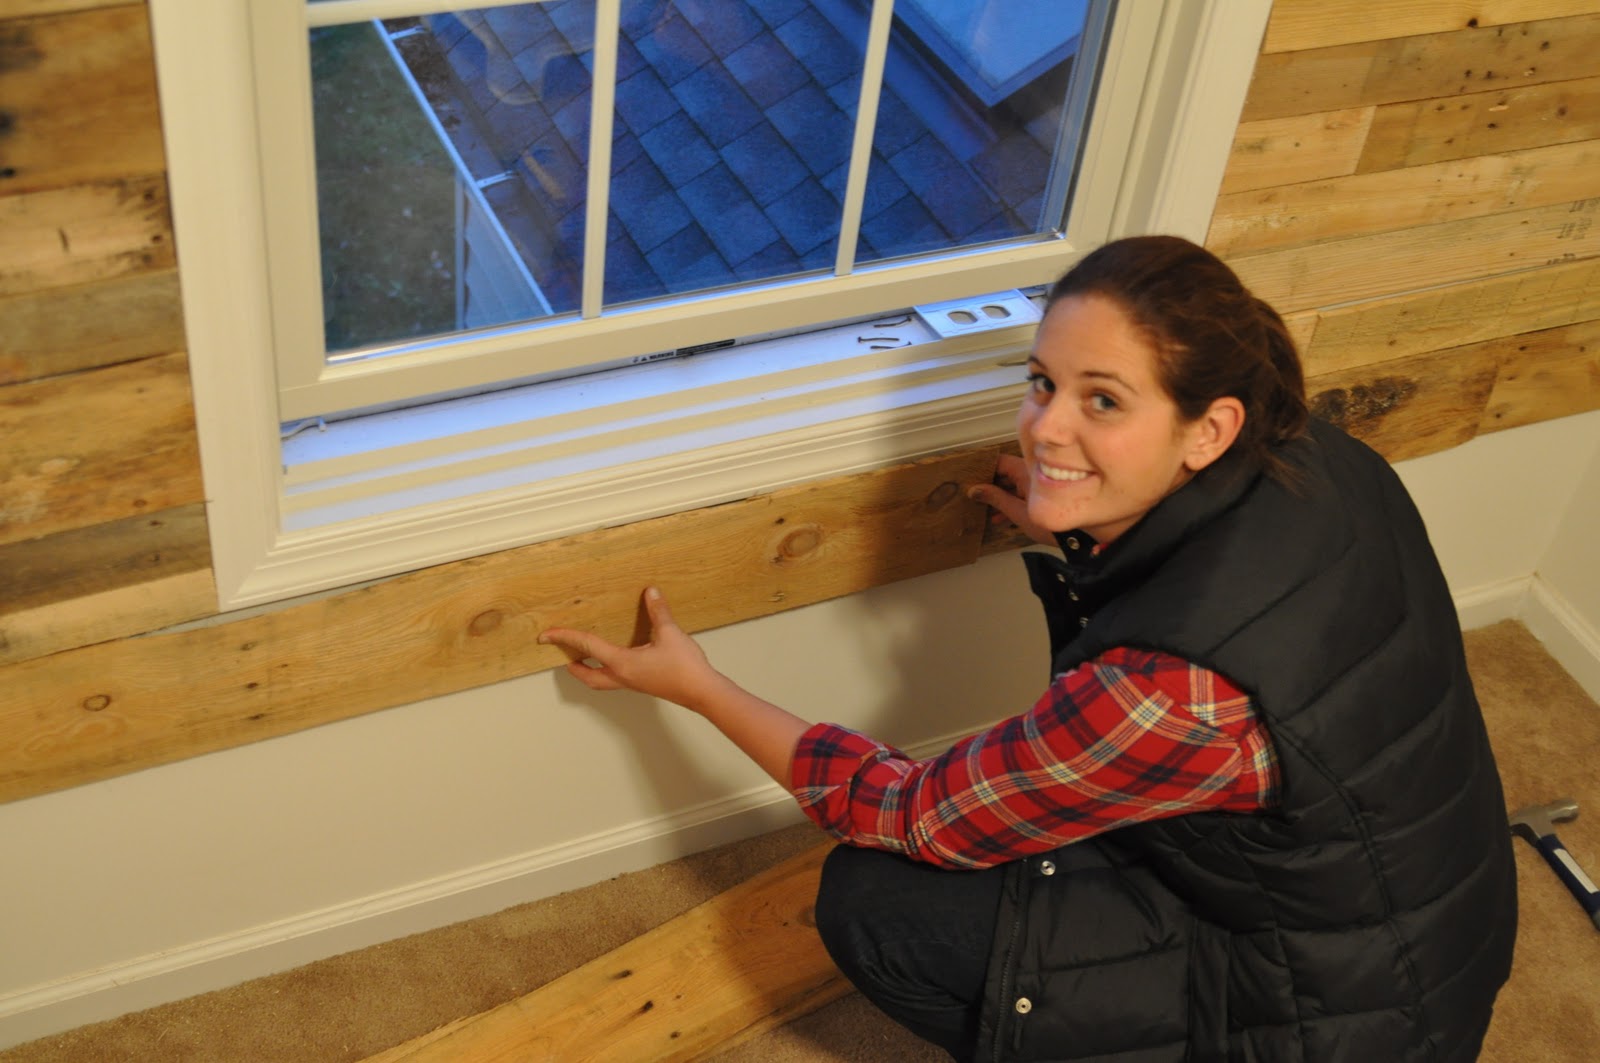
Before putting the pallet wood on the wall, we added some industrial looking lights. The hubby did this part of the job because these girls don’t mess with electric- we have our limits!
To adhere the pallet wood to the wall we just used nails. You could use liquid nails, screws, etc. I thought nails would be the easiest just to spackle over when we we want to change the room (which I don’t know if I’ll ever will want to). Once we had the wall installed we got busy decorating and then pretty much fell in love with the finished product!
How do you like it?
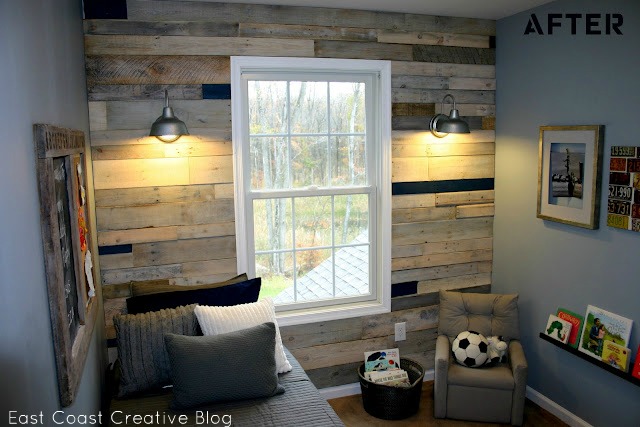
There are so many fun details in this room! You can read about the message board made from reclaimed barnwood here! (Yup, we’re still lovin’ the reclaimed barnwood!)

Not too shabby for a FREE statement wall eh? My son loves his new room and my only complaint is that we didn’t try this fabulous project in one of our master bedrooms! We love it!
So there you have it! Free pallets transformed into a crazy, cool statement wall! It was free, simple, and I totally think you should try this at home!
-Mon
If you liked the look of this project- check out this similar accent wall made from wall paneling


So clever! love love!
I did the same exact thing with my bathroom. Used full boards of PTP 1×6’s and liquid nails as an adhesive with drywall screws…finished it with rustic Manila Sisal rope in-between planks to give it a gingerbread or chinking look… Horizontal and vertical in the corners. Mold and mildew have not been an issue…as of yet…up for 4 years now and still looking great as the first day of completion.
This looks amazing!!! I am going to pin this so I can hopefully tackle this project some day! I love how you painted some of the wood with the navy blue- it looks so cool mixed in with the whitewash.
I like it but was curious about window treatment
I love it but I can’t find a pallet. I asked my local grocery store and they said no bc they send them back. I have a few more to check. Love your blog and so glad y’all dominated on Nate. Wasn’t even a contest. Congratulations.
Just popped over from Sew Dang Cute…LOVE this wall so much! I didn’t follow much of CWTS this year, but I was a contestant last year! Congrats on the Nate Show and everything…I used to live close by in Delaware, but now we’re in Texas;)
I am so in love with this! I am trying to think where I could do this in my home! I have an idea… 😉 I’ll be sure to link back to you if I make one!
Holly- Fun! Be sure to let us know when you do! We’d love to share it with our readers!
Mon & Jess
@Knit-2-Together Stacy & Tracy- thanks for all your comments lately! We just checked out your blog and it’s super-cute! I (Monica) made those sliced potatoes a few weeks ago too! YUM!
wow the pallet wall looks amazing, new follower here xxx
Wow that is fabulous! On my way to church for weeks I passed this empty lot with ‘free pallets’ and I really wanted to pick some up, but we have no where to put them and I didn’t have a project in mind…
@Brooke @ Inside-Out Design Thanks Brooke! I was hoping the navy looked good and now I’m so glad we weren’t too afraid to try it!!
@Lookiewhatidid What we did to find pallets was to actually call Lowes and Home Depot and ask if we could take some. Their general rule is no, but since we called, they said that we could! Good luck!
I love it! It turned out great =)
This is gorgeous! You did an AWESOME job!
I just love that pallet wall — so fun and creative. And, yes, I did see you on Nate and totally enjoyed the show and your project!
I think it looks adorable, but I’d be careful. Wooden pallets are often treated with dangerous chemicals like formaldehyde and methly bromide, not to mention cross-contamination from what ever was shipped on the pallet. Think raw boxed beef or ice melt, etc. I’d think twice before bringing these into my home.
@Anonymous Thanks for bringing up a good point about the wood. We did call and ask about the contents of the pallets, but you can’t be 100%sure. I’d also recommend really giving them a good sanding and not using any pieces of wood that have visible mold (duh!). We also sealed the entire wall with a few coats of waterbased poly. Hopefully that will do the trick. Thanks for your comment!
@Linda Thanks for watching our rookie expereinces on TV! They sure were fun!
@Tonya Thanks! I (Monica)am so in love with his tiny little room. It really is mini, but perfect for my little guy!
Stumbled upon your blog from UCreate; Love to see more Housewives out here in blog land 🙂 The pallet wall is BEAUTIFUL! and I love the paint color and accessories. Looks amazing!
I love this! What is the wall color?
wow!! how gorgeous, love this wall 🙂
This is awesome! And you just can’t beat FREE! Very creative, congrats!
love the look!
love, love, love the wall. we are doing a barn decor in my daughters room and the pallets would work great for doing a fake wainscoting, but I was wondering how did you attach them to the wall???? did you use liquid nails and nails???
Thanks,
Michelle
i die. truly fabulous. i must do this for my son when he is older.
i die. truly fabulous. i must do this for my son when he is older.
I love this…and of course I saw you on the Nate show. Love him and all of his cuteness! You gals are rockstars! Congrats on the win, you totally deserved it but did get a run for your money! Enjoy Cancun! Ah-mazing!
Rachel
http://www.holy-craft.blogspot.com
Oh it’s absolutely fabulous!! I seen your fabulous feature on Stories A to Z…I’m so pinning this!
NEED to convince the hubby to let me bring pallets in the house:-)
Off you to watch your Nate segment….
Stopping in from Thrifty Decor Chick’s link party. Love, love, love the wall. I’m moving it around to different rooms in my house in my head. :o) Looking forward to poking around while I’m here.
Love this-it’s fab, thanks for sharing! New follower here!
Yeah, how did you attach them to the wall in the final attaching and also in the temporary attaching to get the labels on the boards…?
love your blog!! will definitely keep reading!!
Patio Sets
I shared this on my blog this week. Thanks for the inspiration and I LOVE your blog!
What an awesome project! Just wanted to let you know I featured it today on “You Sew Rock Me Fridays” at sewrockin.com.
You can see it here: http://www.sewrockin.com/2011/11/11/you-sew-rock-me-fridays-4/
I look forward to seeing what you guys come up with next!
Jamie @ Sew Rockin’
Love it! Especially the blue ones mixed in.
This is AWESOME!! I have been longing to do a reclaimed wall or ceiling in my home– even more now. Bet he loves his cool space. 🙂
Visiting from TT&J
This is AWESOME!! I have been longing to do a reclaimed wall or ceiling in my home– even more now. Bet he loves his cool space. 🙂
Visiting from TT&J
Simply gorgeous. You’ve inspired me to do a similar project of my own! Thank you!
This is awesome and I’d love to do something similar. Did you just nail the boards to the wall or did you use wood glue too?
DKing
This is a fabulous posting! Really great!
I love this wall! I want to do a focal wall like this in my bedroom. What was the process for attaching the wood to the wall tho??
I wondered the same thing about attaching the pallets to the wall….hot glue, wood glue, simple nails….what did you use???? I am doing my foyer this way and already have the pallet pieces cut but now might white wash them based on your outcome of doing it. Just wondered about attaching them to the wall. I’m a hot glue gun person big time!
I love this room! I’m trying to plan out a new room for my son and shared your project on my blog today.
http://jroxdesigns.wordpress.com/2012/04/24/its-time-for-a-change-its-time-to-update-that-room/
Thanks for such a great source of inspiration!
Amber @ jRoxDesigns
This turned out so good, it looks amazing! How did you attach the boards to the wall?
I LOVE this look! I am about to move into a new home and want to do my son’s room in a “travel” type theme. Things that have been around…and a giant blue/gray world map. This would look great with it. I saw several other people asked my same question. How did you attach it to the wall? I didn’t see the answer, so I hope I didn’t overlook it and am asking you for the 1 millionth time!
Heidi@HomemadeBeautiesByHeidi
Wow!! Don’t know how I’ve never seen this but it is gorgeous!!! Love the blue accent boards! Off to pin this, great job!!
Can I just tell you how much I love your projects over at Hometalk! And they are so popular! This one over 300 views!
blessings,
karianne
Cool
Love this!New follower,I need to go find some pallet’s as I’ve been saying all summer. I have a couple project’s in my head now… one for fall and one for the winter. Thank’s and your lil guy’s room is wonderful.
Good way of creating wooden window and it is giving additional looks to the interior design of the house…
What a fabulous wall! I love it. Wish I could fin da wall in my house for this treatment.
O my Gosh! I cant wait to try something like this….
Love! Gorgeous-rustic-funky!!!
Pinning immediately!
<3 Christina @ I Gotta Create!
Wildly Original link party is open.
Beautiful! LOVE it! I’ve been wanting to do my “crafty room” this way…heck, I’d do every room in the house, lol! AND I’m trying to convince hubby that a “pallet ceiling” in the kitchen would be PERFECT! Hmmm…maybe you could “strong-arm” him for me? LOL! Thanks so very much for sharing!
I can’t even describe how much I love this! New follower here, came over from Shanty2Chic!
Holy WOW. I want this wall in my industrial basement! I just found your site through Beckie at Pretty Handy Girl. This wall would be SO cool in my newly finished (but empty) industrial basement remodel. My kids are sitting on lawn chairs watching our new 50″ TV down there. {priorities, lol!!} My goodness…this would be amazing. Bookmarking your site for lots of future reference.
I’d love to do this in my cinder block garage.Would you suggest just using liquid nails?
Well done! And let’s hear some applause for “hubby”. i have a stack of pallets on the side of the house, waiting for you to drop on by!
Cheers!,
Barbara
What a great idea of repurposing wooden pallets and turning them into a very nice wall design. This is the first time I comment here and I should say you give us genuine, and quality information. Thanks a lot for sharing. Pallet suppliers in Somerset
Love this! I’m going to borrow your whitewashin technique for our dining room table makeover! Thanks for the tutorial 🙂
this can done using best super glue product available in market..
Brilliant! We have an ALL CEDAR house.. inside and out.. ugh… can’t wait to white wash it!
What sealant did you use? And how long did you wait before hanging the boards after sealing? Did you notice a lingering scent? If so – for how long? LOVE IT!!
[…] 2013 were the years of the pallets!! Here’s a variety of ideas from walls, to plants… 1…2…3… We used a pallet to make a simple shelf- unfortunately, we didn’t […]
So to make white wash–lol just mix white paint and water???
[…] Pallet Possibilities How to Build a Wooden Pallet Wall East source […]
[…] Pallet Possibilities How to Build a Wooden Pallet Wall East source […]
[…] East Coast Creative’s Pallet Wall: […]
[…] Wood pallets – What a great way to add an industrial and rustic feel to your […]
[…] This wall is made from old pallets! I’m sure I would have given up when I realized that math was involved and you gotta be good at puzzles to make this work. This room turned out GREAT! Now this is truly a do it yourself home decor project. Stunning! […]
Do you know the color name of the blue grey solid wall?
Great ideas! A professional and informative blog. I love the list on the blackboard, especially the mention of Jesus! Just a quick funny pallet story. My wife has wanted to do some Pallet walls for a long time. My wife gave me directions to a business that said we could have all of the pallets that were stacked behind their shop. I went to the wrong business next door (that just happened to have pallets as well) As I was loading the pallets in my truck, a very angry man pulled up in his car and wondered what I was doing. I told him the name of the man that gave my wife permission to take the pallets. He told me that this was the wrong business .I apologized to him and told him that we wanted to make a pallet wall in our house. After he calmed down, he became really nice and told me that I could have as many of his pallets that I could load!
My husband and I just finished a pallet wood accent wall in our bedroom this weekend, and your tip about the sawsall may have been a marriage saver! We totally cut through those nails rather than trying to pry them out! Thanks for the advice!
Yay!! So glad it helped. Hope your new wall is awesome! 🙂
It looks so cool. I want to do the same with my child room. Do you think that it is appropriate for the child’s room? 🙂
This is a super versatile look for any room, so depending on the theme and style of the room, I’d say give it a try!
Your style iѕ so unique іn comparіson to other folks
I’ve read stuff from. I appreciate you for posting when you hɑve
the opportunity, Guess I’ll just bookmarҝ this blog.
Great post! Have nice day ! 🙂 rlxqp