
Eric and I have owned 3 houses now, our first was an old 1920s Victorian (loaded with charm!), and the second two were new construction. When we built each of our new construction homes, I was dreaming big (it’s what I do!) and we had to crunch numbers and really watch our budget to keep the house in our price range, so that meant we went builder grade on just about everything and decided we’d renovate as we had the money. Builder grade is fine and functional, but usually lacks any style… let’s be honest, they’re almost always boring and generic!

Lowe’s challenged me- and 2 other bloggers- to each take on a builder grade bathroom (picture above), and transform it for only $1000. Now, don’t get me wrong, I understand $1000 is a lot of money, but compared to the 2015 average master bathroom renovation cost of $18,000, it’s peanuts!
Here are a few more pics of the builder grade bathroom I started with… as Coldplay would say, “It was all Yellow!”
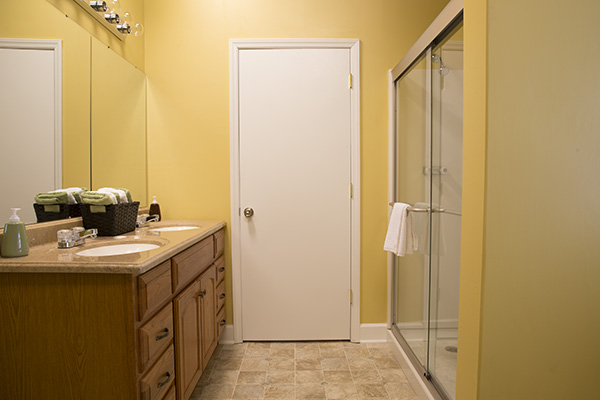
Let’s go through the builder grade bathroom checklist shall we?
Fake tile linoleum flooring: CHECK
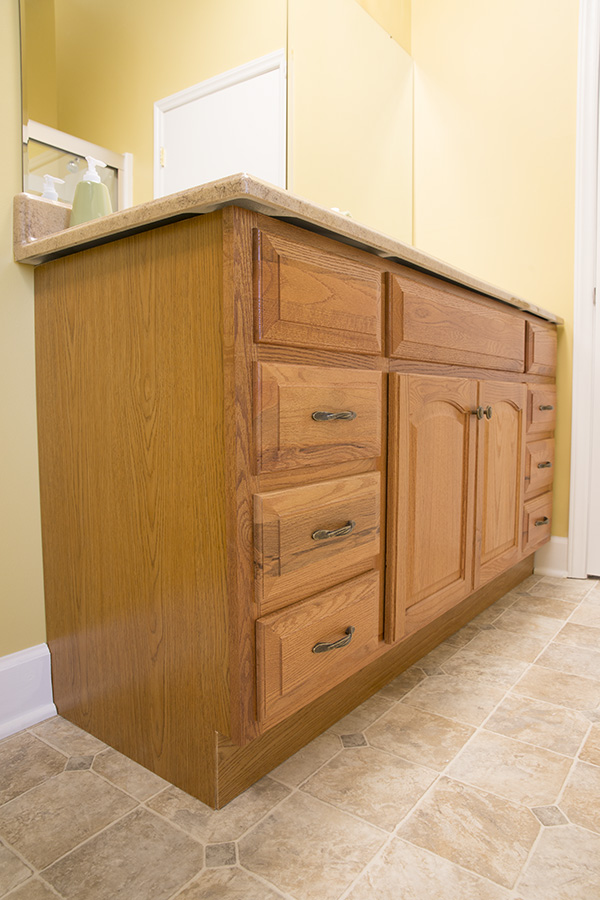
Honey wood tone vanity: CHECK
Hollywood Style Makeup Vanity Lights: CHECK
Yucky paint color- AKA Mustard walls: CHECK
Rather than just tell you about the makeover, check out this video to watch the full transformation! It’s like a mini little dose of “Knock It Off!” – Check it out!
So, what’d you think??
It could possibly be my very favorite makeover to date. It all came together just as I was picturing it in my head and I’ve gotta say, I’m pretty proud of how many projects I was able to include with only $1000!
And you know I wouldn’t leave you hanging- I worked with Lowe’s to create detailed project tutorials for each of my projects. You can get all the tutorials and product information in one place right HERE. Let me tell you a little about each one…
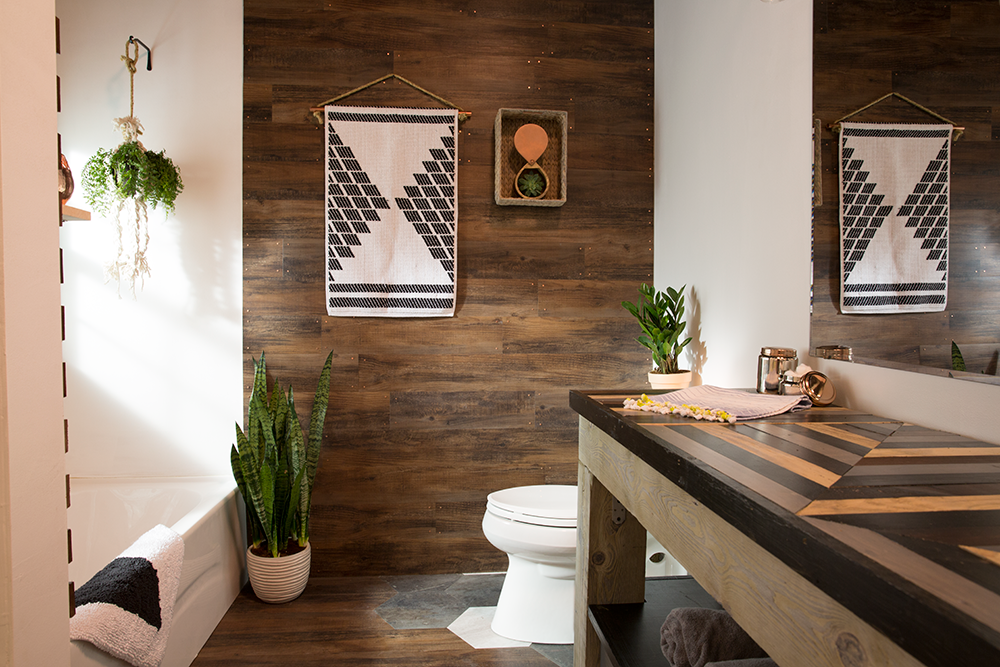
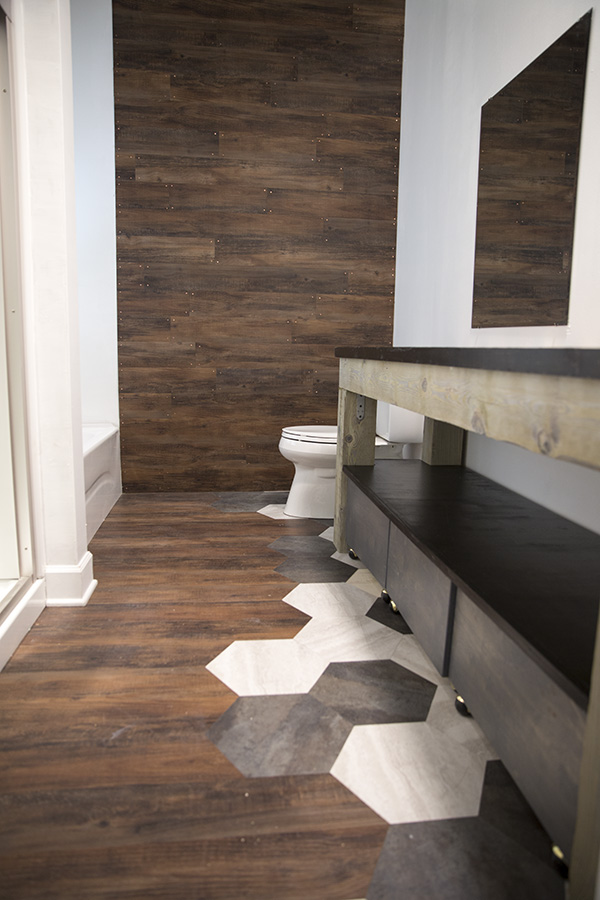
Vinyl Plank Accent Wall
Peel and stick flooring has never, ever, ever looked so good! I carried the vinyl planks from the floor all the way up the wall and then added copper tacks for added detail and to make it seem even more like authentic wood.
And see that wall hanging? It’s actually a Nate Berkus bathroom floor mat wrapped around a piece of copper pipe! It worked perfectly!
Check out the accent wall tutorial HERE.
DIY Vanity with Pieced Wood Countertop
Instead of just painting the existing vanity, I wanted to challenge myself to design and create something that would look completely custom and still provide storage.
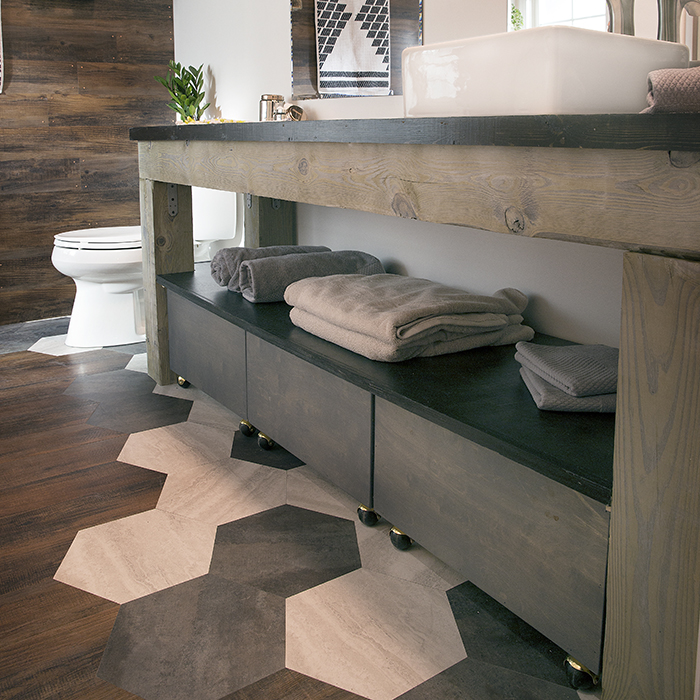

This piece was super easy to build- no advance skills required- and the pieced wood top is quite possibly the coolest thing in the history of bathrooms!
Check out the vanity tutorial HERE
Geometric Patterned Door
It’s become one of my passions in life to transform all the hollow core doors in the world, one door at a time! You might remember my DIY hollow core barn doors? For this bathroom, I went geometric and bold! It’s a huge difference and only cost me paint and tape!
Check out the door patterned tutorial HERE
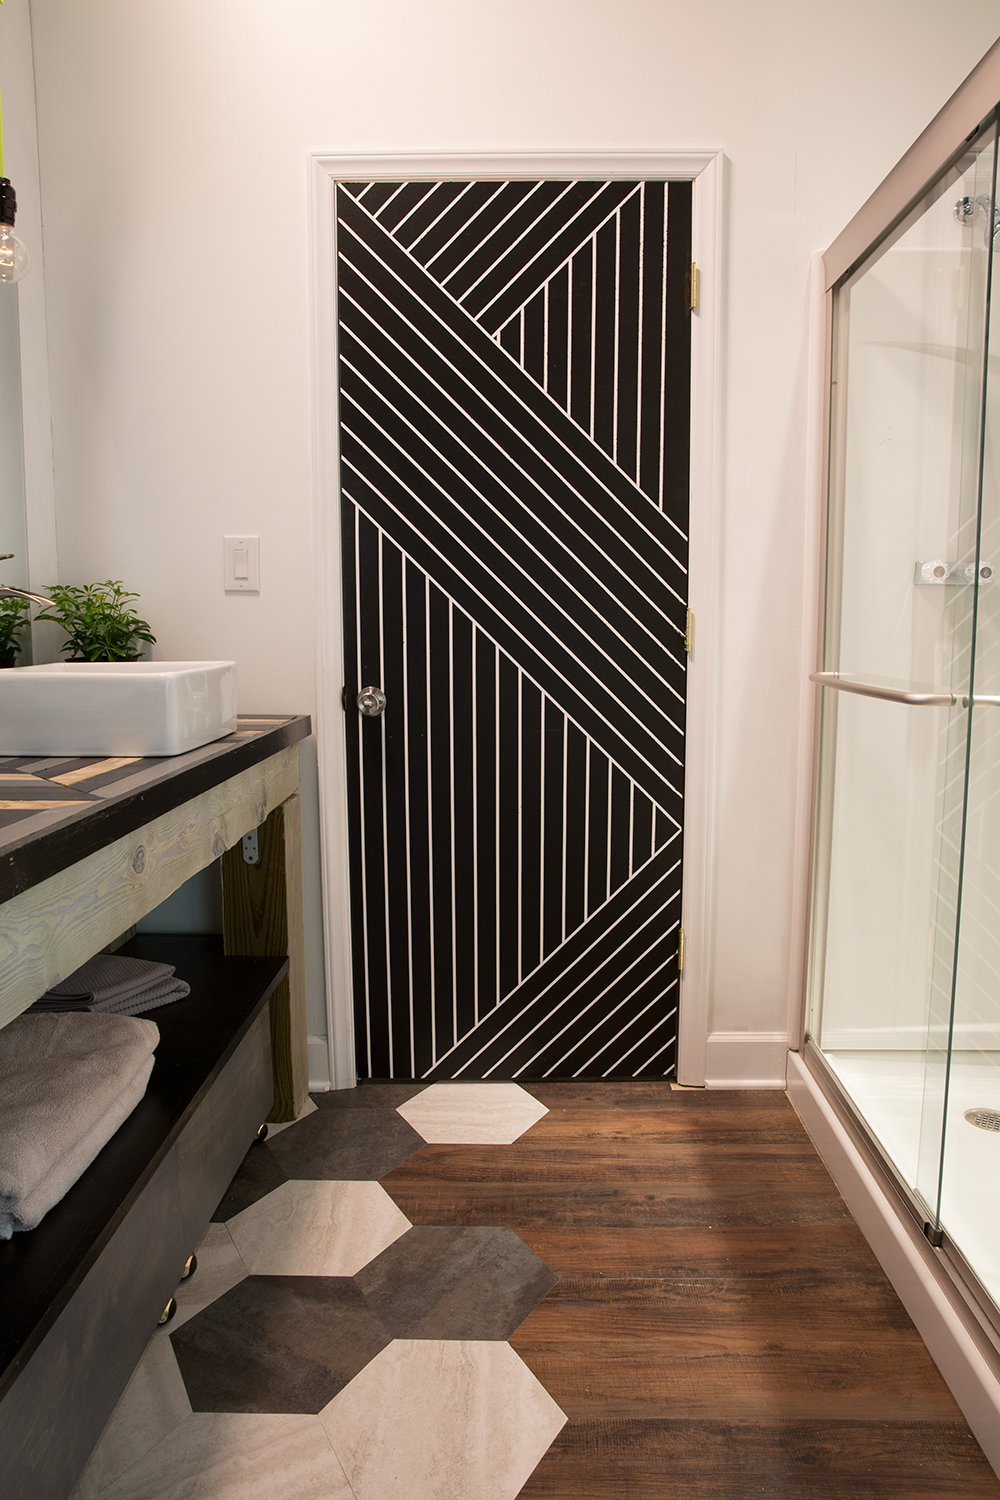
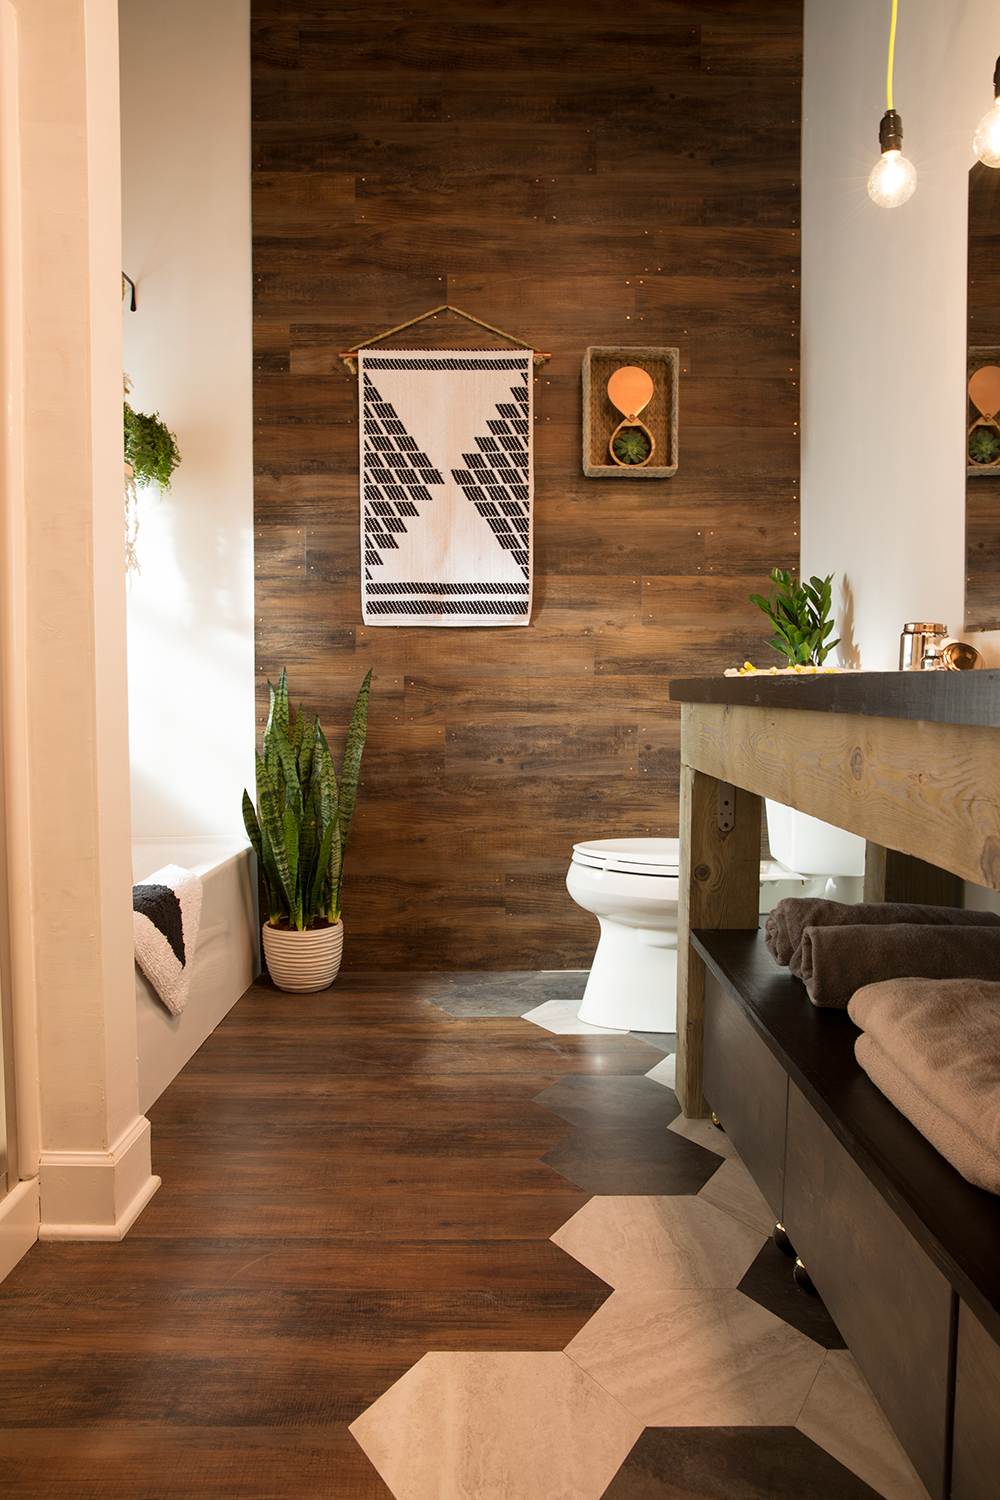
Hexagon Floor
I took a risk with this DIY flooring project- I’d never heard of anyone trying this before, but I really believed that peel and stick tile could look insanely fancy with a little work! Cutting the hexagon shapes took some patience, but oh my word, the result is so worth it!
Check out the Hexagon flooring tutorial HERE
I loved taking part in this challenge from Lowe’s and I’m so thankful to partner with a company that is committed to providing consumers with attainable, budget-friendly, DIY projects! If I’ve said it once, I’ve said it a million times, but you don’t have to spend a ton of money to have great style and this Blogger vs. Builder Grade challenge completely proves that!
I’ll be sharing more about this makeover in the next week or so, but until then, be sure to check out the other bloggers’ builder grade bathroom transformations with Lowe’s!
The Makerista’s Bathroom Makeover
Amber Interior’s Bathroom Makeover
If you have a builder grade bathroom, I hope that all 3 of our bathroom makeovers, inspire you not to settle for “fine” any longer. You can totally DIY your way to the bathroom you’ve always wanted!
I’d love to know what you think of this makeover? Do you have a favorite project?
*This was a sponsored collaboration with Lowe’s Home Improvement. Although I was compensated for my time, all opinions are 100% mine. Thanks for supporting the brands that make East Coast Creative possible! *
—————————-
If you liked this bathroom makeover- you’ll love this post! I’ve rounded up 10 of my best DIY hacks!
Click HERE


oh WOW! I can’t stop looking at the wooden rack and shelves above the bath
This is creativity in it’s highest
http://www.homeworthinteriors.com
anyone know the name of the vinyl wood planks she used for the accent wall??
I used a peel and stick product similar to this one from Lowe’s: https://www.lowes.com/pd/Style-Selections-1-Piece-6-in-x-36-in-Antique-Woodland-Oak-Drk-Brown-Peel-and-Stick-Vinyl-Plank/999957675!
Holy cow! Amazing! I love it all! The wood planked wall and door are my favorite!
Oh my gravy, that FLOOR! And the vinyl plank wall. And the vanity. ???? I’m in love!
Mary- I love that you said “Oh My Gravy!” I say that all the time!! Thanks so much for the love! -Mon
Um WOW, what more can you say than that! It’s amazing. The floor, the vanity, everything looks amazing.
Bravo! I love everything about this and watching the video makes me realize that I miss seeing you and your awesome projects on TV. Please come and fix my home. I live in San Diego and the weather is perfect!!
I just stumbled upon this make-over and I love the burst of creativity. I would love to make the vanity, but the link to the tutorial isn’t referring to it anymore. Do you have a new link or could you send me the tutorial? Regards Lina
Genius! Peel and stick tiles never looked so good. Love how you put them on the wall. Amazing hack. Nicely done girl!
HOLY COW! This is the most amazing thing I have ever seen, and after watching Knock It Off as much as possible, that’s saying a LOT! Every pic I scrolled down through brought more detail and imagination than I would have ever thought you could stuff beautifully into that bathroom, accompanied by wider and wider open-mouthed exclamations for each successive photo! You are a genius and tremendously creative and able! Can’t even come up with enough positive adjectives, and I talk for a living!
Monica you astound me!! This is just stunning!! I love it and the video, it makes me miss you knock it off show! Amazing job!
Oh.My.Lanta!! What an awesome use of such simple materials. I love every single thing!
Hi Monica, so glad to see your still doing your thing!!I am the Grandma that took up all that space on your comments page asking for help w/my kitchen(mobile home) remember? Well if anything it’s looking worse…I really wd give anything I have to have your help. I need your magic to transform my kitchen.My cupboards are just horrid. I wd send a picture if I knew how. I have about $1000.00 socked away for emergencies. Buying the fridge left me short.But if you can think of it this way, it might be the 1sttime you’ve done a mobile home,and there are so many people who live in them and need your ideas.I have a Home Depotwithin a mile,and a lowes about 5 miles or less. I know you use Lowes ,but thats just a short ride.Maybe, if my daughter comes tomorrow, I can get her to send a picture. I am computer illiterate…my appologies. I’ll keep trying to work something out between us. I love your job on that bathroom you did w/Lowes. Please consider me whenever you are thinking of doing another project!! Miss your show so much!!Theres nothing quite like it anymore.,Thanks for taking the time to read this ..I’ll be waiting w/fingers crossed that somehow this can happen Love, Marcia
This is incredible! We also have a new construction home. We are three years in and just starting to make some of the changes we knew we’d want to make. Time, money and vision take longer than we expect. This is just so inspiring!
You don’t see a lot of wood in bathrooms I find, but I think it works beautifully actually!
Oh my goodness! This is crazy good! It’s hard to believe that you only spent $1000!
Just curious though – is the plumbing for the sink exposed or did you hide it in some way?
This bathroom is freaking FABULOUS! The floor is my absolute favorite! So good!
Why didn’t you put in a double banity?
Good question Mary! So we talked a lot about how the bathroom gets used and the response was like 2% washing face and brushing teeth and 90% getting ready- (the other 8 percent who knows what- lol!) so we used just one sink, allowing tons more space for makeup and products and hair stuff etc. Worked really well!
Thanks!
M
Now that is a true artist! I’m not worthy. Seriously… incredible transformation.
[…] friend Monica blew my mind with this $1000 bathroom makeover. Seriously that girl has […]
OMGosh!! Why are you so very very cool!??? The pull and stick planks in an OCTAGON shape and different shades…genius!!
EEEk…I mean HEXAGON!
WOW!! It looks so rich, I can’t believe all of this was done for $1,000!!! The vanity is amazing and I love how you used the peel and stick planks on the wall with the copper nails!! LOVE!!
So you’re totally going to come hold my hand thRough my bathroom reno, right? Haha. Your bathroom is AMAZING!
Wow! It looks awesome. You can really see how you had a vision and a huge sense of resourcefulness. I love the vinyl planks too, so functional and yet very good looking and versatile. Love the whole project!
This is AMAZING.
Soooo…what did you do for the light redo? I’m interested in how that looks. You really didn’t show that. Not even a picture. Please let me know I’m very curious. Great job in the entire redo. That goes unsaid of course.
Thanks
Please pick me! I love you and the show!!! I really need a bathroom makeover, The tile has already started coming off. And the bathroom is pretty original to it’s 1950s style. Please, please, please!!!!!!!
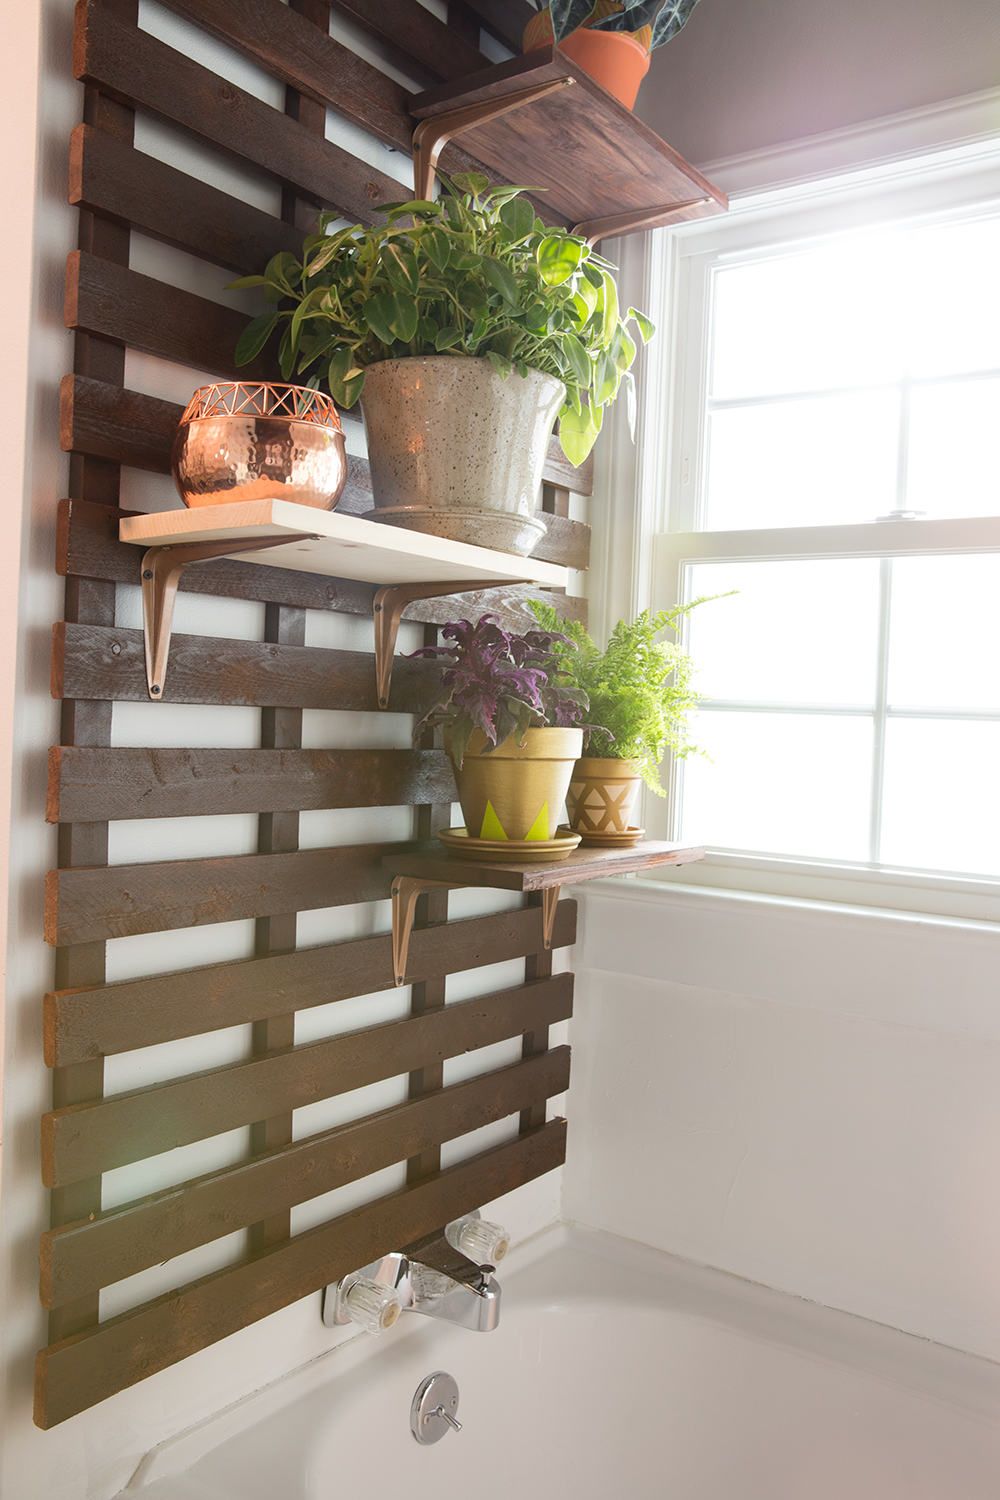
Is there a a tutorial for the plant shelf over the tub? I can attempt to reconstruct it from the photo, but a list of materials is allllllways helpful.
We just tried the vinyl planks on the wall this weekend but they would not stay stuck.?
What brand did you use ?
Hi Robin. The trick is the small tacks that you add to each plank. That helps hold the plank to the while while the adhesive is bonding. I tried it without them and found all my planks on the floor the next night (when I tried that in my own house!). Add the tacks and you’ll be good to go! 🙂
It’s GORGEOUS! Thanks Monica!
Wow!!! I need help. Can you come to my house. I have no creativity!!!
Thank you for some other excellent post. The place else may anybody get that kind of information in such
a perfect means of writing? I have a presentation next week,
and I am on the search for such information.
The link for the vanity goes to generic Lowes DIY page. Do you have the detailed plans? I would love to do this in an old house we are renovatinb
Love everything about this makeover. Can’t find a single tutorial!!!! The link takes me to a page of ideas, but none of the ones here. Can you please post links to the archived tutorials?