
![]()

Round 2 of Creating with the Stars was our Paint Themed Week. There are a million different ways to paint a wall, but friends- you’re about to see one of the coolest techniques the world has ever known! Mallory and Savannah’s Pixelated Wall Treatment is SO my style, and I am really excited for them to share the full tutorial with us today! I’ve been promising Kaden I’d re-do his room for a while now, and I think I just might need to try my own cool boy’s room version of this project very soon!
If you’re not already follower of Classy Clutter, make sure you check out their blog!

—————————————————————————————————————————————————-
![]()
Right when we found out we were contestants on Creating with the Stars, we were so excited for paint week! First, we had to make it through round 1. We were so excited that we made it to week 2! Painting is one of our all time favorite things to do. It can change the look of virtually anything and breathe new life into almost anything. On our blog, we do a lot of paint projects. It’s kind of our “thing”. We just love it.
Today, we’re excited to show you how we created this Pixelated Painterly Wall Treatment. It is pretty easy to do, but I’ll give you fair warning, it is quite time consuming.
![]()
First, we decided we wanted to do a floral image. I’m not a mural painter by any stretch so we thought it would be super fun to modernize it a bit and create a pixelated image. We ran the Mosaic filter on our floral image in Photoshop. You can do this with pretty much any image. It’s really fun! It will also allow you to determine how large or small you want your squares during this step.
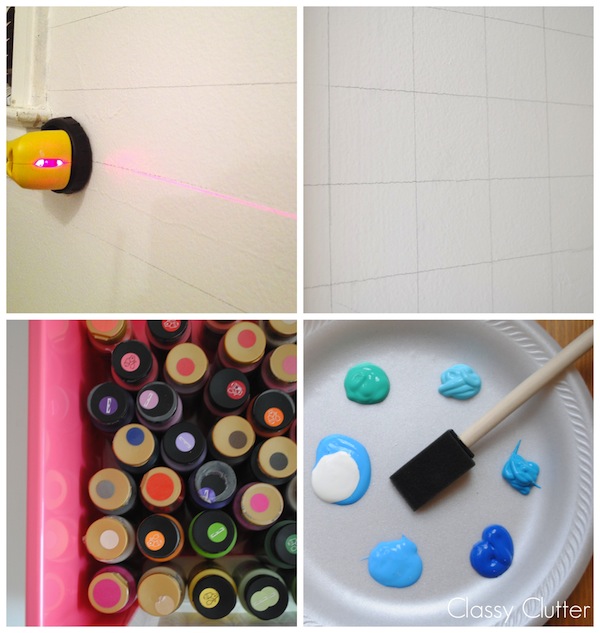
Next, we divide the wall into the right amount of squares. This was probably the hardest part of the project, figuring out how many squares and what size they should be. I used a laser level and a pencil to mark off my squares.
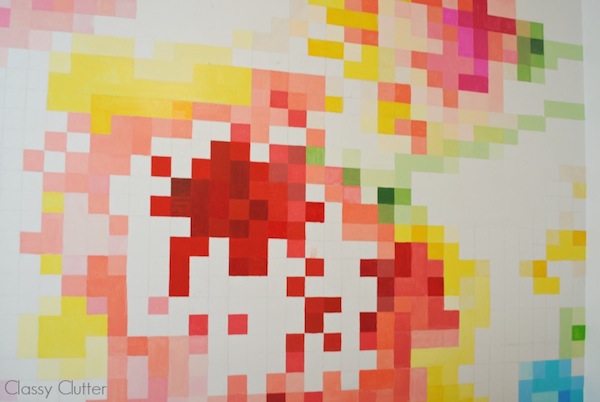
Next, bust out your patience! I hand painted, each and every square that had any color on it. I printed a copy of the pixelated image and taped it on the wall so I could refer to it as I went. This is where you can get creative with mixing colors. You will become a pro color mixer after this project.
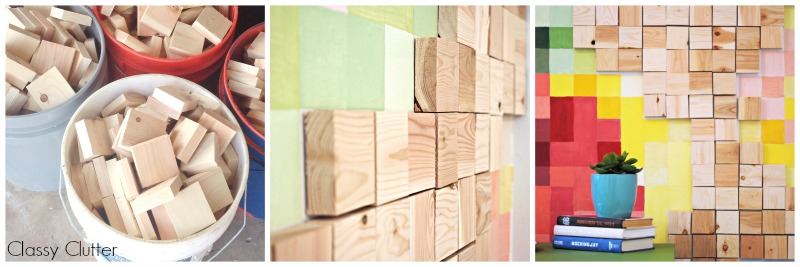
When the entire wall was done, I applied over 400 wooden blocks to all of the white space on the wall. I used mounting tape and those babies were not coming off! They are lightweight so they stuck very well! That’s it! It’s pretty cool because it makes a huge impact but it’s not that difficult. As long as you have loads of patience and you’re not in too much of a hurry to get it done… like we were! Doing this project in 3 days was basically madness but we are in love with it! Thanks to all who voted! We can’t wait to show you what we’ve whipped up for Round 3!
————————————————————————————————————————————————
They hand painted every color block and then applied 400 wooden blocks, WHAT?! That’s a lot of work and patience indeed, which is why we’re so inspired. Plus, Mallory and Savannah know how to tackle more than just paint, check out this thrift store sofa they reupholstered and tufted…

You know they are going to bring their A game for next week’s upcycle round! Don’t forget to come back tomorrow to see how Becki and Chris created their painted place setting, and then on Saturday Tracy will share her baby blues hutch tutorial. Sunday we will share our favorite paint project from the link up party, be sure to join in for a chance to be featured and win a cool prize pack!
There is still time to enter the beach vacation giveaway to Punta Cana from Apple Vacations, who will you take with you?
![]()


I love this wall and that upholstered sofa is amazing!
Thank you so much Julia!! You’re so sweet! xoxo
Thanks for sharing this tutorial. Amazing. Just want I needed for my kids playroom/video game room.
Cheers,
Mariella
[…] classy clutter at east coast creative […]