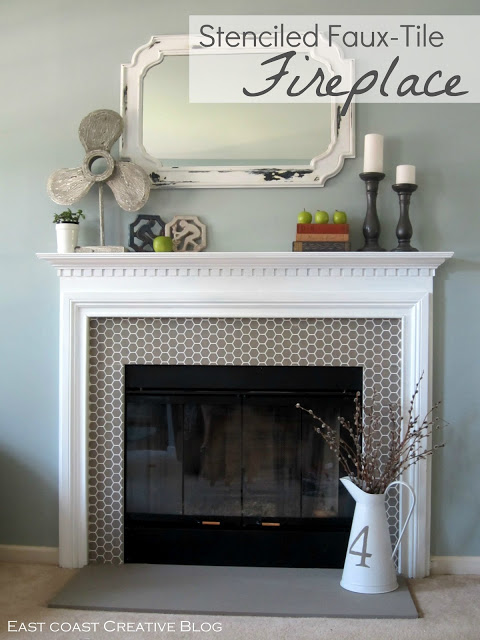
I don’t know about you, but I’m itching to Fall-ify my home. You know that “let’s get cozy, wear sweatshirts and bring out the pumpkins” feeling? Yeah, I have it. One of the major focal points for seasonal decor in our house is our fireplace and mantel, which I decided to give a little stenciled faux-tile makeover before bringing out my Fall stuff. All it takes is chalk paint, a stencil and
a lot of patience. I originally posted this project a few weeks ago over at
Infarrantly Creative, but have been dying to share it with you! I can’t
believe how much I love my stenciled faux-tile fireplace now, and I think you will too.
I’m not going to lie, this was not an easy project. In fact, it took me at least 6 hours of painting and stenciling, but it was so totally worth! Here’e what you need to do:
1.
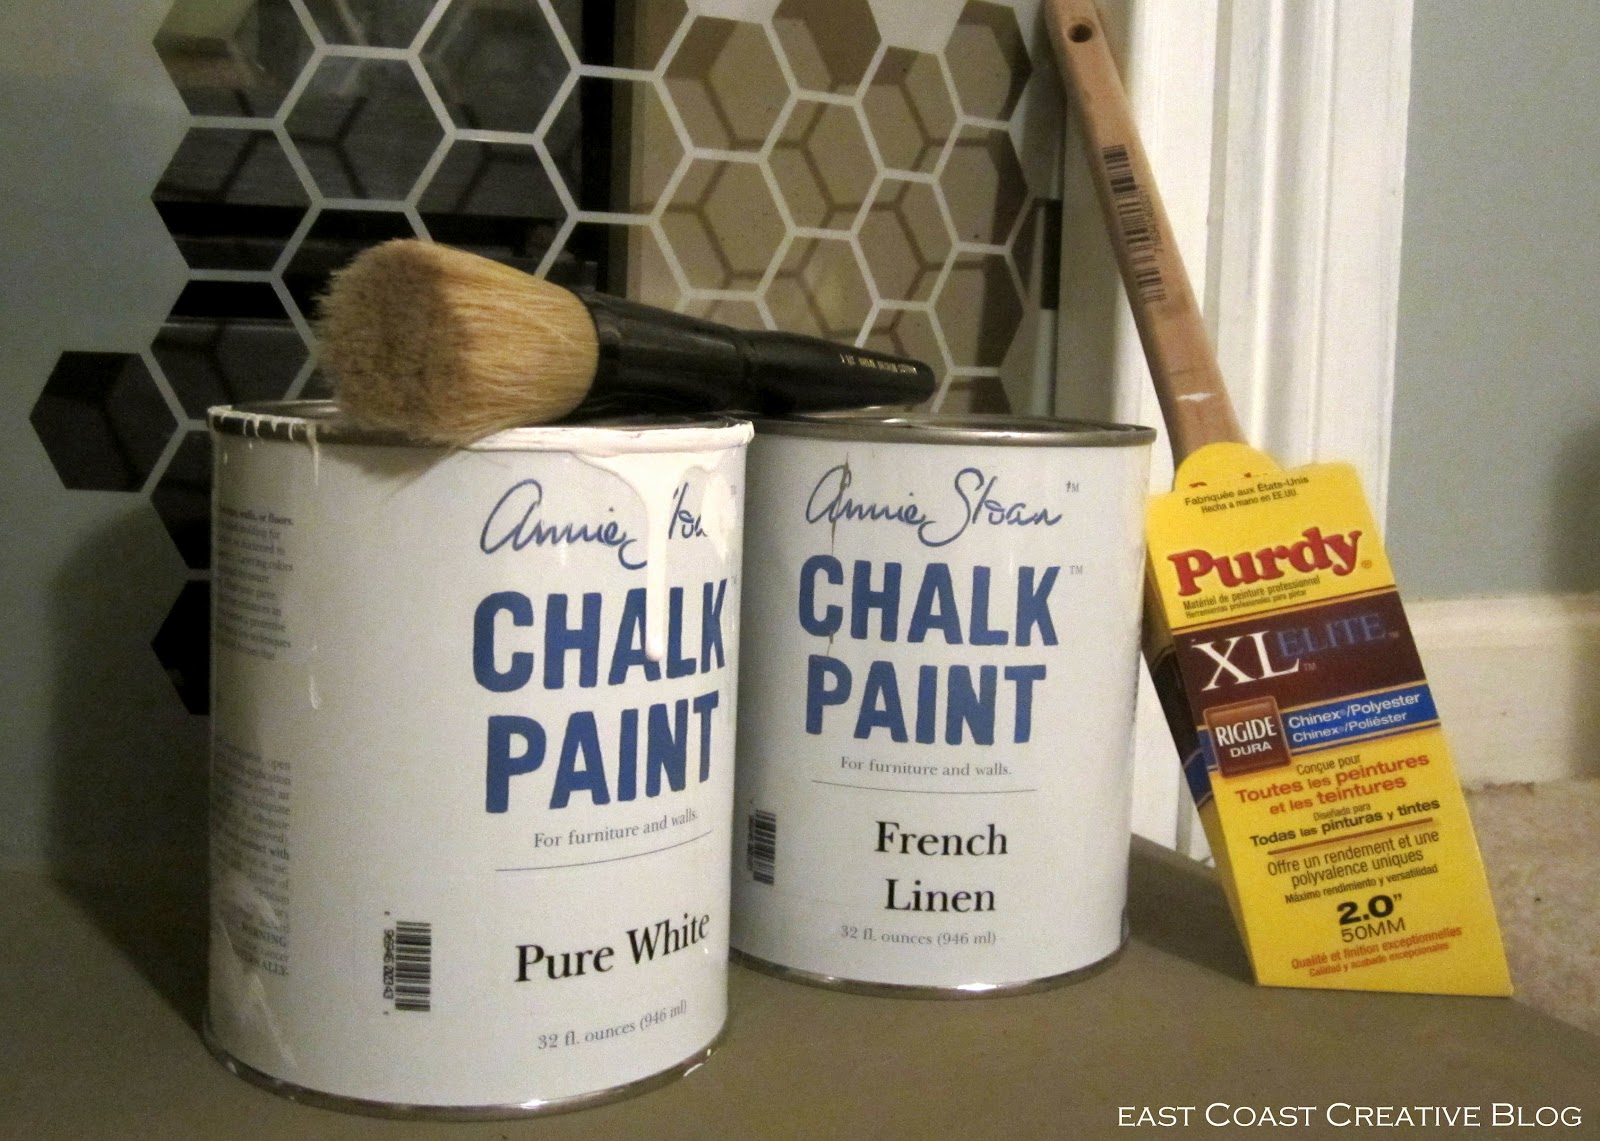
Prep your fireplace. Remember my peach marble tile fireplace surround that I hated? Yuk. I first painted it with Annie Sloan chalk paint that I got from
Shaunna who writes Perfectly Imperfect and sells AS paint , but before I did that, I wiped it down with a damp cloth to remove and dirt, dust and soot.
2.
Choose your paint. I used Annie Sloan’s chalk paint in Pure White and French Linen. Man, I am in love with this stuff! It adheres to any surface- even marble!- with no trouble. Just a quick word about fire safety: we don’t use our fireplace, so I wasn’t worried about whether or not it was flammable, but be sure to check your paint if you have an active fireplace.
3.
Brush your base coat onto the surround. I used Pure White and it took 2 coats to get even coverage. I recruited my hubs to do this part, since, let’s be honest, painting trim is not my strong suit and I’ll take help when I can get it!
4.
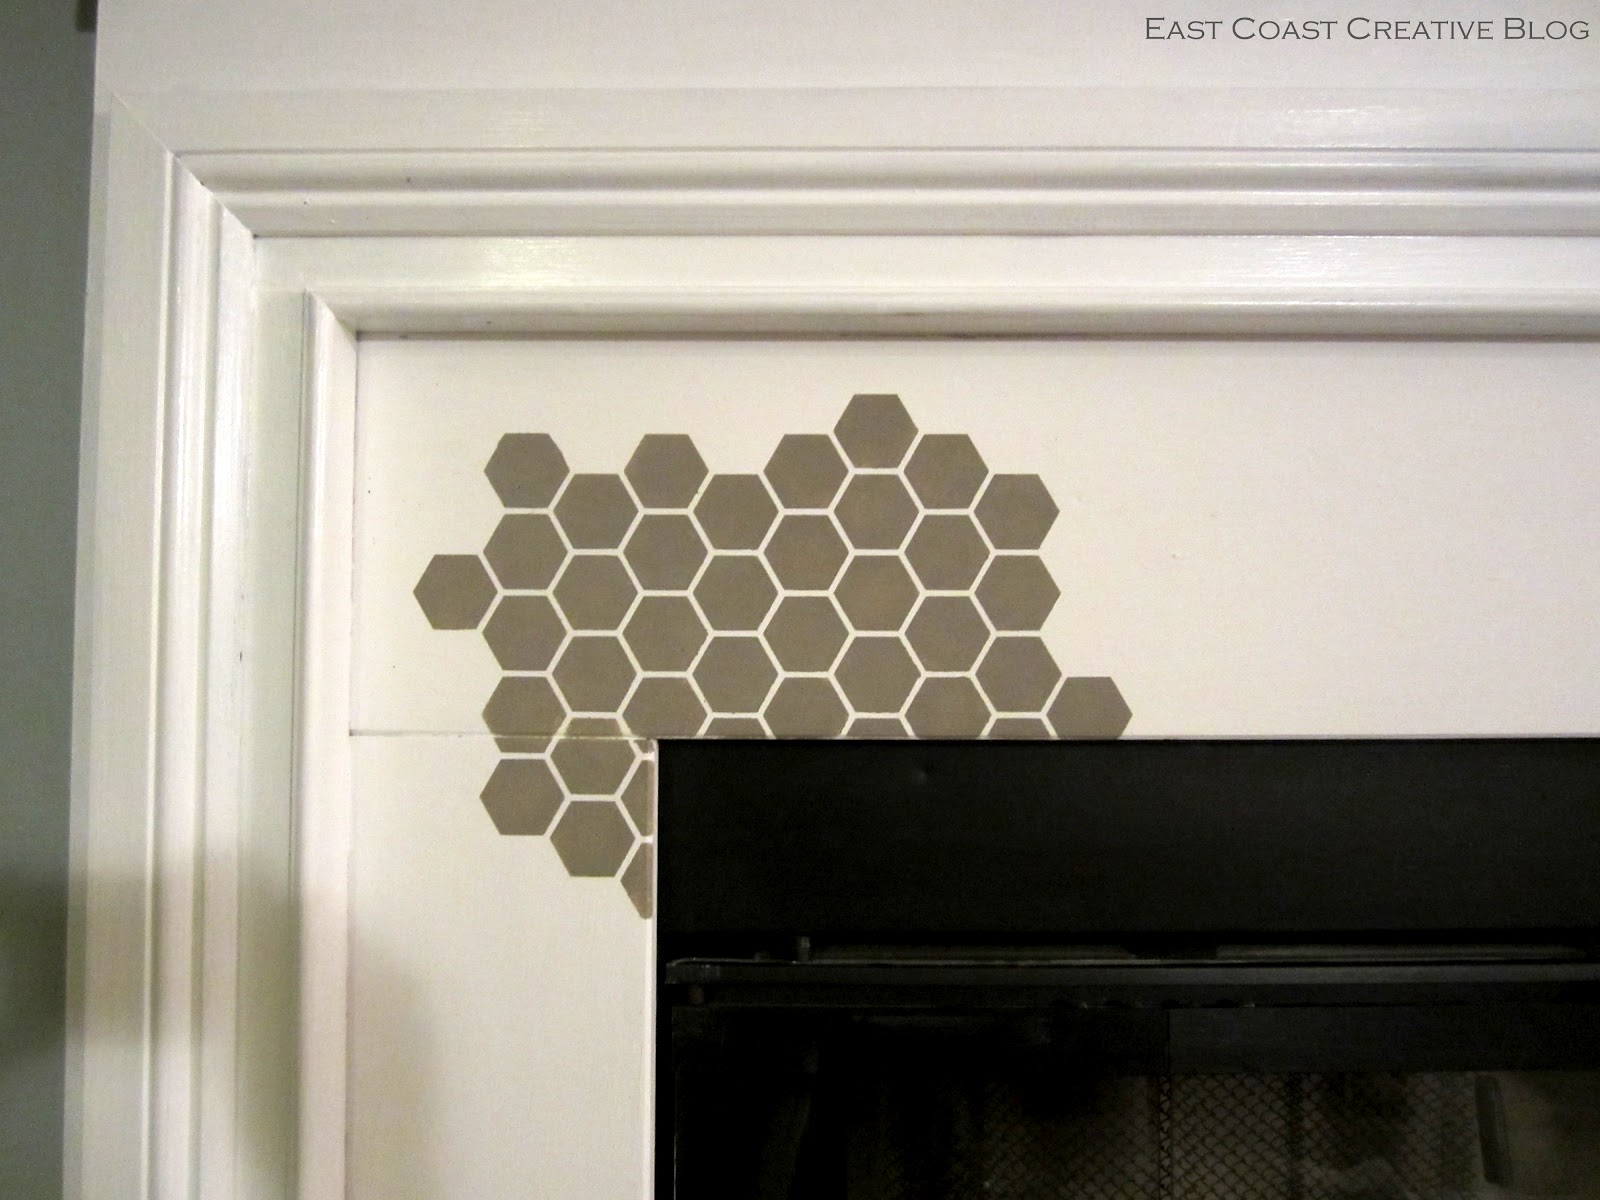
Place your stencil in the upper corner of the surround. Adjust the stencil sheet and check to make sure it’s level, then tape it in place with painters tape. If you want to use a spray adhesive (which I didn’t), spray it on the back of the stencil and place it down evenly. I highly recommend using the adhesive for this job, because it took me a loooong time to get clean lines without it. (We have an awesome tutorial on
stenciling must-haves if you need help with this!)
5.
Begin stenciling. The trick to stenciling without any bleeding is to off-load your brush properly. After dipping into the paint, dab it onto absorbant paper towels, or cardboard until it there is very little paint on the brush. Both my stencil (
Beehive Furniture Stencil) and brush are from
Royal Design Studio, and they are excellent quality, which makes the job go much smoother.
I had to do two to three coats for every stencil to get the coverage I was looking for. Words can not express the excitement of pulling back that very first stencil. Go ahead- try it and tell me that’s not true.
Once the paint is dry, realign the stencil, level it and keep on moving! You might want to turn on some music, because you’ll be doing this for a while. 🙂
At the end of the first night, here’s what I had accomplished. Ugh. I saved the hard parts for last. Yippee!
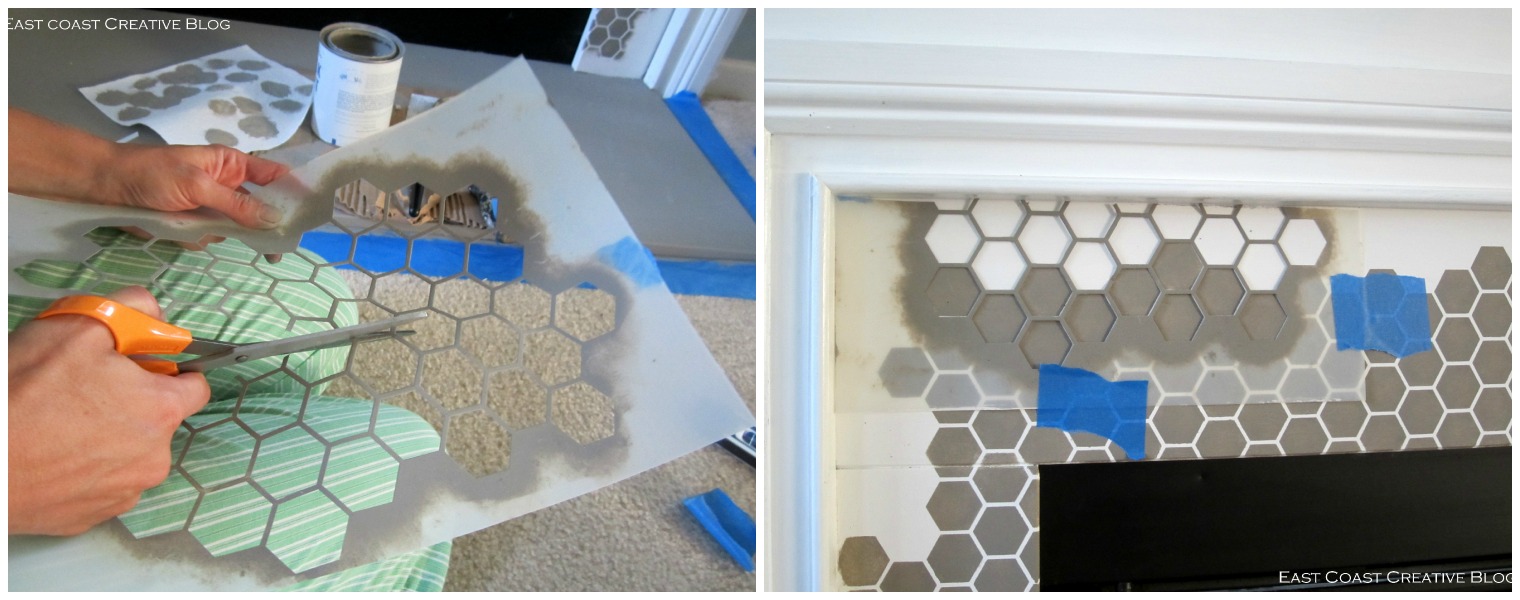
6, Cut your stencil to fit the corners and edges. Oh, this part is so hard, because as I was cutting my stencil, I was envisioning all the projects I could do with it go right down the drain. But, it’s absolutely crucial to cut the stencil if you want clean, crisp lines all the way around.
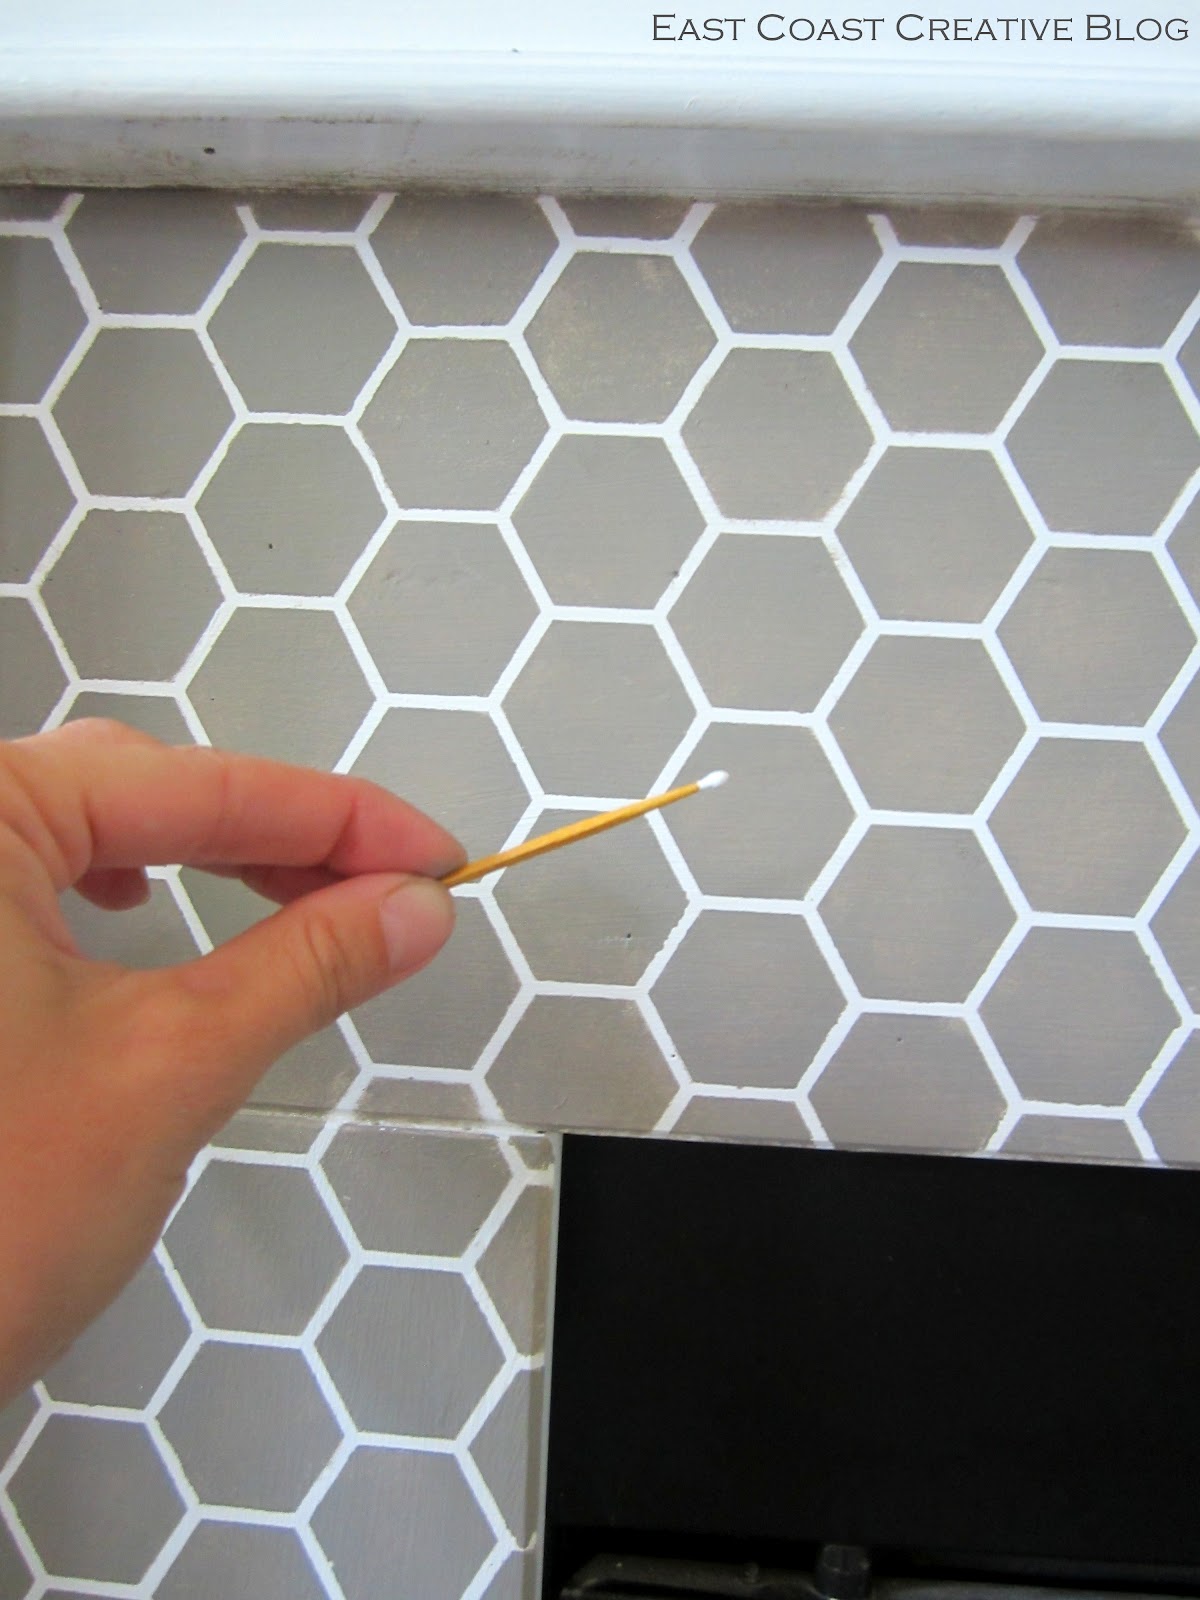
7. Touch up any paint bleeds with a small fine-tipped paint brush….or toothpick, in my case.
No matter how good you are at stenciling, there will always be some bleeding. It’s easy to touch it up with the base paint color and a steady hand. No one will be the wiser!
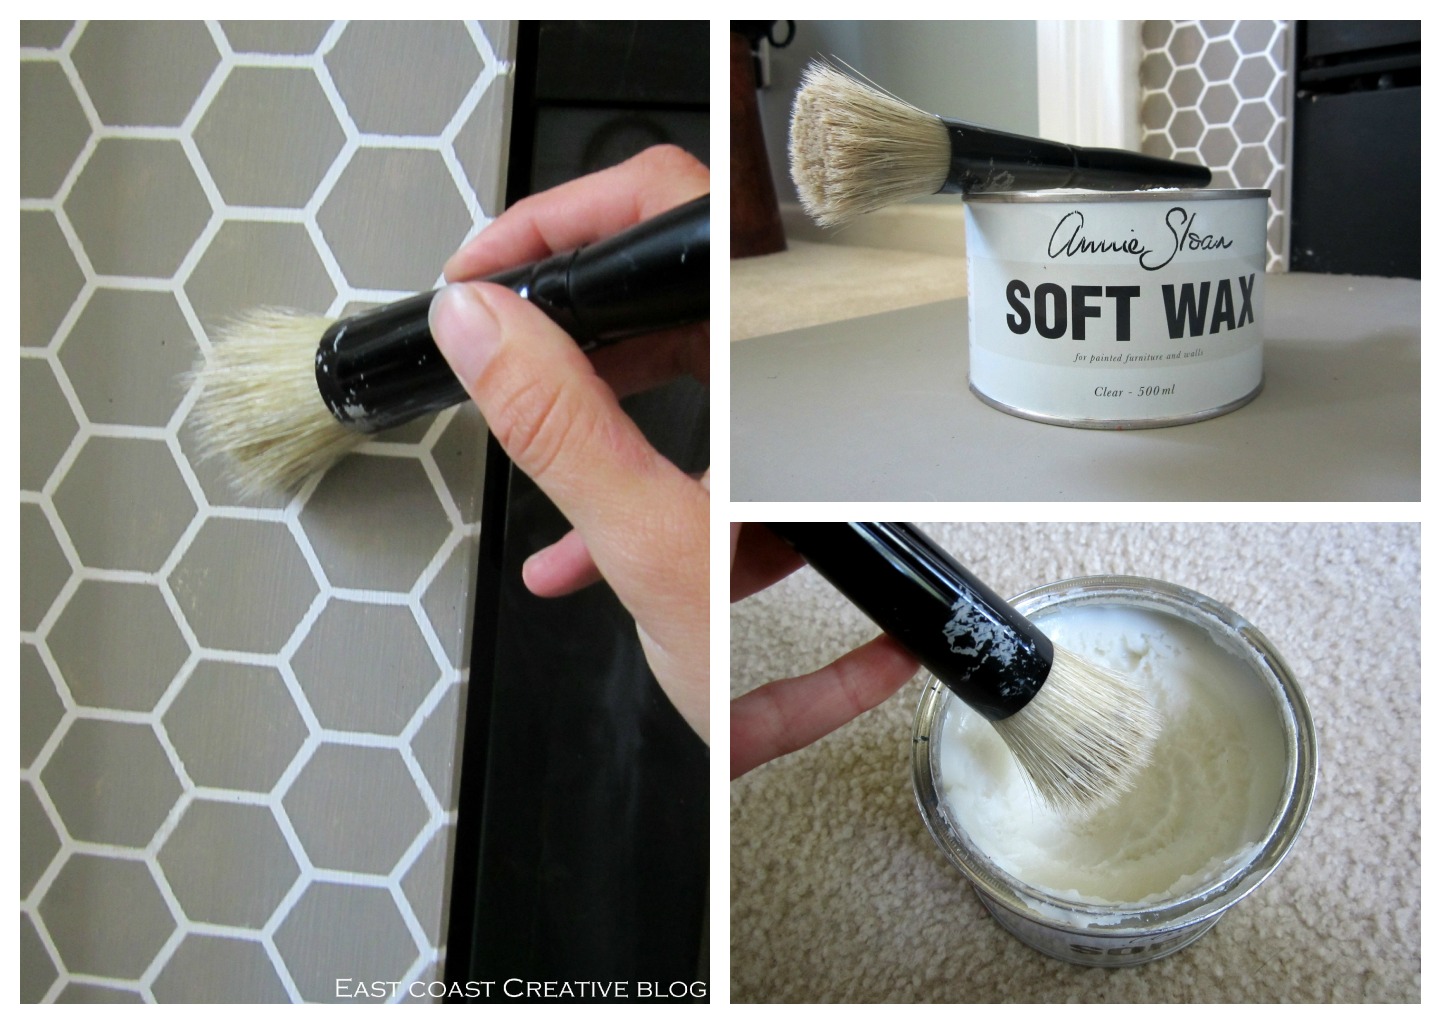
8. Finally, wax it and you’re done! You’ll want to add some kind of protective finish, and I used Annie Sloan soft wax, which was formulated to work with chalk paint. After all that hard work, you’ll want a force field surrounding this thing, but wax will have to do.
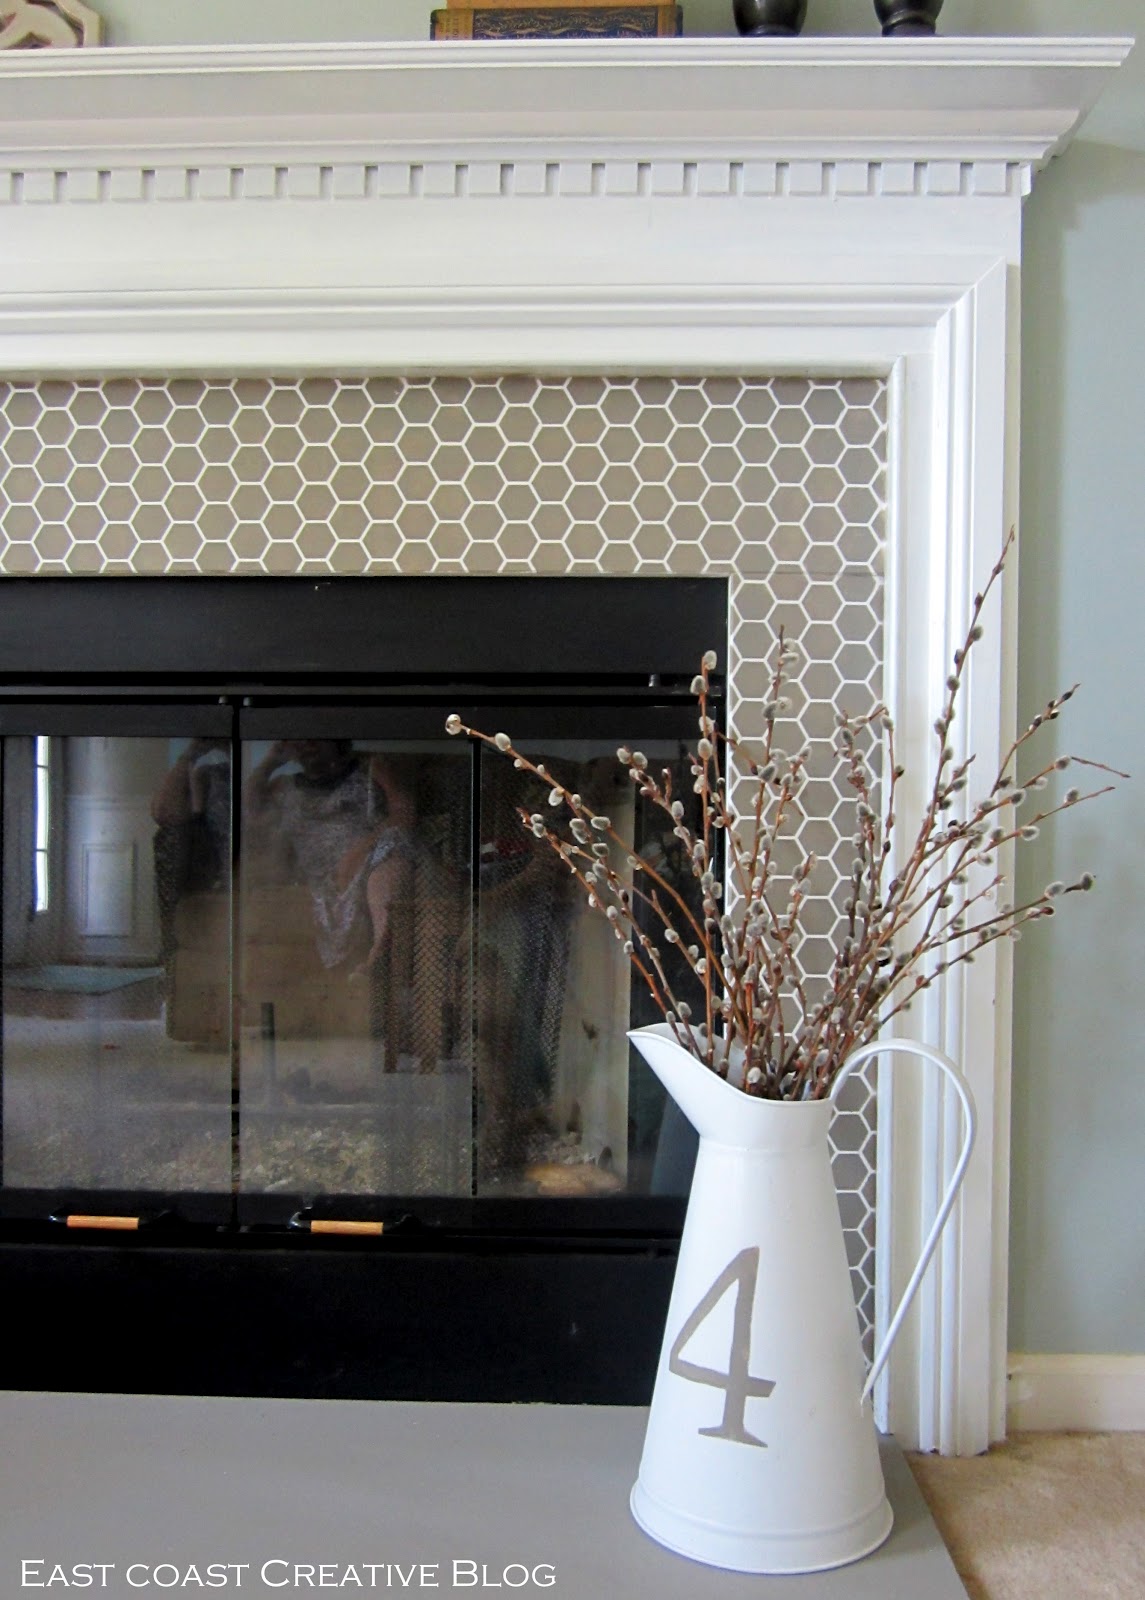
Step back, grab a drink and enjoy your pretty new fireplace surround!
I love love love it, and am already planning a room makeover based on this fireplace!
If you want a cheap project that will instantly give your room a facelift, this stenciled faux-tile fireplace tutorial is for you. Showstopping material, folks!
————————————————————————————————————————-
In other news, if you follow us on facebook (if you don’t, you totally should) you know that I finally entered the year 2012 and have a new HTC OneX smartphone. This thing is amazing and I can’t wait to share with you how it has made my life soooo much easier, but for now I’m totally loving Instagram, and would be thrilled if you decided to follow me!
Monica has been on Instagram for quite a while now, but if you don’t already follow her, add her to your list too!
We’ll give you lots of sneak peeks at our current projects, as well as fun insights into our daily lives and what makes us tick. We promise. 🙂
————————————————————————————————————————–
So, is your fireplace screaming for a makeover?
Would you ever paint it??
Linking up to: Tutorials & Tips


That looks really great! Even though the colors are so neutral, it makes a big statement =) I’ve just recently started with stencils (my first project was a carpet), but the selection of stencils available in Germany is nothing compared to those in the states.
Thank you! I am head over heels in love with stencils right now! Definitely check out Royal Design Studios for tons of awesome stencils.
Thanks for your comment!
Jess
tip, buy two stencils one you cut one you leave alone.ang
Good thought, Ang!
Thanks!
J & M
It’s beautiful. I wouldn’t have thought to do this. It looks like tile from far away.
Thank you, Andrea! Strange ideas come into my head, and sometimes they pay off! That was the case with this one. Glad you like it!
Jess
@Andrea – It does look like tile! I love the design and colors you chose. I am really pleased with Annie Sloane paint too, cause I’m lazy and the fact that I can skip sanding, I’m all in.
Haha, I hear you! That is my FAVORITE thing about Annie Sloan- no prep! 🙂
Thanks for stopping by-
Jess
I’m enjoying the blog! I do have a suggestion, though, and since I’ve thought it every time I read a post lately, I thought I’d share.
Would it be possible to add a byline (“posted by Jess” or “posted by Monica”)at the top of each post, under the title? While I like the personal touch of the signature at the end of each post, if I want to have a context for what I’m reading, I have to scroll all the way down to the end of the post first so I know whose post I’m reading.
Just a thought!
Not sure if you noticed, but we added a line at the top of the post with the name of the person writing the post. Hope you find it helpful! Thanks for the idea!
J & M
Pure awesomeness! Geez, I woulda never guessed it was paint. What a great transformation!
Such a nice compliment- thank you! I’m totally in love!
Have a great night-
Jess
OH EM Gee, I LOVE it, Jess!! 🙂
Haha. thanks Karah! And it all started with Haven. 🙂
Jess
What an awesome idea! It looks absolutely incredible
Thanks!! It made such a difference in the room and I can’t stop looking at it. 🙂
Thanks for stopping by!
Jess
I freakin LOVE it!! JESS!! It’s totally amazing! 🙂
Yay, thank you Kristy! I so appreciate it. 🙂
Jess
What the What? ! is that the same fireplace?! I think you are pulling my leg! I just can’t- I mean- Oh my- Like- What/??! You ladies..I bow down to you and your clever ideas- Like who thinks of stuff like that?! — OH JESS AND MONICA! Yep- That’s is WHO!
Love you both like goobers amount!
Jen
Jen, your comments crack us up. Thank you for being one of our most hilarious commenters! Love you too, girl. 🙂
Jess (& Monica)
This is unbelievable – the best fireplace transformation I’ve seen so far –
Beautiful job!
It looks awesome!!! What did u do with the tile on the floor? Is that just painted with the darker one and waxed also? Thanks so much.
Hey Stephanie,
We painted the marble slab on the floor the same gray as the “tiles” And yes, it’s waxed as well.
Thanks for stopping by!
Jess
This looks awesome! Such a great tutorial! I thought they were tiles for a second. You guys did a fantastic job on making over the fireplace. Great work!
Thanks! Now I just like to sit and stare at my fireplace all day long. Is that wierd? 😉
Jess
I just found this now, a little late but it really is fantastic! I wish I had a fireplace with tile to redo!
Michelle
Off topic, what is the paint color on your walls.. love it.
Just stumbled upon yalls fabulous blog! This is just WOW, love it! Thanks for sharing! New follower!
xo,
bridgett
This looks fabulous! I was wondering how much of the French Linen it took to paint this entire project? I wondered if I might be able to get away with ordering a sample pot or two instead of a full quart?
Thanks!
[…] my leaves probably won’t live to see another day… Its been about a year and my Stenciled Faux Tile Fireplace is still one of my favorite projects to date! It’s the perfect backdrop to all my mantel […]
Hi! I just love what youve done in this room! AMAZING!!! Im crazy about the blue wall color you have chosen. Could you let me know the name and brand? Id love to use it. Thanks! and again wonderful job!
Love this so much! It is now on my list of projects to do. But, a couple of questions. Do you use the fireplace regularly? If so, how has the paint/wax held up? I would be a little worried about the wax getting too hot with a fire going every night. Thanks!
I LOVE this! Do you think it would be possible to do something like this to a brick fireplace?
looks great! glad you added the stenciling. I was so happy to see your post! I wanted to paint my builders-grade green/black marble tile and wasn’t sure where to start. I opted to go with an oil based primer sealer/bonder. I was too impatient to order chalk paint on-line and wait for arrival, or drive out of my area to get it. also, we do use our propane fireplace a lot. first coat is on; about to add the 2nd. can’t wait 🙂
[…] via eastcoastcreative […]
[…] eastcoastcreative VIA […]
Absolutely love this! Hope to be moving into a house soon and couldn’t wait to rip out the marble fireplace that my grandparents would love! but now i shall definitely be stenciling it!! Cant wait to get cracking! Thanks so much 🙂
[…] doing it yourself! The impact it can have on a space is incredible! And if you missed it, Jess transformed her fireplace with some paint and a stencil this past summer. Two updates= no excuses not to get rid of those […]
I already ordered the Annie Sloan chalk paint and wax to replicate this project! I have been dying to do something to makeover the ugly marble on our fireplace sound. Question… what kind of grey paint did you use on the stencil? Regular paint or chalk paint? Thanks!!
I just wanted to pop in and thank you for posting this and the inspiration. I actually stenciled our fireplace last summer when we bought our new home, because of this. It makes a huge impact in the room and I get loads of compliments about it!