
If you’re new around here, let me catch you up a bit… We’re partnering with Stone Depot and EP Henry and building a patio DIY style-we’re crazy and we know it…(sing to the tune of LMFAO). You can catch up on the progress posts here, here, and here.
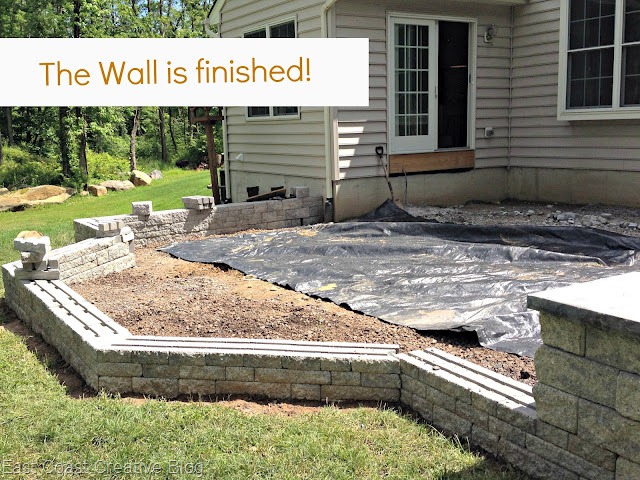
 So, here’s where we were when we left off last week…
So, here’s where we were when we left off last week…

We had finished the base wall and we could finally move onto the patio pavers and the sitting wall. Speaking of the sitting wall…Take a look at that beauty! We’re waiting on a few more wall blocks to be in stock and then it will be finished.

Okay, so after the base wall was done it was time to get moving on the patio itself. This post is going to be chock full of DIY Patio tips, because we learned a lot along the way!
We laid down the geofabric and then we needed to fill the entire patio with stone.

See all that stone? Well, multiply it times four! We needed over 35 TONS of stone and yes, we carried it one wheelbarrow at a time.

I had thought Eric dropped a pile of stone on the grass and the wall, until he explained this little trick. Worked like a charm!


When you need to work on a patio for 5 weeks and you have to move 35 tons of stone, it’s important to have help…

This picture gives you an idea of what the stone was used for. We needed to apply it two inches at a time, run the tamp, and repeat until we raised it up the 20ish inches that we needed.

This is more than a tip, it’s a must. There’s no way a patio of this size can be done by hand. Time for the heavy equipment!


The stone needed to be 3″ below the height of the wall caps. That’s tricky to do everywhere, but there’s a trick that works really well… although it is tedious!
(**Please ignore the spelling error below! I do know how to spell achieve. Thanks!**)

I also should mention that we had to be creative with ways to entertain the kids while we spent so many hours working… The “tractor”-waterfall-rides were a huge hit. Let me just tell you that never in my life did I imagine I’d own anything made by John Deere and I especially didn’t foresee having kids that love driving it around the yard! lol

Alright, back to business. I thought this was a great idea and it helped keep all the leveled stone in place while we moved to the sand.


Leveling the sand it a two person job, but it was quick and easy using this pro method. You lay down 1 inch pipes, fill the area with sand, drag a leveled board across the pipes, and it smoothly levels the area between the pipes.

Look at that smooth sand! Nice work boys! (and yes, I still refer to my hubs as a boy even after 10yrs of marriage)

After the sand, it was the moment we’d all been waiting for and I was ready with camera in hand!

I’ll be back next week with our final update before the grand reveal, but until then, I need some help in the lighting department. I plan to have two lights flanking the door and then I need four pillar lights as well. I definitely want an industrial feel. So, can you help a sister out and leave any recommendations in the comments? THANKS!

Wondering about the flowers on the steps? They’re wildflowers that my kiddos had picked for me as a surprise when I got home from the Haven Conference. I’m a lucky gal.

The patio is so close to being finished, I can almost taste it (or perhaps that’s just the black lung from all the stone and dust!) Can’t wait to show you the finished product!
P.S. If you missed our Haven Conference Recap you can check it out HERE– it was awesome!


Its coming along so great! I bet you will be super excited to have it done though 🙂
Beautiful! Love it! Love the color of the stone pavers! Want to come to Mississippi to put one in my back yard?
Holy moly my shoulders hurt from thinking about wheelbarrowing all of that stone!
I’m so amazed that you are doing this yourself!! I can’t wait to see it all finished! As for lighting, I’ve purchased the most awesome lights from Lowes. Here is the link to the brushed nickel. The one I have is galvanized steel. http://www.lowes.com/pd_400186-18573-LW10270155DS_4294857035__?productId=3699878&Ns=p_product_qty_sales_dollar| 1&pl=1¤tURL=%3FNs%3Dp_product_qty_sales_dollar%7C1&facetInfo= PS it was really nice to meet you at Haven!!
Making a patio like that is a ton of work. We had ours done by a pro because we’re too lazy and old for that kind of work….But it will be gorgeous when it’s done and you’ll love it!
I like these lights http://www.lowes.com/ProductDisplay?partNumber=&catalogId=10051&storeId=10151&langId=-1&productId=1037651
Holy Cannoli Monica, I’m exhausted just looking at the pictures. Kudos to you and your fam and friends… it looks totally fab. I know what ever light you choose it will be lovely… I think those industrialized bowl lights would look super cute too~ http://www.lowes.com/ProductDisplay?partNumber=157380-22685-8870-12&langId=-1&storeId=10151&productId=1037651&catalogId=10051&cmRelshp=req&rel=nofollow&cId=PDIO1
[…] and this meets the Monica standard. After hauling 40 tons of stone and working for weeks on this patio, I needed a quick and simple DIY. This outdoor stenciled rug cost me under $30 and completely […]